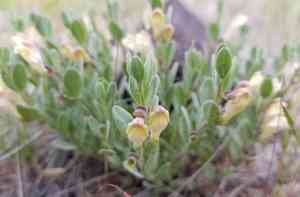
How to Transplant Dwarf skullcap?
Scutellaria nana flourishes optimally when relocated between early and late spring, since the mild weather fosters strong root growth. Choose a bright spot with soil that drains effectively. Make sure to keep the ground damp, yet not saturated, while it establishes.
What Preparations are Needed Before Transplanting Dwarf Skullcap?
What is the Ideal Time for Transplanting Dwarf Skullcap?
The best time to move dwarf skullcap, a perennial, is from early to late spring. During this period, the plant benefits from mild temperatures and increased soil moisture, which aids root establishment. This season also allows dwarf skullcap to adjust gradually before summer heat, promoting better growth and resilience.
How Much Space Should You Leave Between Dwarf Skullcap Plants?
When getting ready to transplant dwarf skullcap, remember to position the plants 12-18 inches (30-45 cm) apart. This spacing helps ensure each plant has ample room to grow and flourish without competing for resources.
What is the Best Soil Mix for Dwarf Skullcap Transplanting?
For dwarf skullcap, select soil that drains well. It's good to enrich the soil with a balanced base fertilizer before planting. Mix in some compost to supply the necessary nutrients for healthy development.
Where Should You Relocate Your Dwarf Skullcap?
Place dwarf skullcap in a spot where it can receive full sunlight for at least 6 hours daily. Dwarf skullcap thrives in brightly lit areas and will perform best with abundant sunlight.
What Equipments Should You Prepare Before Transplantation Dwarf Skullcap?
Gardening Gloves
To safeguard your hands while handling soil and plants.
Shovel or Spade
To dig around and lift the dwarf skullcap plant from the ground.
Trowel
For excavating small holes in the new planting location.
Pruning Shears
To trim any damaged or excessively long roots.
Watering Can or Hose
To hydrate the plant before and after relocation.
Compost or Organic Matter
To enrich the soil at the new planting site.
How Do You Remove Dwarf Skullcap from the Soil?
How Do You Remove Dwarf Skullcap from the Soil?
From Ground: First, water the dwarf skullcap plant to moisten the soil. Then, dig a wide trench around the plant using a shovel or spade, ensuring the plant's root ball remains intact. Carefully work the spade under the root ball to lift the plant from its original spot.From Pot: Water the dwarf skullcap plant thoroughly to facilitate removal. Gently tap the pot sides to loosen the root ball. Invert the pot, supporting the plant with one hand, and carefully slide the plant out of the pot.From Seedling Tray: Water the dwarf skullcap seedlings lightly. Use a trowel or your fingers to gently lift each seedling from the tray, taking care to keep as much of the root system intact as possible.
Step-by-Step Guide for Transplanting Dwarf Skullcap
Site Preparation
Prepare the new planting site by digging a hole that is roughly twice the width and the same depth as the plantâs current root ball.
Soil Enrichment
Incorporate compost or organic matter into the excavated soil to enhance nutrient content and drainage.
Placement
Position the dwarf skullcap plant in the center of the hole, ensuring it sits at the same depth as it was in its original location.
Backfilling
Gently refill the hole with the enriched soil, firming it lightly with your hands to remove air pockets.
Watering
Thoroughly water the newly transplanted dwarf skullcap plant to help settle the soil around the roots.
How Do You Care For Dwarf Skullcap After Transplanting?
Watering
Keep the soil around the dwarf skullcap consistently moist, but not waterlogged, for the initial weeks after transplanting to help establish strong roots.
Mulching
Apply a layer of mulch around the plant's base to retain moisture and regulate soil temperature.
Monitoring
Observe the plant for signs of stress (e.g., wilting, discoloration) and adjust care as necessary.
Pruning
If the plant has any damaged or dead leaves after transplanting, trim them off to encourage new growth.
Troubleshooting Common Issues with Dwarf Skullcap Transplantation.
When is the best time to transplant dwarf skullcap?
Relocate dwarf skullcap from early spring to late spring for optimal growth and establishment.
How far apart should I space each dwarf skullcap?
Space each dwarf skullcap 12-18 inches (30-45 cm) apart to encourage healthy growth.
How should I prepare the soil for transplanting dwarf skullcap?
Ensure well-drained soil enriched with compost. Test and amend if necessary for pH 6.0-7.5.
How do I minimize transplant shock for dwarf skullcap?
Water dwarf skullcap thoroughly before and after transplanting. Avoid windy or excessively hot days.
What kind of sunlight does dwarf skullcap need after transplanting?
Provide dwarf skullcap with full sun to partial shade for best results in growth and flowering.
How deep should I plant dwarf skullcap when transplanting?
Plant dwarf skullcap at the same depth it was in its original container to avoid root stress.
How much water does dwarf skullcap need after transplanting?
Water dwarf skullcap regularly, keeping the soil consistently moist but not waterlogged to prevent root rot.
Should I fertilize dwarf skullcap after transplanting?
Wait about 4-6 weeks after transplanting before applying a balanced, slow-release fertilizer.
How do I handle dwarf skullcap roots during transplanting?
Gently loosen roots if pot-bound and ensure they take a natural spread in the new hole.
What should I do if dwarf skullcap shows signs of wilting after transplanting?
Increase watering frequency and provide temporary shade if needed to reduce plant stress.


