How to Propagate Dwarf skullcap?
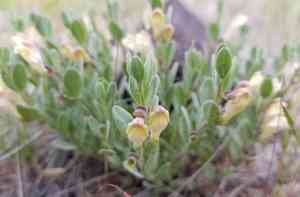
Scutellaria nana is a compact, enduring herbaceous plant frequently encountered in arid, stony environments. Reproduction is generally accomplished by planting seeds in substrate that drains effectively. Seeds ought to be scattered superficially, given their need for illumination to sprout. Sustaining dampness without oversaturation is vital for successful sprouting. Being well-suited for stone arrangements and water-wise landscaping due to its resilience to drought, Scutellaria nana thrives with infrequent interference once rooted.
Optimal Period for Dwarf Skullcap Propagation
Propagation Method
Seeding
Propagation Period
Spring
Tools for Dwarf Skullcap Propagation
Seed Trays
Seed trays are crucial for starting dwarf skullcap from seed. They offer a controlled environment for germination, ensuring consistent moisture and protection from pests. Choose trays with proper drainage to prevent waterlogging.
Seed Starting Mix
A premium seed starting mix is vital for dwarf skullcap. It provides a well-draining, sterile medium that minimizes the risk of seedling diseases and supports robust root development.
Humidity Domes
Humidity domes maintain the necessary moisture levels to promote seed germination and prevent the medium from drying out. This tool is especially useful for ensuring a stable environment for dwarf skullcap seedlings.
Heat Mats
Heat mats provide warmth from below, which can speed up seed germination for dwarf skullcap. They help maintain an ideal temperature, particularly in colder climates or when sowing in early spring.
Misting Bottle
A misting bottle ensures gentle watering for delicate dwarf skullcap seedlings. It prevents soil displacement and provides even moisture without over-saturating the seed starting mix.
Label Stakes
Label stakes are important for tracking dwarf skullcap planted seeds. Accurate labeling prevents confusion, ensuring that different batches of dwarf skullcap can be monitored and managed effectively.
Grow Lights
Grow lights supplement natural sunlight, providing consistent illumination for dwarf skullcap seedlings, especially in areas with insufficient natural light. They promote strong growth and prevent leggy seedlings.
How to Propagate Dwarf Skullcap?
Propagation Type
Simple
Caring for Newly Propagated Dwarf Skullcap
Caring for Newly Propagated Dwarf Skullcap
Once seedlings emerge and develop a few true leaves, gradually introduce them to outdoor conditions by removing the plastic cover and increasing their exposure to light and fresh air. Transplant seedlings into individual pots or directly into the garden, ensuring well-drained soil and planting at the same depth as in seed trays. Water young plants regularly, but avoid waterlogging. Mulching around the base can help retain moisture and suppress weeds. Monitor for any signs of pests or disease, and address issues promptly to ensure healthy growth.
Common Errors to Avoid When Propagating Dwarf Skullcap
Overwatering
Excessive watering can lead to root rot, severely damaging the plant and hindering successful propagation. Dwarf skullcap prefers well-drained soil.
Incorrect soil type
Dwarf skullcap requires specific soil conditions. Using compacted or clay-heavy soil can impede root growth and oxygen flow.
Insufficient light
Dwarf skullcap needs adequate sunlight. Insufficient light can result in weak, leggy growth, reducing the plant's vitality.
Neglecting humidity
Dwarf skullcap cuttings need a certain level of humidity to encourage root formation. Failure to maintain this can result in dry and lifeless cuttings.
Improper cutting technique
Using dull or dirty tools can cause damage to the cutting and introduce infections, compromising the plant's health.
Advice for Propagating Dwarf Skullcap
Use well-drained soil
Ensure that the soil mix allows for good drainage. A blend of perlite or sand with potting soil is beneficial for dwarf skullcap.
Maintain moderate humidity
Place cuttings under a plastic dome or mist them regularly to retain moisture, which aids in root development.
Provide adequate light
Place the cuttings in a location with bright, indirect light to ensure healthy growth without causing stress from too intense sunlight.
Sanitize tools
Always use clean, sharp pruning shears to make cuts. This helps prevent infections and any damage to the plant tissues.
Use rooting hormone
Dipping the cuttings in a rooting hormone can enhance root formation and increase the chances of successful propagation.


