How to Transplant Chilean pencil willow?
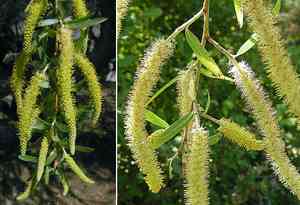
For chilean pencil willow, the ideal periods for relocation are during the milder transitional seasonsâafter the last frost in spring or before the first frost in autumn. Opt for a location featuring damp earth and partial sunlight. Bear in mind, chilean pencil willow thrives with ample space for its root system, so pick a generous area.
What Preparations are Needed Before Transplanting Chilean Pencil Willow?
What is the Ideal Time for Transplanting Chilean Pencil Willow?
The best period to move chilean pencil willow is during the rejuvenating phases of late spring to early summer, or from late autumn to the start of winter. Relocating chilean pencil willow in these seasons takes advantage of mild temperatures and suitable soil conditions, allowing the plant sufficient time to establish roots before intense summer heat or winter cold arrives. Ensuring chilean pencil willow settles into its new spot during these times can lead to a vigorous growing season. This careful timing aligns with natural growth cycles, making the transition easier for chilean pencil willow and increasing the likelihood of successful establishment.
How Much Space Should You Leave Between Chilean Pencil Willow Plants?
Hello, gardening enthusiast! When preparing to give your chilean pencil willow a new home, remember they appreciate ample personal space. Aim for a generous distance of 20-30 feet (6-9 meters) between them, which enables their elegant branches to spread and flourish without overcrowding.
What is the Best Soil Mix for Chilean Pencil Willow Transplanting?
Your chilean pencil willow loves a comfortable place for its roots. Preparing a rich, loamy environment enhanced with a balanced, slow-release fertilizer will create an optimal setting. Consider it a nurturing embrace that feeds and supports your plant's foundation.
Where Should You Relocate Your Chilean Pencil Willow?
Sunlight is vital for your chilean pencil willow! Choose a spot where the sun shines generously, providing full or partial sunlight. It's like selecting the brightest corner on your patio for your morning coffee—warm, luminous, and invigorating.
What Equipments Should You Prepare Before Transplantation Chilean Pencil Willow?
Shovel or Spade
For excavating the chilean pencil willow and creating the planting hole.
Gardening Gloves
To safeguard your hands during work.
Wheelbarrow or Garden Cart
To move the chilean pencil willow and soil.
Pruning Shears
For trimming any damaged roots or branches.
Watering Can or Garden Hose
For hydrating the chilean pencil willow before and after relocation.
Tarp or Burlap
To support the chilean pencil willow's root ball during movement, if needed.
Garden Fork
To loosen the soil surrounding the chilean pencil willow's root ball.
Measuring Tape
To ensure correct spacing between plants.
Soil Amendment Materials
Such as compost, if advised.
Mulch
To help maintain soil moisture post-transplanting.
Stakes and Ties
For stabilizing the chilean pencil willow if it is tall or top-heavy.
How Do You Remove Chilean Pencil Willow from the Soil?
How Do You Remove Chilean Pencil Willow from the Soil?
From Ground: Water the chilean pencil willow thoroughly to moisten the soil. Use a shovel to dig around the plant, maintaining a wide distance to protect the root ball. Carefully slide the shovel beneath the root ball and gently lift the chilean pencil willow from the ground.From Pot: Tilt the container on its side and hold the chilean pencil willow at its base. Tap the bottom and sides of the pot to help dislodge the root ball, then carefully slide the chilean pencil willow out.From Seedling Tray: Water the chilean pencil willow to dampen the soil, which facilitates plant removal. Use a spoon or a small tool to gently lift the plant, ensuring as much of the root system as possible remains intact.
Step-by-Step Guide for Transplanting Chilean Pencil Willow
Preparation
Water the chilean pencil willow thoroughly before beginning the transplant to minimize shock.
Digging the Transplant Hole
Excavate a hole that is twice the width of the chilean pencil willow's root ball and the same depth to allow ample room for root expansion.
Plant Removal
Use the garden fork and shovel for leverage to carefully lift the chilean pencil willow from its current spot, taking care not to harm the root system.
Root Treatment
Trim any damaged or excessively long roots with pruning shears to encourage healthy growth.
Placing the Plant
Position the chilean pencil willow in the center of the new hole and ensure it stands upright.
Backfilling the Hole
Fill in around the root ball with soil, gently pressing down to eliminate air pockets.
Staking
If the chilean pencil willow is tall or unstable, insert stakes around it and loosely tie the plant for support.
Watering
Water thoroughly after planting to settle the soil around the roots and help alleviate transplant stress.
Mulching
Apply a layer of mulch around the base of the chilean pencil willow to retain moisture and regulate soil temperature.
How Do You Care For Chilean Pencil Willow After Transplanting?
Immediate Watering
Water your chilean pencil willow deeply right after transplanting to help settle the soil and hydrate the roots. Continue with regular watering, especially during the initial weeks, to ensure the roots can establish themselves in their new location. Reduce frequency as the plant becomes established, but watch for signs of drought stress, particularly in warmer months.
Staking and Support
Ensure any stakes or supports are firmly in place and that ties are secure but not overly tight. As the chilean pencil willow grows, adjust the ties to prevent girdling the branches.
Pruning
Trim back any broken or damaged branches to encourage healthier growth. However, avoid extensive pruning immediately after transplanting, so the chilean pencil willow can focus on root establishment.
Mulching
Replenish the mulch as needed to maintain a consistent layer that helps suppress weeds and regulate soil moisture levels without touching the base of the chilean pencil willow to prevent rot.
Monitoring
Observe the chilean pencil willow for indications of transplant shock, such as wilting leaves or a lack of new growth. If these occur, provide appropriate care, such as shading from intense sun or additional watering.
Preventative Care
Watch for signs of pests or diseases and treat promptly to prevent any potential threats from taking hold while your chilean pencil willow is still vulnerable post-transplant.
Troubleshooting Common Issues with Chilean Pencil Willow Transplantation.
What's the best time to transplant chilean pencil willow?
Optimal transplanting seasons are after the last spring frost or before the first autumn frost.
How far apart should I plant chilean pencil willow saplings?
Each sapling should be spaced approximately 20-30 feet (6-9 meters) apart to ensure ample growth space.
What should I do if chilean pencil willow leaves wilt after transplanting?
Ensure adequate watering, without over-saturating, to help chilean pencil willow recover from transplant shock.
Why is my chilean pencil willow not thriving after transplanting?
Check for sufficient sun exposure, appropriate soil types, adequate water, and protection from strong winds or pests.
How do I prepare the soil for transplanting chilean pencil willow?
Loosen the soil to a depth of 10 inches (25 cm). Enrich it with compost or well-rotted manure.
How deep should the hole be for chilean pencil willow transplantation?
The hole should be twice the width and the same depth as the root ball of chilean pencil willow.
Can chilean pencil willow be transplanted in full sun locations?
Yes, chilean pencil willow thrives in full sun but can tolerate partial shade too.
How much water does chilean pencil willow need after transplanting?
Water deeply right after transplanting, then regularly until it's well-established, adjusting for rainfall.
How do I handle the roots of chilean pencil willow when transplanting?
Handle roots gently. If bound, slightly loosen but avoid excessive root disturbance.
What to do if chilean pencil willow has slow growth post transplanting?
Patience is key. Ensure proper care and it should gradually adjust to its new location.



