How to Transplant Rampion mignonette?
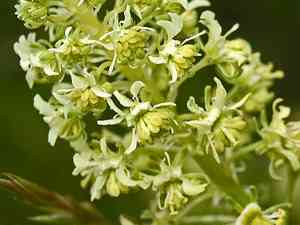
Relocating rampion mignonette during early spring guarantees vigorous development, given that moderate temperatures aid in its settling. Select a well-lit area with fertile earth. Should the roots be intertwined, carefully separate them during placement to encourage peak health.
What Preparations are Needed Before Transplanting Rampion Mignonette?
What is the Ideal Time for Transplanting Rampion Mignonette?
The optimal period for relocating rampion mignonette spans from the start of spring's freshness to its milder middle. This timeframe provides prime growing conditions, as the ground warms and stabilizes, offering rampion mignonette a supportive setting to establish its root system. Moving rampion mignonette during this phase leverages increasing daylight and moderate temperatures, crucial for the successful development of an annual/biennial plant. This guarantees a strong beginning, enabling rampion mignonette to thrive throughout the growing season, maximizing the benefits of longer days ahead.
How Much Space Should You Leave Between Rampion Mignonette Plants?
When moving your rampion mignonette, allow them ample room to thrive! Position them approximately 6-8 inches (15-20 cm) apart. This provides each plant sufficient area to develop robustly and healthily.
What is the Best Soil Mix for Rampion Mignonette Transplanting?
For your rampion mignonette, prepare a planting area with soil that drains well and is rich in organic material. Incorporate a balanced, slow-release fertilizer to ensure a nourishing start. This establishes an ideal base for your plants to flourish.
Where Should You Relocate Your Rampion Mignonette?
Select a sunny location for your rampion mignonette as they thrive in bright conditions. A spot receiving at least 6 hours of daily sunlight is perfect. This will ensure your plants get the energy required for beautiful growth.
What Equipments Should You Prepare Before Transplantation Rampion Mignonette?
Gardening Gloves
To safeguard your hands while handling soil and plants.
Spade or Shovel
For digging and moving rampion mignonette with minimal root disturbance.
Garden Fork
Useful for loosening the soil around rampion mignonette during extraction.
Watering Can or Hose
To hydrate rampion mignonette before and after relocation.
Pruning Shears
To trim any damaged roots or leaves, if required.
Organic Mulch
To aid in retaining soil moisture and regulating temperature after transplant.
Measuring Tape
For accurately spacing rampion mignonette in their new spot.
Wheelbarrow
To transport rampion mignonette and soil to and from the new planting site.
How Do You Remove Rampion Mignonette from the Soil?
How Do You Remove Rampion Mignonette from the Soil?
From Ground: Gently moisten the area around rampion mignonette to make the soil easier to manage. Use a spade or shovel to carefully dig around rampion mignonette, ensuring enough distance to avoid cutting into the root mass. Once a sufficient trench is dug, slide the shovel beneath rampion mignonette and lift it, preserving as much of the root structure as possible.From Pot: Lightly water rampion mignonette, then tilt the pot sideways and tap the bottom to encourage the plant to slide out. Support rampion mignonette by its base as it exits the pot to prevent damage to the stem or roots.From Seedling Tray: Dampen the soil to facilitate removal. Gently push rampion mignonette up from the cell's bottom or use a tool like a dibber to ease it out, while supporting the plant's base to minimize stress on the young seedling.
Step-by-Step Guide for Transplanting Rampion Mignonette
Preparation
Before extracting rampion mignonette from its original location, ensure the new planting area is thoroughly prepared. This involves clearing the space of weeds and debris.
Transplant Hole
Excavate a hole in the designated spot, making it twice as wide as rampion mignonette's current root ball and of equal depth to encourage comfortable root expansion.
Root Inspection
Examine rampion mignonette's root ball for any indications of damage or decay. Trim any broken or dead roots using pruning shears.
Positioning rampion mignonette
Carefully place rampion mignonette into the center of the hole. The top of the root ball should be flush with the surrounding soil surface.
Refilling
Gently backfill the hole with soil, being careful not to compact it excessively, which can impede root growth. Fill until the root ball is just covered, then lightly firm down the soil.
Watering
Thoroughly water rampion mignonette after planting to settle the soil around the roots and eliminate any air pockets.
How Do You Care For Rampion Mignonette After Transplanting?
Monitoring
Observe rampion mignonette for signs of transplant shock, such as wilting or discolored leaves, and intervene by providing shade or additional water if necessary.
Watering
Ensure rampion mignonette receives consistent moisture to aid in root establishment, especially during the initial weeks. Be cautious not to over-water, which can be as detrimental as under-watering.
Mulching
Apply a layer of organic mulch around rampion mignonette, keeping it a few inches away from the stem to maintain soil moisture and temperature.
Supporting
If rampion mignonette is a taller variety and appears unstable, use garden stakes or ties to offer support until it is firmly rooted.
Pruning
Remove any damaged or diseased foliage to help rampion mignonette direct energy towards developing new growth.
Troubleshooting Common Issues with Rampion Mignonette Transplantation.
Why are my rampion mignonette seedlings wilting after transplanting?
Wilting might stem from transplant shock. Ensure gentle handling and gradually accustom seedlings to outdoor conditions before moving them.
When is the perfect time to transplant rampion mignonette?
Relocate during the ideal window of early to mid-spring when the soil is workable and the risk of frost has passed.
How do I prepare the soil for transplanting rampion mignonette?
Enrich the soil with compost or well-rotted manure and ensure it's well-drained and loose for successful transplantation.
What's the ideal spacing for rampion mignonette when transplanting?
Allow rampion mignonette ample room to thrive by spacing them 6-8 inches (15-20 cm) apart. This permits sufficient growth.
How deep should I plant rampion mignonette seedlings?
Plant rampion mignonette at the same depth they were in their original container, ensuring the root base is level with the soil surface.
Why is my rampion mignonette not growing after transplant?
Check for excessive or insufficient watering, inadequate sunlight, or nutrient deficiencies. Rampion mignonette requires consistent moisture and full to partial sun.
Can I transplant rampion mignonette on a hot, sunny day?
It's best to transplant on an overcast day or in the late afternoon to minimize stress and prevent wilting from intense sun.
Should I water rampion mignonette after transplanting?
Absolutely! Water immediately after transplanting to settle the soil around the roots and encourage recovery from transplant shock.
How can I protect my transplanted rampion mignonette from pests?
Keep the area free of weeds, and consider using floating row covers to guard against insects until rampion mignonette is established.
My rampion mignonette looks yellow after transplanting; what should I do?
Yellowing may indicate nutrient stress. Provide a balanced fertilizer and ensure proper watering, avoiding both over and under-watering.



