How to Transplant Sandpaper oak?
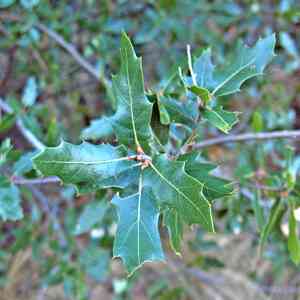
Sandpaper oak flourishes when relocated in the middle to latter part of spring, allowing it to acclimate prior to the summer warmth. It favors a bright spot with soil that drains effectively. Optimal circumstances guarantee superior root development and vigorous expansion.
What Preparations are Needed Before Transplanting Sandpaper Oak?
What is the Ideal Time for Transplanting Sandpaper Oak?
Sandpaper oak thrives when moved from early to late spring, as this period allows for optimal root development before the summer heat. Transplanting then ensures strong growth, minimizes shock, and improves adaptation to the new setting, fostering healthier and more vibrant overall progress.
How Much Space Should You Leave Between Sandpaper Oak Plants?
For a successful transplant, ensure each sandpaper oak is spaced approximately 20-30 feet (6-9 meters) apart to provide ample room for growth and flourishing.
What is the Best Soil Mix for Sandpaper Oak Transplanting?
Opt for soil that drains well and is slightly acidic to neutral. Before transplanting, enrich the soil by mixing in compost or a balanced slow-release fertilizer to supply essential nutrients.
Where Should You Relocate Your Sandpaper Oak?
Choose a spot that receives full sun, as sandpaper oak requires at least 6 hours of direct sunlight daily to thrive.
What Equipments Should You Prepare Before Transplantation Sandpaper Oak?
Gardening Gloves
To shield your hands while handling soil and plants.
Shovel or Spade
For excavating the plant and preparing the hole at the new site.
Garden Trowel
Useful for more precise digging tasks and to assist in loosening roots.
Watering Can or Hose
To hydrate the plant and soil both before and after relocation.
Pruning Shears
For trimming any damaged or excess roots and branches.
Garden Fork
To help aerate the soil around the plant and minimize root disturbance.
Mulch
To aid in retaining soil moisture post-transplanting.
How Do You Remove Sandpaper Oak from the Soil?
How Do You Remove Sandpaper Oak from the Soil?
From Ground: First, moisten the soil around the sandpaper oak. Then, dig a wide trench around the plant using a shovel or spade, ensuring the root ball remains intact. Carefully work the spade beneath the root ball to lift the plant from its original spot.From Pot: Water the sandpaper oak thoroughly. Gently tip the pot sideways and tap its sides to loosen the plant. Slide the plant out, taking care not to harm the roots. If necessary, use a garden trowel for assistance.From Seedling Tray: Water the seedlings well. Use a garden trowel to loosen the soil around each seedling. Gently lift each seedling by its leaves or its root ball, being careful not to damage the delicate roots.
Step-by-Step Guide for Transplanting Sandpaper Oak
Preparation
Water the plant thoroughly in its current location before beginning. This reduces stress and simplifies the removal process.
Digging the Hole
Prepare the new planting site by digging a hole twice as wide and as deep as the sandpaper oak's root ball. This provides ample space for root expansion.
Removal
Follow the appropriate removal method (from ground, pot, or seedling tray) to carefully extract the sandpaper oak from its original spot.
Placing in New Location
Position the sandpaper oak in the prepared hole at the new site, ensuring it sits at the same depth as it was originally. Backfill the hole with soil, gently firming it around the roots to eliminate air pockets.
Watering
Thoroughly water the sandpaper oak after transplanting to settle the soil and provide hydration to the plant.
How Do You Care For Sandpaper Oak After Transplanting?
Watering
Keep the soil around the sandpaper oak consistently damp, but not waterlogged, for the initial weeks post-transplant to encourage strong root development.
Mulching
Apply a layer of mulch around the base of the sandpaper oak to help retain soil moisture and regulate temperature.
Monitoring
Observe the sandpaper oak for any indications of transplant shock, such as wilting or yellowing leaves. If issues arise, provide additional water or shade as needed.
Pruning
Trim any damaged or broken branches to allow the plant to direct energy towards root establishment.
Troubleshooting Common Issues with Sandpaper Oak Transplantation.
When is the best time to transplant sandpaper oak?
Relocate sandpaper oak in early to late spring for optimal growth and establishment.
How far apart should I space sandpaper oak when transplanting?
Space sandpaper oak 20-30 feet (6-9 meters) apart to ensure adequate room for growth.
What type of soil is best for transplanting sandpaper oak?
Select well-draining, loamy soil for transplanting sandpaper oak to foster healthy root development.
How deep should I dig the hole for sandpaper oak?
Excavate a hole twice as wide and as deep as the root ball of sandpaper oak.
Should I prune sandpaper oak before transplanting?
Trim dead or damaged branches before relocating sandpaper oak to promote vigorous new growth.
How much water does sandpaper oak need after transplanting?
Water sandpaper oak deeply, providing 1-2 inches (2.5-5 cm) per week during its first growing season.
Do I need to fertilize sandpaper oak immediately after transplanting?
Wait a few weeks before fertilizing sandpaper oak post-transplant to allow roots to settle.
How do I protect sandpaper oak from transplant shock?
Mulch around sandpaper oak and water consistently to minimize stress and prevent transplant shock.
What should I do if sandpaper oak's leaves turn yellow after transplanting?
Ensure proper watering and check for drainage problems if sandpaper oak's leaves become yellow.
How can I support sandpaper oak's growth after transplanting?
Stake young sandpaper oak trees if necessary and monitor for pests to ensure healthy development.



