How to Transplant Brittle prickly pear?
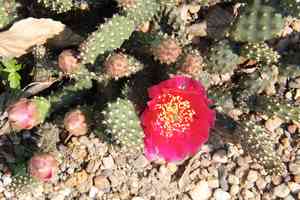
The most favorable period for relocating brittle prickly pear is during the invigorating warmth of late spring, which fosters vigorous development. Select a location bathed in sunlight that offers superior drainage. Should you be planting several, ensure ample room for their expansion. A helpful suggestion: exercise caution when handling brittle prickly pear to prevent damage.
Essential Preparations Before Relocating Brittle Prickly Pear
Optimal Timing for Brittle Prickly Pear Relocation
The best period to move brittle prickly pear is during its spring revival, typically in mid-spring. This timing aligns with its natural growth cycle, promoting root establishment and minimizing stress. The mild spring weather aids brittle prickly pear in a smooth transition to its new spot. By transplanting brittle prickly pear in this season of renewal, you leverage the moderate climate, fostering healthy root development and acclimatization before summer's heat.
Required Spacing Between Brittle Prickly Pear Plants
Firstly, allow brittle prickly pear ample room to expand. Position each plant approximately 2-4 feet (60-120 cm) apart. This ensures they don't compete for resources and have sufficient space to thrive!
Ideal Soil Mixture for Brittle Prickly Pear Transplanting
For brittle prickly pear, utilize well-draining soil. A mix of half garden soil and half coarse sand would be perfect. Also, apply a cactus-specific fertilizer to nourish your plant. Begin with a slow-release type to minimize the risk of over-fertilization.
Choosing the New Location for Your Brittle Prickly Pear
Finally, select a sunny location for your brittle prickly pear. This plant thrives in sunlight and grows best in areas receiving abundant direct light. Ensure it gets at least 6 hours of sunlight daily, and you'll observe its vigorous growth!
Tools Required Before Transplanting Brittle Prickly Pear
Gardening Gloves
These provide defense against the sharp spines of the brittle prickly pear plant during handling.
Trowel
This small hand implement is used for digging, applying, or smoothing soil in confined areas when extracting and relocating.
Shovel
You'll need a shovel to excavate the planting hole and to extract the plant from its current ground location.
Pruning Shears
These are employed for trimming any damaged or unproductive parts of the brittle prickly pear prior to transplanting.
Watering Can
Used to hydrate the plant immediately after transplanting to aid root establishment in its new spot.
Wheelbarrow
Assists in moving the plant from its original site to the new planting location, especially for larger plants or longer distances.
Bucket
Used for transporting organic compost or potting mix utilized during transplantation.
How to Extract Brittle Prickly Pear from the Soil
How to Extract Brittle Prickly Pear from the Soil
From Ground: For plants already rooted in the ground, keep the root ball as intact as possible. Begin by moistening the soil around the brittle prickly pear to ease digging and reduce root stress. Use a shovel to carefully dig around the plant, avoiding root damage. Once resistance from roots is no longer felt, gently lift the plant from the ground. From Pot: Water the potted brittle prickly pear, allowing drainage. Carefully slide the plant out of the pot, gently tapping the sides and bottom if necessary. Avoid pulling or stretching the plant to prevent damage. From Seedling Tray: These plants are young and delicate. Start by watering the tray, then gently push the soil and root ball out from the bottom. Remember to handle the brittle prickly pear by its leaves, not its stem, to prevent harm.
Step-by-Step Guide for Relocating Brittle Prickly Pear
Preparation
Prepare the new planting site by digging a hole twice the width and the same depth as your brittle prickly pear's root ball. Loosen the surrounding soil for improved root establishment.
Plant Placement
Carefully position the brittle prickly pear in the hole. Ensure the roots are spread out, not cramped or twisted. Adjust the plant's height within the hole, by adding or removing soil, to match its previous growing level.
Backfilling
Fill the hole halfway with the excavated soil mixed with organic compost. Water thoroughly to help settle the soil around the root ball, then continue filling the hole with soil. Lightly tamp to firm the soil around the brittle prickly pear.
Final Touches
Water the plant deeply to help it settle into its new environment. Be careful not to overwater or flood the area around the plant.
Post-Transplant Care for Brittle Prickly Pear
Watering
Maintain consistent watering but avoid overwatering, as brittle prickly pear prefers dry conditions. Excessive water can lead to root rot. Adjust the watering schedule based on weather and soil moisture.
Pruning
Trim any damaged or diseased sections of the brittle prickly pear to encourage new growth and prevent disease spread.
Protection
Since brittle prickly pear can be vulnerable to pests like scale insects and mealybugs, monitor for these and treat promptly. Consider using natural predators or organic pesticides.
Positioning
Ensure the brittle prickly pear is not overshadowed by larger plants or structures, as it requires ample light for growth.
Addressing Common Issues with Brittle Prickly Pear Transplantation.
When is the optimal time to transplant brittle prickly pear?
Transplanting brittle prickly pear is best done in season S2. This allows the plant sufficient time to root before colder temperatures arrive.
What is the recommended spacing for brittle prickly pear during transplantation?
For optimal growth and development, maintain a distance of approximately 2-4 feet (60-120 cm) between each brittle prickly pear plant.
How should I prepare the soil for transplanting brittle prickly pear?
Well-draining soil is crucial for brittle prickly pear. Amend it with organic matter or sand to ensure proper drainage and prevent excessive water retention.
What size hole should I dig for transplanting brittle prickly pear?
Dig a hole that is twice the size of the plant's rootball. This allows the roots to spread comfortably, which is vital for brittle prickly pear's growth.
How much water does brittle prickly pear require after transplanting?
Brittle prickly pear is drought-tolerant, so be careful not to overwater. Water thoroughly immediately after transplanting, then only when the top inch (about 2.5 cm) of soil is dry.
Should brittle prickly pear be transplanted into direct sunlight?
Brittle prickly pear thrives in full sunlight but can tolerate some light shade. However, too much shade can hinder growth and development.
What to do if brittle prickly pear shows signs of wilting after transplantation?
Some wilting is expected post-transplant, but persistent wilting may indicate root distress. You might need to adjust watering or check for root diseases.
How do I safely handle brittle prickly pear during transplantation to avoid injury?
Wear gloves and use tools when handling brittle prickly pear to protect yourself from its prickles. Handle it gently, holding it at the base of the plant.
What should I do if brittle prickly pear doesn't bloom after transplanting?
Patience is essential. Transplanting stress can delay blooming. Ensure brittle prickly pear receives adequate sun and water, and await the next bloom season.
Can brittle prickly pear be transplanted in a pot?
Absolutely! Just ensure the pot has good drainage and is wide enough to accommodate 2-4 feet (60-120cm) spacing between plants, if planting more than one brittle prickly pear.



