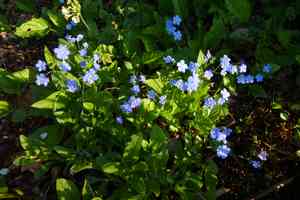
How to Transplant Blue-eyed mary?
The optimal period for transplanting blue-eyed mary is during spring, a time of vigorous renewal. Choose a location offering partial shade and soil that drains effectively. Carefully settle the root system and guarantee regular hydration after moving the plant to facilitate a smooth adjustment.
What Preparations are Needed Before Transplanting Blue-eyed Mary?
What is the Ideal Time for Transplanting Blue-eyed Mary?
The perfect time to move blue-eyed mary is in early spring, when new growth begins. This timing allows roots to establish before summer's heat. As the ground softens and days lengthen, blue-eyed mary benefits from ample spring moisture, promoting strong root development. This period aligns well with blue-eyed mary's natural growth cycle, ensuring a smooth transition and healthier blooms. Choosing this optimal time gives blue-eyed mary an excellent start in its new spot.
How Much Space Should You Leave Between Blue-eyed Mary Plants?
When relocating your blue-eyed mary, ensure ample room for growth. A spacing of 1-2 feet (approximately 30.5-61 cm) is optimal. This provides sufficient area for them to thrive without competing for resources. Simple enough, right?
What is the Best Soil Mix for Blue-eyed Mary Transplanting?
Your blue-eyed mary will flourish in soil that drains well, ideally sandy or loamy. Incorporate a slow-release granular fertilizer into the base when preparing the soil. This will provide your plants with a nutrient-rich beginning!
Where Should You Relocate Your Blue-eyed Mary?
Select a spot where your blue-eyed mary will receive partial to full sunlight throughout the day. If such a location isn't available, don't worry. They also perform well in partial shade. Happy gardening!
What Equipments Should You Prepare Before Transplantation Blue-eyed Mary?
Gardening Gloves
To safeguard your hands while handling soil and prevent injuries during the transplanting process.
Shovel or Spade
To excavate a hole where the blue-eyed mary will be placed.
Pruning Shears
To trim the roots and leaves of the blue-eyed mary prior to transplantation, encouraging healthier development.
Measuring Tape
To ensure the planting hole has the correct depth and width.
Watering Can or Hose
To moisten the soil before and after the transplant.
Mulch
To cover the newly transplanted blue-eyed mary, which helps retain soil moisture.
Hand Trowel
To extract the blue-eyed mary from its original spot, especially if it's in a pot or seedling tray.
How Do You Remove Blue-eyed Mary from the Soil?
How Do You Remove Blue-eyed Mary from the Soil?
From Ground: To extract blue-eyed mary from the ground, first, moisten the soil around the plant. Then, use a spade to carefully dig a wide trench around blue-eyed mary, keeping the root ball intact. Gently work the spade beneath the root ball, carefully lifting the plant from its original position. Be sure not to harm the roots.From Pot: If blue-eyed mary is in a pot, water it thoroughly first. Invert the pot while gently supporting blue-eyed mary at its base. Tap the pot's bottom until the plant, along with its root ball, slides out. Avoid pulling the plant, as this could damage the roots.From Seedling Tray: If removing seedlings from a tray, start by watering the tray. Then, use a hand trowel or an old spoon to carefully scoop out each individual blue-eyed mary seedling, ensuring you get as many roots as possible without causing damage.
Step-by-Step Guide for Transplanting Blue-eyed Mary
Hole Preparation
Use your shovel to dig a hole twice the width of blue-eyed mary's root ball and match its current depth in the ground, pot, or tray.
Preparations of blue-eyed mary
Before planting, prune blue-eyed mary by removing any dead or damaged leaves and roots. This will promote the growth of healthier roots and foliage after transplanting.
Insertion of blue-eyed mary
Carefully position blue-eyed mary in the center of the hole. Ensure the top of its root ball is level with the surrounding soil to prevent water from collecting around its base.
Fill the Hole
Backfill the hole with the excavated soil, pressing it firmly into place around the root ball.
Watering
After planting, thoroughly water the area. This will help the soil settle around the roots and aid blue-eyed mary's recovery from transplant shock.
Mulching
Apply a layer of mulch on top of the soil around the plant, but keep it away from blue-eyed mary's stem to prevent rot.
How Do You Care For Blue-eyed Mary After Transplanting?
Watering
Blue-eyed mary generally prefers consistently moist soil. After transplantation, ensure regular watering, but avoid waterlogging, which can lead to root rot.
Pruning
Regularly prune blue-eyed mary to maintain its form and support its growth. Remove any dead or damaged leaves that could potentially drain energy from the plant.
Pest Control
While blue-eyed mary isn't particularly known for attracting pests, it's still important to monitor it. If you observe insects or damaged foliage, consider using an organic pesticide.
Seasonal Care
Depending on its type, blue-eyed mary may become dormant in winter. If this occurs, reduce watering during this period. Once spring arrives and new growth appears, you can resume regular care.
Troubleshooting Common Issues with Blue-eyed Mary Transplantation.
In what season should I transplant blue-eyed mary?
The optimal time to transplant blue-eyed mary is during the first to third season (S1-S3). The cooler weather helps the plant establish its roots with minimal stress.
What is the suitable distance in between blue-eyed mary when transplanting?
Aim for a spacing of approximately 1-2 feet (0.3-0.6 meters) between each blue-eyed mary plant. This allows each plant to thrive without competing for nutrients and space.
Why are the leaves of blue-eyed mary yellow after transplanting?
Yellow leaves might indicate overwatering or a nutrient deficiency. Ensure the plant is not in waterlogged soil and is receiving balanced plant food.
What could be causing wilted leaves on my transplanted blue-eyed mary?
Wilted leaves could be a sign of transplant shock. Consistent watering and protection from direct sunlight can help the plant recover.
My blue-eyed mary seems stunted after transplant. What should I do?
Stunted growth might result from root disturbance during transplant. Allow it some time, ensuring it receives adequate sunlight, water, and nutrients to recover and grow.
What depth should I consider when transplanting blue-eyed mary?
The hole should be deep enough to accommodate blue-eyed mary's entire root ball, slightly deeper than the pot it was originally growing in.
Why is my transplanted blue-eyed mary losing its leaves?
Leaf drop can be a stress response to transplanting. Maintain consistent watering, sufficient sunlight, and ensure the plant is not exposed to extreme temperature changes.
What can I do if my blue-eyed mary doesn't flower after being transplanted?
Ensure you are fertilizing it correctly and it is getting enough sunlight. It may also be adjusting to its new location, so allow it some time.
Why does my transplanted blue-eyed mary have poor growth compared to others?
The plant might be in a less than ideal location, receiving insufficient sunlight or nutrients. Verify that the soil pH, sun exposure, and nutrient levels are appropriate.
How soon can I water blue-eyed mary after transplanting?
Water blue-eyed mary immediately after transplanting to settle the soil and help reduce transplant shock. Afterward, water it regularly according to its needs.


