How to Transplant Creeping-bluet?
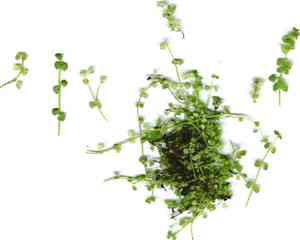
Creeping-bluet thrives when relocated between the beginning and end of spring, benefiting from agreeable climatic conditions. Select a spot with partial sunlight and soil that drains effectively to guarantee peak development. Bear in mind that careful handling during this period is crucial for successful adaptation.
Essential Preparations Before Relocating Creeping-bluet?
When is the Best Time to Move Creeping-bluet?
The prime window for relocating creeping-bluet spans from the beginning to the end of spring. Moving it during this period allows creeping-bluet to establish its root system prior to summer's heat, ensuring vigorous development and blooming. Early spring conditions provide ideal soil moisture and temperature, fostering successful adaptation and minimizing transplant shock.
What Distance Should Be Maintained Between Creeping-bluet Plants?
When relocating creeping-bluet, position the plants 1-2 inches (2.5-5 cm) apart. This spacing will provide ample room for them to spread and flourish effectively without competing for resources.
What is the Optimal Soil Blend for Creeping-bluet Relocation?
Utilize soil that drains well, mixed with organic compost. This will supply creeping-bluet with the necessary nutrients for robust growth. Incorporating a foundational fertilizer rich in nitrogen and phosphorus can also stimulate initial development.
Where Should You Replant Your Creeping-bluet?
Select a site with partial to full sun exposure. Creeping-bluet thrives best in areas receiving at least 4-6 hours of sunlight daily, so choose a spot where it can absorb some rays!
What Tools Are Necessary Before Relocating Creeping-bluet?
Gardening Gloves
To safeguard your hands while handling soil and the plant.
Small Shovel or Spade
For excavating and extracting the plant from its original spot.
Watering Can or Hose
To hydrate the plant before and after its relocation.
Trowel
For digging a hole in the new planting area.
Compost or Organic Matter
To enrich the soil in the fresh planting site.
Mulch
To retain moisture and inhibit weed growth around the newly relocated plant.
How Do You Extract Creeping-bluet from the Ground?
How Do You Extract Creeping-bluet from the Ground?
From Ground: First, moisten the creeping-bluet plant to dampen the soil. Next, dig a wide trench around the plant using a small shovel or spade, ensuring the plant's root ball remains intact. Carefully work the spade beneath the root ball to lift the plant from its initial location.From Pot: Thoroughly water the creeping-bluet plant a few hours before relocation. Gently compress the sides of the pot to loosen the soil, then carefully tilt the pot and slide the plant out, keeping the root ball whole.From Seedling Tray: Lightly water the creeping-bluet seedling tray. Use a trowel or your hands to carefully lift each seedling from the tray, taking care to keep as much soil around the roots as possible.
Step-by-Step Guide for Relocating Creeping-bluet
Site Preparation
Select an appropriate location with well-drained soil and the necessary sunlight conditions for your creeping-bluet plant. Dig a hole that is twice as wide and as deep as the plant's root ball.
Soil Enrichment
Incorporate compost or organic matter into the excavated soil to enhance fertility and drainage.
Relocation
Position the creeping-bluet plant into the prepared hole, ensuring it sits at the same depth as it was in its original spot. Fill the hole with soil and gently firm it down to remove air pockets.
Watering
Thoroughly water the newly relocated creeping-bluet to help settle the soil and minimize transplant shock.
Mulching
Apply a layer of mulch around the base of the plant, leaving some space around the stem to prevent rot. This aids in moisture retention and weed control.
How Do You Care For Creeping-bluet After Relocation?
Watering
Keep the soil around the creeping-bluet consistently moist, but not waterlogged, for the initial weeks after relocation to aid in establishing strong roots.
Monitoring
Observe for any indications of transplant shock, such as wilting or yellowing leaves, and provide additional water or shade if required.
Fertilizing
Avoid fertilizing immediately after relocation; wait until the plant exhibits new growth, then apply a balanced fertilizer to support its development.
Addressing Common Issues with Creeping-bluet Relocation.
When is the optimal time to move creeping-bluet?
The best time to move creeping-bluet is from early spring to late spring.
What is the ideal spacing for relocating creeping-bluet?
Space creeping-bluet plants 1-2 inches (2.5-5 cm) apart for optimal growth.
How do I prepare the soil for relocating creeping-bluet?
Use well-draining soil enriched with compost for relocating creeping-bluet.
Should I water creeping-bluet immediately after relocating?
Yes, water creeping-bluet thoroughly after relocating to help settle the roots.
How much sunlight does creeping-bluet need after relocating?
Creeping-bluet thrives in full sun but tolerates partial shade too.
What should I do if creeping-bluet wilts after relocating?
Check soil moisture and ensure creeping-bluet isn't exposed to harsh conditions; water appropriately.
How deep should I plant creeping-bluet seedlings?
Plant creeping-bluet seedlings at the same depth they were growing in their pots.
Is mulching necessary for creeping-bluet after relocating?
Mulching helps retain soil moisture and control weeds around creeping-bluet.
How long does it take creeping-bluet to establish after relocating?
Creeping-bluet typically takes a few weeks to establish strong roots after relocating.
Do I need to fertilize creeping-bluet after relocating?
A light application of balanced fertilizer can support creeping-bluet's growth post-relocation.



