How to Transplant Kimberley queen fern?
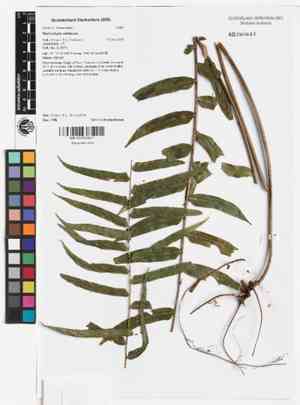
Relocate your kimberley queen fern once spring is well underway to capitalize on robust development. Ideal locations replicate its inherent preference for filtered illuminationâconsider areas with ample yet diffused light. Any advice for infrequent repotting? Careful manipulation is crucial for preserving its fragile foliage.
What Preparations are Needed Before Transplanting Kimberley Queen Fern?
What is the Ideal Time for Transplanting Kimberley Queen Fern?
The optimal period for relocating kimberley queen fern is during mid-spring or as spring concludes. This timeframe provides a balanced mix of moderate temperatures and adequately warmed soil, promoting root establishment and minimizing transplant shock. By selecting this season, you ensure kimberley queen fern has sufficient time to adapt before the summer heat, which can enhance its growth and resilience. Our method is systematic, ensuring kimberley queen fern transitions smoothly from its original container to its new location, benefiting from peak seasonal conditions.
How Much Space Should You Leave Between Kimberley Queen Fern Plants?
First, you'll need to get the planting area ready for kimberley queen fern. Carefully plan your spacing. Each kimberley queen fern requires approximately 2-3 feet (60-90 cm) of room to develop. Providing ample space will allow for proper air circulation and encourage healthy growth.
What is the Best Soil Mix for Kimberley Queen Fern Transplanting?
Now, let's prepare the soil for kimberley queen fern. You'll want to use a rich, well-draining soil type as your foundation. Incorporating some organic compost or a quality all-purpose garden fertilizer will supply the essential nutrients for kimberley queen fern. Remember, kimberley queen fern prefers a slightly acidic pH, so monitor that level.
Where Should You Relocate Your Kimberley Queen Fern?
Finally, you'll want to locate the perfect spot for your kimberley queen fern. They thrive in indirect or filtered sunlight. Excessive direct sun exposure might lead to sunburn. A location beneath a large tree or on a porch that receives morning or late afternoon sun would be perfect. Enjoy your gardening journey with kimberley queen fern!
What Equipments Should You Prepare Before Transplantation Kimberley Queen Fern?
Gardening Gloves
To keep your hands clean and protected from any sharp stones, thorns, or roots that might be hidden in the soil.
Shovel
Essential for digging holes.
Pruning Shears
To trim off old fronds of the kimberley queen fern before transplanting to prevent excessive water loss.
Garden Trowel
For digging small holes and extracting the plant from its pot or seedling tray.
Watering Can
For hydrating the kimberley queen fern after relocation.
Wheelbarrow (Optional)
Useful for transporting large amounts of soil or compost when preparing the new planting site.
Mulch
To help retain moisture and regulate soil temperature after transplanting.
Planting Stakes (Optional)
To offer additional support to the kimberley queen fern if necessary after transplanting.
How Do You Remove Kimberley Queen Fern from the Soil?
How Do You Remove Kimberley Queen Fern from the Soil?
From Ground: Hydrate the soil around the kimberley queen fern before you begin any work. This will make the soil easier to manage and reduce the risk of root damage. Dig a trench around the plant's perimeter that is wider than its leaf spread to ensure ample space for the root ball. Carefully slide the shovel beneath the root ball, lifting it to extract it from the ground. Try to keep the root ball as intact as possible to minimize transplant shock.From Pot: Begin by watering your kimberley queen fern a few hours prior to your planned move. This ensures the root ball remains cohesive when you remove it from the pot. To extract the kimberley queen fern from its pot, invert the pot while gently supporting the plant's base. Tap the bottom of the pot a few times, which should cause the root ball to slide out. If the plant doesn't release, you can use a garden trowel to help loosen the soil along the pot's interior.From Seedling Tray: Ensure the seedlings are well-watered before starting this process. Using a small trowel or even a spoon, gently scoop out the seedling without disturbing the roots. It's crucial to handle the seedlings very carefully to avoid damage.
Step-by-Step Guide for Transplanting Kimberley Queen Fern
Hole Preparation
Prepare a hole that is twice the size of the root ball of your kimberley queen fern. If your garden soil is heavy clay or sandy, amend it with some organic matter to improve water retention or drainage.
Plant Placement
Carefully position your fern in the hole. The top of its root ball should be level with or slightly above the surrounding ground. Planting too deep can suffocate the plant; too shallow, and the roots can dry out quickly.
Filling the Hole
Backfill the hole with the original or amended soil, gently firming it around the base of the fern. Leave some space for watering.
Watering
Water immediately after transplanting. The soil should settle around the roots, eliminating air pockets. Keep the soil moist, but not waterlogged.
Applying Mulch
After watering, spread a layer of mulch around the base of the kimberley queen fern. Mulch helps the soil retain moisture and inhibits weed growth.
How Do You Care For Kimberley Queen Fern After Transplanting?
Watering
Keep the soil consistently moist but not saturated. The kimberley queen fern thrives in a humid environment, so misting can help maintain ideal conditions. Avoid heavy watering until the plant is well established.
Pruning
Trim off any yellow or brown fronds that may appear after transplanting. This allows your kimberley queen fern to direct its energy towards new growth.
Monitoring
Keep a close watch on the kimberley queen fern for any indications of disease or pest infestation. Early detection and treatment can prevent minor issues from escalating into major problems.
Temperature
Kimberley queen fern prefers temperatures between 60-70°F (15-24°C). Shield it from extreme temperature shifts, as sudden fluctuations can cause stress.
Troubleshooting Common Issues with Kimberley Queen Fern Transplantation.
When is the best time to transplant kimberley queen fern?
The optimal transplanting period for kimberley queen fern is during the S2-S3 season, which typically corresponds to late spring to early summer in most climates.
How much space does kimberley queen fern require after transplanting?
Providing kimberley queen fern with a generous 2-3 feet (60-90 cm) in all directions after transplanting will allow it to grow and spread freely.
What kind of soil is best when transplanting kimberley fern?
Kimberley queen fern thrives in well-draining soil, enriched with organic matter. It prefers soil with a neutral to slightly acidic pH.
What is the proper depth to plant kimberley queen fern after transplant?
Plant kimberley queen fern at the same depth it was growing in its previous container. Do not bury the crown of the plant deeper into the soil.
How frequently should I water kimberley queen fern after transplanting?
After transplanting, keep the soil lightly moist but not waterlogged. Reduce watering once kimberley queen fern has established, but do not let the compost dry out completely.
What kind of light condition is ideal for kimberley queen fern after transplanting?
Kimberley queen fern prefers bright, indirect light. However, it can also tolerate some shade. Avoid direct sun which can scorch the leaves.
Should I fertilize kimberley queen fern after transplanting?
Yes, you should. However, wait for 3-4 weeks post transplanting, and then feed kimberley queen fern with a balanced, slow-release fertilizer.
How should I handle kimberley queen fern during transplanting to minimize shock?
Handle kimberley queen fern gently by its root ball during transplanting. Avoid shaking off too much of the old soil to minimize shock to the plant.
Why are the leaves on my recently transplanted kimberley queen fern turning yellow?
Yellow leaves might indicate overwatering or insufficient light. Ensure kimberley queen fern is receiving bright but indirect sunlight and the soil is moist, but not waterlogged.
How can I prevent pests after transplanting kimberley queen fern?
Prevent pests by inspecting the kimberley queen fern regularly. If you notice small pin-sized yellow to brown spots, treat it with a recommended insecticide.



