How to Transplant Hollyleaf pincushionplant?
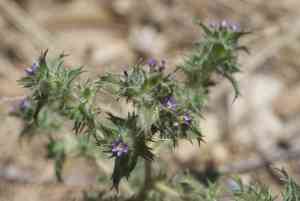
The ideal time to relocate hollyleaf pincushionplant is in early spring when temperatures are mild. Select a bright area with soil that drains effectively. Steer clear of overly wet areas to ensure thriving development. Proper conditions enhance the plant's ability to recover after being moved.
What Preparations are Needed Before Transplanting Hollyleaf Pincushionplant?
What is the Ideal Time for Transplanting Hollyleaf Pincushionplant?
Hollyleaf pincushionplant, an annual, flourishes when moved in early spring. This timing supports optimal development as it aligns with rising temperatures and extended daylight, offering prime conditions for root establishment. Relocating hollyleaf pincushionplant at this point maximizes its blooming potential and overall vitality, leading to a more vibrant and robust garden display.
How Much Space Should You Leave Between Hollyleaf Pincushionplant Plants?
For relocating your hollyleaf pincushionplant, position each plant 6-12 inches (15-30 cm) apart to guarantee ample room for growth and flourishing. This spacing promotes good air circulation, lowering disease risk and fostering healthy development.
What is the Best Soil Mix for Hollyleaf Pincushionplant Transplanting?
Your hollyleaf pincushionplant will benefit from well-draining soil with a slightly sandy or loamy texture. Prepare the soil by mixing a balanced, slow-release fertilizer into the base to give your plants a strong start. Aim for a slightly acidic to neutral pH for optimal outcomes.
Where Should You Relocate Your Hollyleaf Pincushionplant?
Select a sunny location for your hollyleaf pincushionplant as these annuals prefer full sunlight. Ensure they receive at least 6 hours of daily sun for peak growth and flowering. A site with good air circulation will also help maintain plant health.
What Equipments Should You Prepare Before Transplantation Hollyleaf Pincushionplant?
Gardening Gloves
To safeguard your hands while handling soil and plants.
Trowel
To excavate the plant from its current spot and create a new hole in the ground.
Shovel or Spade
To dig a wider trench around the plant if necessary.
Watering Can or Hose
To hydrate the plant before and after relocation.
Bucket
To transport the plant if required.
Mulch
To aid in retaining soil moisture after the plant has been moved.
How Do You Remove Hollyleaf Pincushionplant from the Soil?
How Do You Remove Hollyleaf Pincushionplant from the Soil?
From Ground: First, moisten the soil around the hollyleaf pincushionplant to dampen it. This helps loosen the soil and minimize root damage. Dig a wide trench around the plant using a shovel or spade, ensuring the plant's root ball stays intact. Carefully work the spade beneath the root ball to lift the plant from its original position.From Pot: Thoroughly water the hollyleaf pincushionplant to soften the soil. Gently turn the pot on its side and tap the bottom to loosen the soil. Grasp the plant at its base and carefully slide it out of the pot, ensuring the root ball remains intact.From Seedling Tray: Water the soil in the seedling tray beforehand to moisten it. Use a trowel or your fingers to gently lift each seedling from the tray, ensuring each root system and attached soil remain intact. Handle each seedling by its leaves, rather than the stem, to avoid damage.
Step-by-Step Guide for Transplanting Hollyleaf Pincushionplant
Prepare the New Location
Ensure the new planting site is ready before extracting the hollyleaf pincushionplant from its original spot. Dig a hole in the ground that is twice as wide and the same depth as the plant's root ball.
Remove the Plant
Follow the appropriate removal procedure based on the plant's current location, ensuring the root ball remains intact.
Place the Plant in the Ground
Gently position the hollyleaf pincushionplant into the prepared hole in the ground. Ensure the top of the root ball is level with or slightly above the surrounding soil.
Backfill the Hole
Fill the hole with soil, using your hands or a trowel to gently firm the soil around the root ball. Make sure there are no air pockets, and the plant is stable and upright.
Water Thoroughly
Immediately water the newly transplanted hollyleaf pincushionplant thoroughly to help settle the soil around the roots and reduce transplant shock.
Apply Mulch
Apply a layer of mulch around the base of the plant to help retain moisture and suppress weeds. Keep the mulch a few inches away from the stem to prevent rot.
How Do You Care For Hollyleaf Pincushionplant After Transplanting?
Watering
Keep the soil around the hollyleaf pincushionplant consistently moist, but not waterlogged, for the first few weeks after transplanting to help establish strong roots.
Monitoring
Regularly check the plant for signs of stress such as wilting or yellowing leaves. If such signs are noticed, adjust watering habits and check for pests or disease.
Weeding
Keep the area around the hollyleaf pincushionplant free of weeds to reduce competition for nutrients and water.
Mulch Maintenance
Replenish mulch as needed to maintain a consistent layer that helps retain moisture and suppress weeds.
Troubleshooting Common Issues with Hollyleaf Pincushionplant Transplantation.
When is the best time to transplant hollyleaf pincushionplant?
Relocate hollyleaf pincushionplant in early spring for optimal growth and establishment.
What is the ideal spacing for transplanting hollyleaf pincushionplant?
Space the plants 6-12 inches (15-30 cm) apart to ensure healthy growth and airflow.
How should soil be prepared for transplanting hollyleaf pincushionplant?
Loosen the soil and mix in compost to improve drainage and nutrient content.
What should I do if hollyleaf pincushionplant looks wilted after transplanting?
Ensure the plant is well-watered and shielded from intense sunlight until it recovers.
How deep should I plant hollyleaf pincushionplant during transplantation?
Plant hollyleaf pincushionplant at the same depth it was growing in its original container.
What should I do if hollyleaf pincushionplant experiences transplant shock?
Keep the soil consistently moist and avoid fertilizing immediately after transplanting.
Can hollyleaf pincushionplant be transplanted in summer?
Avoid transplanting in summer; early spring is optimal to reduce stress on the plant.
How often should I water hollyleaf pincushionplant after transplanting?
Water thoroughly after planting, then keep the soil moist but not waterlogged.
What sunlight conditions does hollyleaf pincushionplant need post-transplantation?
Hollyleaf pincushionplant thrives in full sun; ensure it receives at least 6 hours of sunlight daily.
How to prevent pests on newly transplanted hollyleaf pincushionplant?
Regularly inspect the plants and use organic or mild insecticidal solutions if needed.



