How to Transplant White-flowered iris?
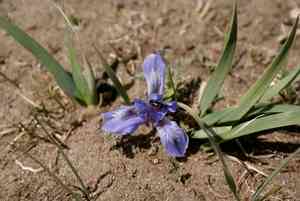
Relocate white-flowered iris during its period of active development, generally spanning from late spring through pleasant early summer, to allow sufficient time for root establishment. Place them in sunny, adequately drained locations to foster robust health, exercising caution during the transfer to protect fragile root structures.
What Preparations are Needed Before Transplanting White-flowered Iris?
What is the Ideal Time for Transplanting White-flowered Iris?
The perfect time to move white-flowered iris is from mid-spring to early summer. This period allows for strong root development before colder weather, helping white-flowered iris thrive. Choosing this window ensures white-flowered iris has enough time to adjust, benefiting from mild temperatures that encourage vigorous growth, minimize transplant shock, and promise a vibrant display.
How Much Space Should You Leave Between White-flowered Iris Plants?
When relocating your white-flowered iris, provide sufficient room for each to flourish. Position them approximately 18-24 inches (45-60 cm) apart. This spacing promotes ample growth and good air circulation, contributing to plant health.
What is the Best Soil Mix for White-flowered Iris Transplanting?
To create an optimal bed for your white-flowered iris, combine well-draining soil with aged compost or a balanced slow-release fertilizer. This mixture will supply a nutrient-rich base that supports robust root growth.
Where Should You Relocate Your White-flowered Iris?
Your white-flowered iris will thrive in a sunny spot receiving at least 6 hours of daily light. Select a location that offers morning sun and some afternoon shade to protect the plant during the day's hottest hours.
What Equipments Should You Prepare Before Transplantation White-flowered Iris?
Gardening Gloves
To safeguard your hands while handling soil and plants.
Hand Trowel
For excavating small white-flowered iris plants or creating individual planting holes.
Spade or Shovel
To dig out the plant's root ball from the ground or larger containers.
Watering Can or Hose
To hydrate white-flowered iris before and after its relocation.
Wheelbarrow
To transport white-flowered iris and soil if the new site is not close by.
Garden Fork
To loosen the soil surrounding the white-flowered iris's root system.
Pruning Shears
For trimming any damaged roots or foliage.
Measuring Tape
To ensure correct spacing between transplanted white-flowered iris.
How Do You Remove White-flowered Iris from the Soil?
How Do You Remove White-flowered Iris from the Soil?
From Ground: First, water the white-flowered iris plant to moisten the soil. Next, dig a wide trench around the plant using a shovel or spade, ensuring the root ball remains intact. Carefully work the spade beneath the root ball to lift white-flowered iris from its original spot.From Pot: Water the white-flowered iris in its container to facilitate removal. Turn the pot on its side and gently slide white-flowered iris out while supporting the plant and root ball. If white-flowered iris is stuck, tap the pot's sides and bottom to loosen it.From Seedling Tray: Water the tray to simplify seedling removal. Use a hand trowel or spatula to carefully lift each white-flowered iris seedling, taking care not to harm the delicate roots and shoots.
Step-by-Step Guide for Transplanting White-flowered Iris
Preparation
Mark the area where white-flowered iris will be moved. Clear the space of weeds and debris to prevent competition and ensure a welcoming environment for white-flowered iris. Prepare the soil by loosening it with a garden fork to improve root penetration and growth. Ensure the planting area is large enough for the white-flowered iris's root ball.
Digging the Hole
Use a shovel or spade to dig a hole that is twice as wide and the same depth as the white-flowered iris's root ball. This provides ample room for root expansion.
Removing the white-flowered iris
Follow the appropriate removal method described above, depending on whether white-flowered iris is in the ground, a pot, or a seedling tray. Handle the plant gently to minimize stress and root damage.
Placing the white-flowered iris
Place white-flowered iris in the prepared hole, ensuring it stands upright. The top of the root ball should be level with the surrounding ground. Avoid planting too deeply or too shallowly.
Refilling the Hole
Gently backfill the hole with the excavated soil, lightly tamping around white-flowered iris to ensure good soil-to-root contact.
Watering
Thoroughly water the transplanted white-flowered iris after planting to settle the soil and remove air pockets around the roots.
Mulching
Apply a layer of mulch around the base of white-flowered iris, but not touching the stem or leaves, to help retain soil moisture and regulate soil temperature.
How Do You Care For White-flowered Iris After Transplanting?
Monitoring
Observe white-flowered iris for any indications of transplant shock, such as wilting or yellowing leaves, and address issues as needed.
Additional Watering
Ensure white-flowered iris receives sufficient water to establish itself in its new location; this may initially require more frequent watering.
Staking
If white-flowered iris is tall and slender, consider staking it to provide support against strong winds until its roots are firmly established.
Pruning
Trim away any damaged or dead foliage and roots during transplanting to encourage healthy new growth.
Protecting from Pests and Disease
Monitor white-flowered iris for any signs of pests or disease and treat appropriately with environmentally friendly methods suitable for beginners.
Feeding
After a few weeks, once white-flowered iris has settled into its new spot, begin to incorporate a balanced fertilizer to promote vigorous growth.
Troubleshooting Common Issues with White-flowered Iris Transplantation.
What's the best time to transplant white-flowered iris?
The optimal period is when spring transitions to summer, ensuring a smooth adjustment for white-flowered iris.
How far apart should I plant white-flowered iris for optimal growth?
Aim for generous spacing, about 18-24 inches (45-60 cm) apart, to give white-flowered iris ample room to thrive.
My white-flowered iris is wilting after transplanting. What should I do?
Ensure white-flowered iris has enough water, protection from intense midday sun, and check for root-bound conditions.
What soil type is best when transplanting white-flowered iris?
Prefer well-draining soil rich in organic matter to provide white-flowered iris with a nourishing new home.
How deep should I plant white-flowered iris?
Set white-flowered iris at a depth where the crown rests just at soil level, promoting healthy, upright development.
Can I transplant white-flowered iris on a hot day?
Avoid very hot days for transplanting. Opt for cooler, overcast conditions to minimize white-flowered iris stress.
The leaves of white-flowered iris are yellowing post-transplant. Why?
Yellowing may indicate stress. Check moisture, sunlight, and nutrient levels, and adjust care accordingly.
How much should I water white-flowered iris after transplanting?
Water generously post-transplant to settle soil around roots, then adjust to regular watering as white-flowered iris establishes.
Is it necessary to use fertilizer when transplanting white-flowered iris?
A mild starter fertilizer can aid white-flowered iris's recovery, but avoid strong feeds that might harm roots.
Should I prune white-flowered iris before transplanting?
Trim any damaged leaves to direct white-flowered iris's energy towards root establishment, avoiding extensive pruning.



