How to Transplant Lesser canadian St. John's wort?
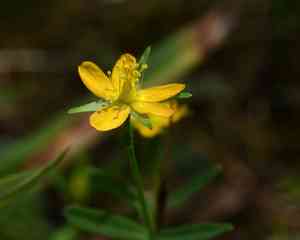
Hypericum canadense thrives when relocated during the revitalizing period of early to mid-spring. Place it in a brightly lit area with soil that drains effectively for peak development. Think about supplying extra hydration if the local climate is especially arid.
What Preparations are Needed Before Transplanting Lesser Canadian St. John's Wort?
What is the Ideal Time for Transplanting Lesser Canadian St. John's Wort?
The best period for relocating lesser canadian St. John's wort is from early to mid-spring, benefiting from mild temperatures and increased soil moisture. This timing allows the plant to establish its root system before summer heat. Transplanting during this window encourages robust growth and a stronger root structure, improving overall plant health and resilience.
How Much Space Should You Leave Between Lesser Canadian St. John's Wort Plants?
When moving lesser canadian St. John's wort, ensure plants are spaced 12-18 inches (30-45 cm) apart. This spacing provides ample room for each plant to grow without competing for nutrients and sunlight.
What is the Best Soil Mix for Lesser Canadian St. John's Wort Transplanting?
Prepare the soil for lesser canadian St. John's wort by selecting a well-draining, sandy or loamy type. Incorporate a balanced, slow-release fertilizer to supply essential nutrients. An ideal pH range of 6.0-7.0 supports healthy development.
Where Should You Relocate Your Lesser Canadian St. John's Wort?
Choose a planting site that receives full sun to partial shade. Lesser canadian St. John's wort thrives in bright light but can endure some shade. Confirm the chosen spot is not prone to waterlogging to prevent root rot.
What Equipments Should You Prepare Before Transplantation Lesser Canadian St. John's Wort?
Gardening Gloves
To safeguard your hands while handling soil and plants.
Hand Trowel
For digging small, deep holes and carefully working around roots.
Shovel or Spade
To excavate and lift the plant from its original spot.
Watering Can
To hydrate the plant before and after relocation.
Organic Compost
To enrich the soil at the new site.
Mulch
To help maintain soil moisture after transplanting.
How Do You Remove Lesser Canadian St. John's Wort from the Soil?
How Do You Remove Lesser Canadian St. John's Wort from the Soil?
From Ground: First, water the lesser canadian St. John's wort plant to moisten the soil. Next, dig a wide trench around the plant using a shovel or spade, ensuring the plant's root ball remains intact. Carefully work the spade beneath the root ball to lift the plant from its initial location.From Pot: Water the lesser canadian St. John's wort plant in the pot to loosen the soil. Gently hold the plant at its base and invert the pot, tapping the bottom until the plant slides out with its root ball intact.From Seedling Tray: Water the seedlings to make the soil easier to manage. Gently press the bottom of each cell to push the plant out, being careful not to harm the roots.
Step-by-Step Guide for Transplanting Lesser Canadian St. John's Wort
Prepare the New Site
Ensure the new location is free of weeds and loosen the soil to an adequate depth. Mix in some organic compost to enrich the soil.
Dig the Hole
Excavate a hole that is twice as wide and slightly deeper than the root ball of the lesser canadian St. John's wort plant.
Remove the Plant from Original Location
Follow the specific instructions mentioned above to carefully extract the plant, depending on whether it is in the ground, a pot, or a seedling tray.
Planting
Place the lesser canadian St. John's wort plant into the center of the hole, making sure the top of the root ball is level with the surrounding soil. Backfill the hole with soil, pressing gently to eliminate air pockets.
Watering
Thoroughly water the lesser canadian St. John's wort plant immediately after transplanting to help settle the soil around the roots.
Mulching
Apply a layer of organic mulch around the base of the plant to retain moisture and suppress weeds.
How Do You Care For Lesser Canadian St. John's Wort After Transplanting?
Watering
Keep the soil around the lesser canadian St. John's wort consistently moist, but not waterlogged, for the initial few weeks post-transplant to aid in root establishment.
Monitoring
Regularly inspect the lesser canadian St. John's wort plant for signs of transplant shock, such as wilting or yellowing leaves, and adjust care as needed.
Weeding
Maintain the area around the lesser canadian St. John's wort plant free from weeds to reduce competition for nutrients and water.
Protection
Consider using a protective cover or barrier if the lesser canadian St. John's wort plant is in an area prone to strong winds or heavy rain during the initial transplant period.
Troubleshooting Common Issues with Lesser Canadian St. John's Wort Transplantation.
When is the best time to transplant lesser canadian St. John's wort?
Early to mid-spring is ideal for transplanting lesser canadian St. John's wort to ensure better establishment.
What spacing should I use when transplanting lesser canadian St. John's wort?
Space lesser canadian St. John's wort plants 12-18 inches (30-45 cm) apart to allow sufficient growth.
How should the soil be prepared for transplanting lesser canadian St. John's wort?
Ensure the soil is well-drained, fertile, and slightly acidic to neutral (pH 5.5-7).
How to minimize transplant shock in lesser canadian St. John's wort?
Water thoroughly before and after transplanting and avoid root disturbance to lessen stress.
What is the depth requirement for planting lesser canadian St. John's wort?
Plant lesser canadian St. John's wort at the same depth it was previously growing to prevent stress.
Should I trim lesser canadian St. John's wort before transplanting?
Trimming is not essential, but removing damaged leaves can improve plant recovery post-transplant.
How much water does lesser canadian St. John's wort need after transplanting?
Water lesser canadian St. John's wort deeply immediately after transplanting and keep the soil consistently moist for 2 weeks.
Is mulching necessary when transplanting lesser canadian St. John's wort?
Yes, mulch around lesser canadian St. John's wort to retain soil moisture and suppress weeds, but avoid contact with stems.
How to handle wilt in newly transplanted lesser canadian St. John's wort?
Ensure adequate watering and partial shade, avoiding direct sunlight until the plant stabilizes.
Can I use fertilizer when transplanting lesser canadian St. John's wort?
Mixing a balanced slow-release fertilizer into the soil during transplanting helps promote growth.



