How to Transplant Green-tinge spiderlily?
The ideal period to relocate green-tinge spiderlily is from late spring to mid-summer, coinciding with renewed vigorous growth. Select a bright location that offers effective water drainage. Maintain consistent soil dampness as green-tinge spiderlily acclimates to its new environment for a smooth establishment.
Essential Preparations Before Relocating Green-tinge Spiderlily?
Optimal Period for Relocating Green-tinge Spiderlily?
The best time to move green-tinge spiderlily is after the final frost, once warmer weather arrives, typically from late spring to early summer. This timeframe allows green-tinge spiderlily ample opportunity to develop strong roots before the colder autumn period. Transplanting now leverages favorable conditions, ensuring a smooth transition for green-tinge spiderlily and encouraging vigorous development.
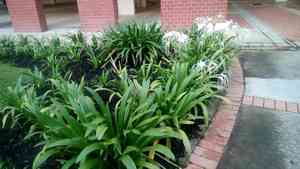
Recommended Spacing Between Green-tinge Spiderlily Plants?
Position green-tinge spiderlily approximately 15-18 inches (38-46 cm) apart. This provides sufficient room for each plant to grow and ensures adequate air circulation, helping to prevent diseases.
Ideal Soil Blend for Green-tinge Spiderlily Relocation?
Prepare a well-draining soil, rich in organic material, for your green-tinge spiderlily. Before transplanting, incorporate a balanced, slow-release fertilizer to give your plants a robust start.
Preferred Location for Your Green-tinge Spiderlily?
Select a site for your green-tinge spiderlily that receives partial to full sun exposure. An area with morning sun and afternoon shade would be perfect for these plants to flourish.
Tools Required Before Relocating Green-tinge Spiderlily?
Gardening Gloves
To safeguard your hands when handling green-tinge spiderlily and during soil preparation.
Shovel or Spade
For excavating around and under the plant to carefully extract it from its current spot.
Watering Can or Hose
To hydrate the plant before and after removal, and to maintain soil moisture post-transplant.
Wheelbarrow or Plant Dolly
To move the green-tinge spiderlily from its original position to the new planting site.
Pruning Shears
To trim any dead or damaged roots prior to transplanting.
Measuring Tape
To accurately determine spacing and depth when planting green-tinge spiderlily in its new home.
How to Extract Green-tinge Spiderlily from the Ground?
How to Extract Green-tinge Spiderlily from the Ground?
From Ground: Start by watering the green-tinge spiderlily to loosen the soil. Dig a wide circle around the plant with a shovel or spade to protect the root ball. Gently work the shovel under the roots to lift the plant from the soil.From Pot: Water the green-tinge spiderlily thoroughly, then turn the pot on its side and gently tap or squeeze it to loosen the root ball. Carefully pull the plant out by its base, avoiding damage to stems or roots.From Seedling Tray: Moisten the soil in the tray and carefully remove the green-tinge spiderlily by lifting it from the base using a spoon or similar tool. Be careful not to harm the young roots.
Step-by-Step Guide for Relocating Green-tinge Spiderlily
Preparation
Gather all necessary tools and water the green-tinge spiderlily to get it ready for the move.
Root Ball Integrity
Ensure the root ball remains intact when removing the green-tinge spiderlily from its initial spot to prevent root damage.
Trimming
Use pruning shears to remove any damaged or excessively long roots.
Transport
Carefully place the green-tinge spiderlily in a wheelbarrow or on a plant dolly to move it to the new site without excessive jarring.
Planting Hole
Dig a hole that is twice as wide and the same depth as the root ball of the green-tinge spiderlily.
Placement
Position the green-tinge spiderlily in the center of the hole and gently spread its roots outwards.
Soil
Backfill the hole with the excavated soil, gently tamping around the base to eliminate air pockets.
Watering
After planting, water the green-tinge spiderlily deeply to help settle the soil around the roots and encourage outward growth.
Post-Transplant Care for Green-tinge Spiderlily
Initial Watering
Water generously immediately after transplanting to help reduce transplant shock.
Consistent Watering Schedule
Establish a regular watering routine, ensuring the soil stays consistently moist, especially during the first growing season.
Observation
Regularly check for signs of transplant shock, such as wilting or discolored leaves, and address them promptly if they appear.
Pruning
Snip off any dead or yellowing leaves to redirect energy towards healthy growth.
Mulching
Apply a layer of mulch around the base to retain moisture, regulate soil temperature, and suppress weeds.
Patience
Allow the green-tinge spiderlily time to adapt to its new location without disturbance, avoiding major pruning or fertilization until it is established.
Resolving Common Issues with Green-tinge Spiderlily Relocation.
When is the best time to relocate green-tinge spiderlily?
The ideal time for transplanting green-tinge spiderlily is from late spring to mid-summer, when the weather is warm but not excessively hot.
What's the optimal spacing for green-tinge spiderlily?
For green-tinge spiderlily, allow a generous distance of 15-18 inches (38-45 cm) between each plant for best growth.
Why is my green-tinge spiderlily's growth stunted after relocation?
Stunted growth might be due to planting too deep or compacted soil. Ensure the crown is just above soil level and the soil drains well.
How much should I water green-tinge spiderlily after transplanting?
Keep the soil consistently moist without over-saturating. Water thoroughly initially, then maintain steady moisture until the plant is established.
What should I do if green-tinge spiderlily's leaves wilt post-transplant?
Wilting can indicate transplant shock. Ensure adequate watering and consider providing shade for a few days to aid recovery.
Why are the green-tinge spiderlily's roots decaying after transplant?
Root rot can result from excessive watering or poor drainage. Make sure to plant green-tinge spiderlily in well-drained soil and monitor your watering schedule.
How do I prepare the soil for relocating green-tinge spiderlily?
Prepare a rich, loamy, well-draining soil with organic matter. Till to a depth of at least 10-12 inches (25-30 cm).
Can I use fertilizers when relocating green-tinge spiderlily?
Wait 4-6 weeks after transplanting before applying balanced fertilizer to prevent root burn and allow the plant to settle.
How deep should I plant green-tinge spiderlily bulbs?
Bulbs should be planted with their tops just beneath the surface, as planting too deep can impede growth.
What are the indicators of successful transplant in green-tinge spiderlily?
Successful transplant is shown by new growth, such as fresh leaves or shoots, and continued healthy development without signs of stress.


