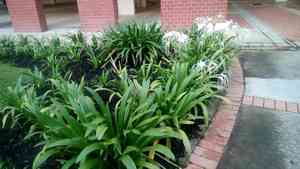
How to Prune Green-tinge spiderlily?
This enduring bulb-producing plant features striking, aromatic blossoms and flourishes in soil that drains effectively. For green-tinge spiderlily, eliminating faded flowers stimulates additional blooming and preserves its visual attractiveness. Cut back the leaves once they turn yellow, usually after the flowering period, to channel energy back to the bulb. Perform pruning from spring through autumn for peak development. Pruning focuses less on managing size and more on fostering robust flowering and averting ailments, guaranteeing green-tinge spiderlily's strong resurgence annually.
Advantages of Trimming green-tinge spiderlily
Advantages of Trimming green-tinge spiderlily
Trimming green-tinge spiderlily promotes robust development and maintains its desired form. This action stimulates fresh, vigorous growth while preventing straggly appearance and overcrowding, ensuring green-tinge spiderlily flourishes with visual appeal.
Optimal Period for Trimming green-tinge spiderlily
Optimal Period for Trimming green-tinge spiderlily
green-tinge spiderlily's active growth phase typically begins in late spring and extends through summer, making late spring to early summer the ideal time for pruning or trimming. During this interval, the plant is emerging from dormancy and starting to produce new growth, meaning that pruning will encourage the plant to develop fresh, healthy foliage and blossoms. Furthermore, pruning in late spring allows gardeners to eliminate any winter damage. Trimming in the fall is not advised as new growth stimulated by cutting may not have sufficient time to harden before colder temperatures, making the plant more vulnerable to winter harm.
Necessary Tools for Trimming green-tinge spiderlily
Hand Pruners
Perfect for cutting through green-tinge spiderlily's faded flower stems and light foliage. Select bypass pruners for clean, healthy cuts that foster better regrowth.
Gardening Scissors
green-tinge spiderlily's thinner, more delicate structures might be easier to trim using scissors to avoid unnecessary harm.
Pruning Saw
For mature green-tinge spiderlily that possess thick, woody base stems not easily managed by hand pruners, a pruning saw offers a clean cut without tearing.
Loppers
On mature green-tinge spiderlily with thicker stalks, loppers provide ample leverage to simplify pruning larger materials, reducing gardener strain.
How to Trim green-tinge spiderlily
Identify
Inspect green-tinge spiderlily to pinpoint diseased and withered leaves, as well as dead or ailing branches.
Sanitation
Before pruning, sterilize pruning tools to prevent disease transmission.
Remove Leaves
Use bypass pruners to carefully snip off diseased and withered leaves at their base where they connect to the main stem.
Prune Branches
Cut away dead and diseased branches of green-tinge spiderlily at their point of origin to encourage healthy development. Make cuts clean and angled away from the main plant axis to allow water runoff.
Cleanup
Properly dispose of all removed leaves and branches to minimize disease spread risk and promote a healthy growing environment for green-tinge spiderlily.
Common Trimming Errors with green-tinge spiderlily
Over-trimming
Removing excessive foliage can weaken green-tinge spiderlily, as it relies on its leaves for photosynthesis. Aim to trim no more than one-third of the plant at a time.
Incorrect Cut Placement
Cutting too close to the bulb or too far from it can harm green-tinge spiderlily. Prune just above where the leaf stalk meets the base to prevent damage.
Uneven Cuts
Making jagged or uneven cuts can lead to pest infestations and diseases. It's vital to use sharp, clean shears for a precise cut.
Trimming Healthy Growth
Removing green, healthy growth can limit green-tinge spiderlily's ability to bloom. Focus on dead or yellowing leaves and spent flower stalks.
Ignoring Dead Foliage
Failing to remove dead or dying leaves can attract pests and diseases. Regularly inspect green-tinge spiderlily for unhealthy foliage to remove.
Neglecting Tool Cleanliness
Not disinfecting pruning tools before and after use can spread disease between plants. Always clean your tools to ensure the health of green-tinge spiderlily.
General Trimming Advice for green-tinge spiderlily
Sharp Tools
Utilize sharp, sterile pruning shears for clean cuts. This helps prevent damage and disease to green-tinge spiderlily.
Correct Timing
Prune immediately after flowering to encourage future blooms, as green-tinge spiderlily has a unique growth cycle that should not be interrupted by untimely pruning.
Focus On Dead Material
Concentrate on removing yellowing leaves, dead foliage, and spent flower stalks to direct energy towards healthy growth and flowering.
Encourage Airflow
Trim dense foliage to enhance air circulation, which helps prevent disease and pests from affecting green-tinge spiderlily.
Cut Angle
Make cuts at a 45-degree angle to prevent water accumulation, which could lead to rot or fungal issues in green-tinge spiderlily.
Protect Bulb
When pruning, take care not to damage the bulb, as this is crucial to the health and re-flowering of green-tinge spiderlily.


