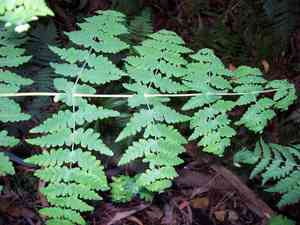
How to Transplant Batwing fern?
The ideal period to relocate batwing fern is from late spring's emergence into early summer, which encourages vigorous development. Position batwing fern in an area receiving filtered illumination, guaranteeing damp, adequately draining substrate. When shifting batwing fern, proceed gently to safeguard its fragile leaves.
Essential Preparations Before Moving Batwing Fern
Optimal Timing for Relocating Batwing Fern?
The best time to move batwing fern is during the pleasant period from late spring to mid-summer. This timeframe offers ideal warmth and consistent weather, promoting root establishment and development. Transplanting batwing fern then capitalizes on the season's steady temperatures and soil moisture, helping your batwing fern settle with minimal stress. A helpful tip: this period benefits from extended daylight, giving batwing fern ample chance to flourish in its new spot!
Recommended Spacing Between Batwing Fern Plants?
For batwing fern, allow ample room for expansion. I suggest maintaining a minimum distance of 2-3 feet (60-90 cm) between each plant when transplanting. This ensures each plant has sufficient area for healthy development!
Ideal Soil Blend for Batwing Fern Transplantation?
Prepare the soil for batwing fern by incorporating a foundational fertilizer rich in organic matter. It thrives in well-drained, humus-rich soil. Pre-work this approximately 2 weeks before the transplant for optimal results!
Where to Replant Your Batwing Fern?
Select a location that receives partial shade or indirect sunlight for batwing fern. It appreciates some sun but is sensitive to intense, direct exposure. A spot that offers afternoon shade would likely be perfect!
Tools Required Before Transplanting Batwing Fern
Gardening Gloves
These will safeguard your hands from soil and any sharp roots while handling the batwing fern plant and earth.
Shovel or Spade
To carefully excavate the batwing fern plant from its original site without harming its root system.
Gardening Trowel
To prepare the new planting hole and to backfill soil around the batwing fern plant after placing it in the ground.
Pruning Shears
These might be necessary if you need to remove any dead or damaged parts of the batwing fern plant during transplantation.
Watering Can or Hose
To hydrate the batwing fern plant immediately following transplantation.
How to Extract Batwing Fern from the Soil?
How to Extract Batwing Fern from the Soil?
From Ground: First, water the batwing fern plant moderately to moisten the soil. This makes it easier to remove the plant without damaging its roots. Next, use a shovel or spade to dig a trench around the plant, ensuring you are far enough away to avoid disturbing the root ball. Gradually work the spade beneath the root ball to separate it from the ground. Be careful not to injure the roots during this process.From Pot: Begin by watering the batwing fern plant in its pot. This helps keep the soil intact during the transition. Turn the pot sideways, then gently tap the pot's edges and shake it slightlyâthis will help loosen the plant. Try to support the plant by its base while sliding it out of the pot. If it's stuck, avoid pulling, as this could harm the plant. Instead, apply more pressure to the pot or use a knife to separate the root ball from the pot.From Seedling Tray: The procedure is similar to the pot method. However, since seedling trays are made of lighter material, simply inverting the tray and gently tapping it should allow the batwing fern plant to slide out easily.
Step-by-Step Guide for Transplanting Batwing Fern
Site Preparation
Prepare the new planting location by digging a hole twice as wide and as deep as the batwing fern plant's root ball. Ensure the hole is centered and level.
Plant Positioning
Place the batwing fern plant in the center of the hole. The top of the root ball should be flush with or slightly above the ground surface. Orient the plant's batwing-like leaves to face your desired growth direction.
Finishing Up
Backfill the hole with the excavated soil. Point the trowel towards the plant and gently push the soil back into the hole to fill it. Firm the soil around the plant with your hands to eliminate any air pockets.
Watering
Use a watering can or hose to water the batwing fern, making the soil moist but not saturated. This aids the plant in settling into its new environment.
Post-Transplant Care for Batwing Fern
Monitoring
Observe the batwing fern plant for several days after transplanting. Look for any indications of transplant shock, such as wilting or yellowing foliage.
Watering
Maintain a consistent watering schedule, without waterlogging the soil, as the batwing fern plant adapts to its new spot. However, be cautious not to overwater, as this can lead to root rot.
Pruning
Remove any yellow or wilting leaves to encourage new growth. Use sharp pruning shears for this task.
Relocation
If the batwing fern plant shows signs of struggling to adapt to the chosen location, such as scorched leaves or severe wilting, do not hesitate to move it to a more suitable spot.
Protection
Watch out for pests and diseases that might threaten your batwing fern and take necessary action if detected early.
Addressing Common Issues During Batwing Fern Transplantation.
What's the best time of year to transplant batwing fern?
The ideal season to transplant batwing fern is during stages S3-S5, typically late spring to early autumn, when temperatures are moderate.
How much space should I leave between batwing fern plants when transplanting?
For optimal growth of batwing fern, maintain a distance of about 2-3 feet (60-90 cm) between each plant during transplantation. This prevents overcrowding.
Is there a specific way to prepare the soil for batwing fern transplant?
Yes, batwing fern prefers nutrient-rich, well-draining soil. Ensure you prepare the ground by removing old roots and adding compost before transplanting.
How much water does batwing fern need right after transplanting?
Water batwing fern thoroughly immediately after transplanting. However, be sure not to overwater as this plant prefers soil that's moist, but never soggy.
How deep should I plant the batwing fern during transplantation?
When transplanting batwing fern, position the plant's root ball at the same level it was growing in its previous pot. This ensures proper growth.
Do I need to prune batwing fern before or after transplanting?
It's best to prune batwing fern prior to transplantation. Remove any dying or dead fronds to focus the plant's energy on new growth.
What's the ideal temperature for batwing fern post-transplanting?
Post-transplant, batwing fern thrives in temperatures of 65-75°F (18-24°C). Protecting it from harsh weather extremes will ensure its successful growth.
What should be the size of the new pot for batwing fern during transplantation?
Your new pot should be slightly larger than the existing root ball. Giving batwing fern too much room can result in a soggy growing medium.
Should I use a specific type of fertilizer for batwing fern after transplanting?
After transplanting, use an all-purpose slow-release fertilizer for batwing fern. This will provide nutrients over time and support the growth of your plant.
How soon can I expect to see new growth on my batwing fern after transplanting?
Patience is key! With proper care, you can expect to see new growth on batwing fern 4-6 weeks post-transplanting. Keep the care up, you're doing great!


