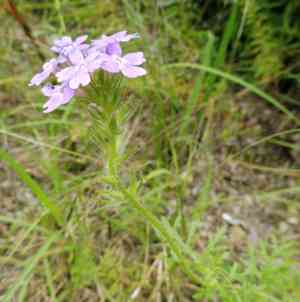
How to Transplant Dakota mock vervain?
The optimal period for relocating dakota mock vervain spans from early to late spring, given the plant's preference for new development and temperate conditions. Select a sun-drenched spot featuring soil that drains effectively for superior outcomes. Carefully loosen the root mass before moving, which helps the plant's roots rapidly take hold and flourish.
Essential Preparations Before Relocating Dakota Mock Vervain?
Optimal Timing for Moving Dakota Mock Vervain?
The ideal window for relocating dakota mock vervain spans from the warmth of early spring through late spring, and again from late summer into the cooler days of mid-fall to late fall. These periods offer favorable soil conditions, allowing the roots of dakota mock vervain to establish well before extreme weather. This timing also promotes extended blooming, giving dakota mock vervain ample opportunity to flourish beautifully. Your garden will certainly appreciate it!
Recommended Spacing for Dakota Mock Vervain Plants?
When relocating dakota mock vervain, provide adequate room for growth by positioning them approximately 8-12 inches (20-30 cm) apart. This spacing ensures proper air circulation and prevents overcrowding, leading to healthier plants.
Best Soil Blend for Dakota Mock Vervain Relocation?
To establish an excellent base for dakota mock vervain, select well-draining soil rich in organic matter. We suggest incorporating compost with the existing soil and adding a slow-release, all-purpose fertilizer for a robust start.
Where to Replant Your Dakota Mock Vervain?
For our beautiful dakota mock vervain to thrive, aim for a location that receives full sun or partial shade. Target at least 6 hours of direct sunlight daily to ensure abundant blooms.
Necessary Equipment for Transplanting Dakota Mock Vervain?
Gardening Gloves
To safeguard your hands while handling soil and the dakota mock vervain plant.
Garden Shovel
Crucial for loosening soil around plant roots during extraction and preparing the new planting site.
Garden Trowel
Useful for minor adjustments and precise shaping of the planting hole.
Pruning Shears
Handy for trimming any dead or superfluous growth on the dakota mock vervain plant prior to relocation.
Watering Can or Garden Hose
Essential for thoroughly hydrating the dakota mock vervain plant in its new spot.
How to Extract Dakota Mock Vervain from its Current Location?
How to Extract Dakota Mock Vervain from its Current Location?
From Ground: Before lifting the dakota mock vervain from the ground, moisten the area to facilitate soil workability and keep roots hydrated. Then, use a garden shovel to carefully dig around the plant, maintaining a safe distance from the base to avoid root damage. Once the soil is loose, gently lift the plant from its cavity. From Pot: Similar to ground removal, thoroughly water the plant before transfer. Gently tap the pot's sides to loosen the dakota mock vervain, then invert the pot while carefully supporting the plant at its base. If the plant resists, do not force it; instead, tap a bit more firmly. From Seedling Tray: If the dakota mock vervain is in a seedling tray, water it thoroughly first. Then, push up the cell's base to help ease the seedling out. Avoid pulling it by the stem or leaves, as this can harm the plant.
Step-by-Step Guide for Relocating Dakota Mock Vervain
Site Assessment
As you prepare for the relocation, perform a final check of the chosen site to confirm its readiness for the dakota mock vervain plant.
Plant Removal
Follow the instructions provided above to extract the plant from its original spot, depending on its current growing medium.
Hole Preparation
Excavate a hole twice the size of the dakota mock vervain's root ball. Remember, a wider hole is preferable to a deeper one.
Planting
Position the dakota mock vervain in the hole at the same depth it was previously growing. Avoid burying the plant too deeply, as this can impede its development.
Soil Backfill
Gently refill the hole with the excavated soil, lightly firming it with your hands.
Watering
Water the plant sufficiently to settle the soil around the root ball.
Post-Transplantation Care for Dakota Mock Vervain?
Watering
Allow the soil to dry slightly between waterings; dakota mock vervain prefers well-drained conditions and dislikes sitting in waterlogged soil.
Mulching
Apply organic mulch around the plant's base to keep the soil cool and reduce moisture loss due to evaporation.
Pruning
Dakota mock vervain may benefit from light trimming to encourage denser growth, promote flowering, and maintain its shape. Be careful not to prune excessively at once to avoid stressing the plant.
Pest and Disease Monitoring
Watch for indications of pests or diseases. Dakota mock vervain can occasionally be affected by aphids or spider mites. If you observe any unusual spots, discoloration, or tiny insects, use an appropriate organic pesticide or fungicide.
Resolving Common Issues with Dakota Mock Vervain Relocation.
When is the optimal time to move a dakota mock vervain?
Ideally, relocate your dakota mock vervain from early to late spring, late summer, or from mid-fall to late fall. These periods offer the most favorable growing conditions.
What is the correct spacing for dakota mock vervain during relocation?
Maintain a distance of approximately 8-12 inches (20-30cm) between each dakota mock vervain. Proper plant spacing helps ensure optimal growth and health.
Why are the leaves of my relocated dakota mock vervain turning yellow?
Yellow leaves might indicate overwatering or inadequate soil drainage. Ensure the dakota mock vervain is planted in well-draining soil and adjust irrigation as needed.
How can I tell if my dakota mock vervain has root rot after relocation?
Root rot manifests as wilting, yellowing, or browning of foliage. If your dakota mock vervain exhibits these symptoms post-relocation, inspect the roots for decayed areas.
What should I do if my relocated dakota mock vervain doesn't flower?
The dakota mock vervain might require more sunlight or could be lacking nutrients. Evaluate the plant's location for light exposure and consider applying a balanced fertilizer.
How should I handle a dakota mock vervain root ball during relocation?
Handle the dakota mock vervain root ball with care to prevent damage. Aim to retain as much of the original soil around the roots as possible throughout the process.
What type of soil does a dakota mock vervain prefer for relocation?
Dakota mock vervain thrives in sandy or loamy soil that drains effectively. It also appreciates soil that is slightly acidic to slightly alkaline.
How soon should I water my dakota mock vervain after relocating?
It's best to water your dakota mock vervain immediately after relocation. This helps settle the soil around the roots and minimizes transplant shock.
Why is my relocated dakota mock vervain wilting?
Wilting could be a sign of transplant shock or insufficient water. Ensure the plant is adequately irrigated and consider using a root stimulant.
What action should I take if pests attack my relocated dakota mock vervain?
If pests infest your dakota mock vervain, use a natural pesticide or pest-repelling plants. Maintaining healthy, robust plants is also an effective way to deter pests.


