How to Transplant Arizona lipfern?
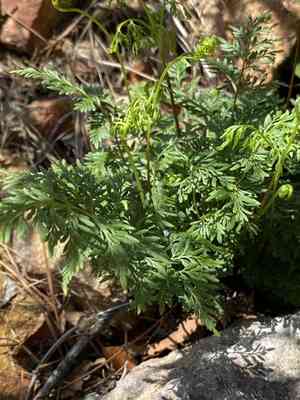
Arizona lipfern flourishes when relocated in the balmy late summer, capitalizing on the prolonged daylight. Optimal sites feature well-draining, stony substrates with abundant illumination. Guarantee minimal disruption to the root system during transplantation for superior outcomes.
Necessary Preparations Before Relocating Arizona Lipfern
Optimal Period for Moving Arizona Lipfern?
Arizona lipfern should ideally be moved during the height of summer, specifically from mid to late summer. This timing capitalizes on warm soil temperatures and ample sunlight, promoting strong root development. Transplanting at this time ensures the plant establishes itself well before colder periods, maximizing its growth potential and resilience.
Required Spacing Between Arizona Lipfern Plants?
Ensure arizona lipfern are spaced 12-15 inches (30-38 cm) apart to provide adequate room for growth without overcrowding. This allows for sufficient air circulation and access to nutrients.
Best Soil Mixture for Arizona Lipfern Relocation?
Prepare the soil with excellent drainage, such as sandy or gritty soil. Incorporate a foundational fertilizer rich in organic matter to supply arizona lipfern with the necessary nutrients for thriving.
Where to Replant Your Arizona Lipfern?
Select a sunny location for arizona lipfern to guarantee it receives abundant sunlight. These plants flourish in full sun, so aim for a spot that gets at least 6-8 hours of direct sunlight daily.
Equipment to Prepare Before Transplanting Arizona Lipfern?
Gardening Gloves
To safeguard your hands while handling soil and plants.
Shovel or Spade
For excavating holes and trenches.
Trowel
For more precise digging and transplanting tasks.
Watering Can or Hose
To supply water before and after the relocation.
Wheelbarrow
To move the plant if necessary.
Garden Fork
To loosen the earth around the plant.
Compost
To enrich the new planting site.
How to Extract Arizona Lipfern from the Ground?
How to Extract Arizona Lipfern from the Ground?
From Ground: First, hydrate the arizona lipfern plant to moisten the soil. Then, excavate a wide trench around the plant using a shovel or spade, ensuring the plant's root ball remains intact. Carefully work the spade beneath the root ball to lift the plant from its original spot.From Pot: Ensure the arizona lipfern plant is thoroughly watered before removal. Gently compress the pot to loosen the root ball. Carefully invert the pot, holding the plant's base. Tap the pot's bottom if needed to release the plant.From Seedling Tray: Water the seedling tray thoroughly. Use a trowel to carefully lift each arizona lipfern plant from the tray, ensuring as much of the root system as possible remains intact. Handle seedlings by their leaves, not stems, to prevent damage.
Step-by-Step Guide for Relocating Arizona Lipfern
Prepare the New Location
Dig a hole twice as wide and the same depth as the root ball of your arizona lipfern plant. Add compost to the hole to enrich the soil.
Position the Plant
Place the arizona lipfern plant in the hole, ensuring it is at the same depth it was previously growing. The top of the root ball should be level with the surrounding soil.
Backfill and Firm the Soil
Fill the hole with the enriched soil, gently firming it around the root ball to eliminate any air pockets.
Water Thoroughly
Immediately water the arizona lipfern after transplanting to settle the soil around the plant's roots.
Mulch (Optional)
Apply a layer of mulch around the base of the arizona lipfern to help retain moisture and suppress weeds.
Post-Transplant Care for Arizona Lipfern?
Watering
Keep the soil around the arizona lipfern consistently moist, but not waterlogged, for the initial weeks after transplanting to aid in strong root establishment.
Mulching
Apply a layer of mulch around the base to help retain moisture and regulate soil temperature.
Monitoring
Observe the arizona lipfern for signs of transplant shock, such as wilting or yellowing leaves, and provide additional care as necessary.
Pest and Disease Control
Regularly inspect the arizona lipfern for any indications of pests or diseases and take appropriate measures if required.
Resolving Common Issues with Arizona Lipfern Relocation.
When is the optimal time to move arizona lipfern?
Mid to late summer is ideal for relocating arizona lipferns to ensure successful establishment.
What is the recommended spacing for arizona lipferns?
Space arizona lipferns approximately 12-15 inches (30-38 cm) apart for optimal growth and airflow.
What soil conditions are best for transplanted arizona lipferns?
Well-drained, gritty soil is ideal for arizona lipferns. Ensure the soil is not excessively moist.
How deep should I plant arizona lipfern when transplanting?
Plant arizona lipfern at the same depth it was growing previously, around 2-3 inches (5-8 cm) deep.
What watering regimen should I follow after transplanting?
Water arizona lipferns lightly and regularly until established, then reduce watering to prevent root rot.
How can I minimize transplant shock for arizona lipferns?
Water thoroughly before and after relocating arizona lipferns and avoid excessive disturbance to the root ball.
Do arizona lipferns require special fertilization during transplanting?
A light application of balanced fertilizer can help arizona lipferns establish, but avoid over-fertilizing.
Should I prune arizona lipferns when transplanting?
Prune any damaged roots or fronds during transplanting, encouraging healthy new growth afterward.
How do I prepare the new site for relocating arizona lipferns?
Till the soil and mix in organic matter to enhance soil structure and fertility for arizona lipferns.
What is the ideal temperature range for moving arizona lipferns?
Relocate arizona lipferns in temperatures between 70-85°F (21-29°C) for the best chances of success.



