How to Transplant Worm seeded spurge?
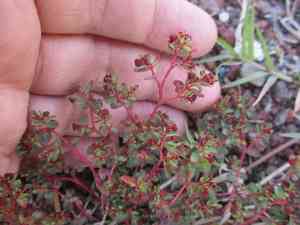
Worm seeded spurge flourishes when relocated during the revitalizing period of late winter. Select a bright spot with soil that drains effectively. Provide steady hydration, avoiding saturation, to encourage robust root development.
What Preparations are Needed Before Transplanting Worm Seeded Spurge?
What is the Ideal Time for Transplanting Worm Seeded Spurge?
The best time to move worm seeded spurge is in early spring. This period allows the plant to benefit from warmer soil and longer days, which encourages strong root growth. Transplanting worm seeded spurge at this point promotes vigorous development and improves its hardiness, preparing it well for the upcoming growing season.
How Much Space Should You Leave Between Worm Seeded Spurge Plants?
For worm seeded spurge, ensure adequate room by spacing each plant 9-12 inches (23-30 cm) apart. This provides ample space for healthy growth without overcrowding.
What is the Best Soil Mix for Worm Seeded Spurge Transplanting?
Prepare well-draining soil enriched with compost to boost nutrients. Incorporate a general-purpose base fertilizer, such as a balanced 10-10-10, to support worm seeded spurge's development.
Where Should You Relocate Your Worm Seeded Spurge?
Select a spot that receives full sunlight for at least 6-8 hours daily. Worm seeded spurge thrives in bright light, which helps ensure robust and healthy plants.
What Equipments Should You Prepare Before Transplantation Worm Seeded Spurge?
Gardening Gloves
To safeguard your hands while handling soil and plants.
Shovel or Spade
For digging a hole for transplanting and removing the plant from its original spot if necessary.
Trowel
For more precise digging around the root ball.
Watering Can or Hose
To hydrate the plant at various stages of transplantation.
Bucket or Container
To move the plant if required.
Mulch
To help maintain soil moisture after transplanting.
Stakes or Supports
To prop up the plant if it needs assistance standing upright post-transplant.
How Do You Remove Worm Seeded Spurge from the Soil?
How Do You Remove Worm Seeded Spurge from the Soil?
From Ground: First, moisten the soil around the worm seeded spurge plant. Then, dig a wide trench around the plant using a shovel or spade, making sure the root ball stays intact. Carefully work the spade beneath the root ball to lift the plant from its initial location.From Pot: Water the plant thoroughly a few hours prior to removal. Gently tap the pot's sides to loosen the soil. Invert the pot, supporting the plant with your hand, and carefully slide the worm seeded spurge plant out. If it resists, use a trowel to gently loosen the soil around the edges.From Seedling Tray: Water the seedlings, then use a small tool like a trowel or spoon to carefully lift each worm seeded spurge plant from the tray, taking care to preserve as much of the root system as possible.
Step-by-Step Guide for Transplanting Worm Seeded Spurge
Prepare the Hole
Dig a hole approximately twice the width and the same depth as the root ball of your worm seeded spurge plant. Ensure the hole is spacious enough to comfortably accommodate the entire root system.
Remove the Plant
Follow the relevant instructions in the removal process section to carefully extract the worm seeded spurge from its original spot.
Place the Plant
Gently position the worm seeded spurge plant into the hole, ensuring it sits at the same depth as it did previously. Carefully spread out the roots if they are circling or tangled.
Fill the Hole
Backfill the hole with soil, gently pressing it down around the plant's base to eliminate any air pockets. Avoid piling soil against the stem.
Water the Plant
Thoroughly water the worm seeded spurge plant immediately after transplanting to help settle the soil and establish initial moisture levels.
Apply Mulch
Spread mulch around the base of the worm seeded spurge plant to help retain moisture and suppress weeds. Keep mulch a few inches away from the stem to prevent rot.
How Do You Care For Worm Seeded Spurge After Transplanting?
Watering
Keep the soil around the worm seeded spurge consistently moist, but not waterlogged, for the first few weeks after transplanting to aid in strong root establishment.
Monitoring
Regularly inspect the worm seeded spurge plant for any signs of stress, such as wilting or yellowing leaves, and adjust care as needed.
Support
If the worm seeded spurge plant appears unstable, use stakes or supports to help it remain upright as its root system establishes.
Weeding
Keep the area around the worm seeded spurge plant free from weeds, which can compete for nutrients and water.
Troubleshooting Common Issues with Worm Seeded Spurge Transplantation.
When is the best time to transplant worm seeded spurge?
The optimal season to transplant worm seeded spurge is early spring, ensuring ideal growth conditions.
How much spacing should worm seeded spurge have when transplanting?
Space worm seeded spurge plants 9-12 inches (22-30 cm) apart to allow for proper growth and air circulation.
What type of soil is best for transplanting worm seeded spurge?
Utilize well-draining soil mixed with organic compost to ensure healthy root development for worm seeded spurge.
Should I water worm seeded spurge immediately after transplanting?
Yes, water worm seeded spurge thoroughly after transplanting to help settle the soil and hydrate the roots.
How can I prevent root damage while transplanting worm seeded spurge?
Handle the roots gently and avoid tearing them. Use a trowel to carefully work around the roots.
Do I need to prune worm seeded spurge before transplanting?
Lightly prune worm seeded spurge to remove dead or damaged leaves, helping to reduce transplant shock.
What sunlight conditions does worm seeded spurge need after transplanting?
Ensure worm seeded spurge receives at least 6 hours of direct sunlight daily for optimal growth.
Can I use fertilizer when transplanting worm seeded spurge?
Apply a balanced, slow-release fertilizer to support worm seeded spurge's growth without overstressing the young plant.
How do I know if worm seeded spurge is experiencing transplant shock?
Look for wilting, yellowing leaves, or slowed growth. Ensure proper care to help worm seeded spurge recover.
What should I do if worm seeded spurge wilts after transplanting?
Check for proper watering and soil drainage. Mulch around worm seeded spurge to retain moisture and moderate temperature.



