How to Transplant Grumichama?
Relocate grumichama during the revitalizing period of early to late spring, leveraging temperate conditions for root development. Choose a bright spot with soil that drains effectively. Careful management of the root system will ensure grumichama's vigorous progress.
What Preparations are Needed Before Transplanting Grumichama?
What is the Ideal Time for Transplanting Grumichama?
The perfect period to move grumichama is after the last frost, as the weather warms up. This time, usually from early spring to just before summer, provides the best conditions for grumichama. Transplanting grumichama during this window offers many benefits; the soil, soft from winter, is moist and easy for roots to spread. The mild climate helps young plants adjust without extreme temperatures. This season of new beginnings allows grumichama to establish its roots and enjoy the gentle sun, ensuring a strong start and future growth.
How Much Space Should You Leave Between Grumichama Plants?
Hello, gardener! For your grumichama, you'll want to give each plant ample room to develop. Aim to space them approximately 10-20 feet (3-6 meters) apart. This provides the roots sufficient space to spread without competing with nearby plants.
What is the Best Soil Mix for Grumichama Transplanting?
Ready to prepare the perfect bed? Grumichama thrives in well-draining, fertile soil. Begin by incorporating some quality compost or a balanced organic fertilizer to enrich your soil. A pH ranging from slightly acidic to neutral is ideal for your grumichama!
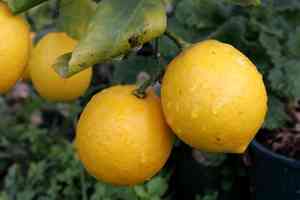
Where Should You Relocate Your Grumichama?
Sunlight is crucial for your grumichama! Select a bright location where the plant will receive full to partial sun exposure throughout the day. This will keep your grumichama thriving, healthy, and ready to produce delicious fruits in due course.
What Equipments Should You Prepare Before Transplantation Grumichama?
Gardening Gloves
To safeguard your hands while handling soil and plants.
Shovel or Spade
For digging up the plant and preparing the new planting site.
Pruning Shears
To trim any dead or excess growth.
Wheelbarrow
For moving the plant and soil.
Watering Can or Hose
To hydrate the plant before and after moving.
Mulch
To help maintain soil moisture and regulate root zone temperature.
Tarp or Burlap
To keep the soil around the plant's roots intact during relocation if necessary.
How Do You Remove Grumichama from the Soil?
How Do You Remove Grumichama from the Soil?
From Ground: Start by watering the grumichama plant to make the soil easier to manage. Use a shovel to carefully dig around the plant's edge, taking a generous amount of soil to protect the root system. Gently pry under the root ball and lift the plant from its spot.From Pot: Water the grumichama to ensure the roots are well-hydrated. Tilt the pot sideways and gently tap to loosen the soil and roots. Carefully ease the plant out, supporting the base and root ball, avoiding harsh pulling that could harm the roots.From Seedling Tray: Water the seedling tray to keep the roots moist. Carefully remove the grumichama by lifting from the stem's base with a spoon or small trowel, ensuring you retain as much of the root system as possible.
Step-by-Step Guide for Transplanting Grumichama
Prepare New Location
Dig a hole twice as wide and the same depth as the grumichama's root ball to ensure ample space for root expansion.
Inspect The Roots
Before planting, examine the roots. If they are circling or matted, gently separate them. If any roots are broken, prune them cleanly.
Place The Plant
Carefully position the grumichama in the prepared hole. The top of the root ball should be level with the ground surface.
Backfill The Hole
Slowly refill the hole with the excavated soil, gently firming it around the roots to eliminate air pockets.
Water Thoroughly
After planting, water the grumichama generously to settle the soil around the roots and remove any remaining air pockets.
Apply Mulch
Apply a 2-3 inch layer of mulch around the base of the grumichama, keeping it a few inches away from the stem to prevent rot.
How Do You Care For Grumichama After Transplanting?
Watering
Establish a consistent watering schedule, keeping the soil evenly moist to encourage root growth without over-saturating.
Observation
Regularly check the grumichama for signs of stress, such as yellowing leaves or wilting. These can indicate watering issues or disease.
Mulching
Replenish the mulch layer as needed to maintain moisture and temperature levels, and to suppress weed growth.
Pruning
As the grumichama becomes established, trim any dead or damaged branches to promote healthy development.
Support
If the grumichama shows signs of leaning or instability, provide support with stakes or ties, being careful not to harm the stem.
Troubleshooting Common Issues with Grumichama Transplantation.
When is the best time of year to transplant grumichama?
Move grumichama when the season transitions from winter's cold to the warmth of late spring.
How much space should I allocate for grumichama when planting?
Allow each grumichama ample room to thrive, typically 10-20 feet (3-6 meters) apart.
Why are my grumichama's leaves wilting after transplanting?
Post-transplant wilting can indicate shock. Ensure careful handling, sufficient watering, and minimal root disturbance.
What soil type is best for transplanting grumichama?
Utilize well-draining, fertile soil, enriching it with organic matter if necessary, to foster strong roots.
Does grumichama require deep planting when transplanting?
Not too deep; plant grumichama with the root-ball level with or slightly above the surrounding soil.
How should I water grumichama after transplanting?
Water thoroughly until settled, then regularly to maintain moist soil without waterlogging the roots.
Can I transplant grumichama in full sun?
Yes, grumichama flourishes in full sun, ensuring it receives ample light to aid in recovery post-transplant.
How do I handle grumichama's roots during transplanting?
Minimize disturbance to grumichama's roots, gently tease them if pot-bound, and ensure they spread out in the new location.
What should I do if grumichama shows transplant shock symptoms?
Keep the soil consistently moist, provide shade from intense sun, and avoid fertilizers until recovery is evident.
Can I use fertilizer immediately after transplanting grumichama?
Delay fertilizing until grumichama exhibits new growth; early fertilization can harm sensitive roots.


