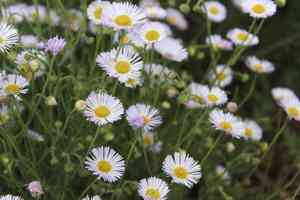
How to Transplant Chaparral fleabane?
Chaparral fleabane flourishes when transplanted between early and mid-spring. This schedule enables the plant to develop its root system prior to the arrival of hotter temperatures. Select a bright, adequately draining spot for superior outcomes. Verify that the soil possesses moderate fertility for peak development.
What Preparations are Needed Before Transplanting Chaparral Fleabane?
What is the Ideal Time for Transplanting Chaparral Fleabane?
The best time to move chaparral fleabane is from early to mid-spring. During this period, the ground is damp and temperatures are mild, which helps roots take hold. Spring transplanting allows chaparral fleabane the full growing season to adapt and flourish, leading to strong development and abundant flowers.
How Much Space Should You Leave Between Chaparral Fleabane Plants?
When relocating chaparral fleabane, position each plant 12-15 inches (30-38 cm) apart. This provides ample room for proper growth without competition for resources.
What is the Best Soil Mix for Chaparral Fleabane Transplanting?
Prepare well-draining soil, ideally a sandy loam mixture, for chaparral fleabane. Incorporate a balanced, all-purpose base fertilizer to enrich the soil, encouraging robust development.
Where Should You Relocate Your Chaparral Fleabane?
Chaparral fleabane thrives best in full sun. Select a garden spot that receives at least 6-8 hours of direct sunlight daily.
What Equipments Should You Prepare Before Transplantation Chaparral Fleabane?
Gardening Gloves
To safeguard your hands while handling soil and plants.
Trowel
To excavate holes for relocating chaparral fleabane.
Shovel
For lifting and moving larger specimens.
Watering Can
To hydrate the plant before and after its relocation.
Wheelbarrow
To transport the plant if it's sizable or if you have multiple plants.
Pruning Shears
To trim any damaged roots or foliage.
Stakes and Ties
To provide support if the plant becomes top-heavy.
How Do You Remove Chaparral Fleabane from the Soil?
How Do You Remove Chaparral Fleabane from the Soil?
From Ground: First, moisten the chaparral fleabane plant to dampen the soil. Next, dig a wide trench around the plant using a shovel or spade, ensuring the root ball remains intact. Carefully work the spade beneath the root ball to lift the plant from its original spot.From Pot: Ensure the soil in the pot is damp by watering it thoroughly an hour before removal. Gently tilt the pot and slide the chaparral fleabane plant out, supporting the stem's base and the root ball with your hands. If the plant is root-bound, carefully loosen the roots.From Seedling Tray: Water the seedling tray before removing chaparral fleabane. Use a trowel to gently lift each seedling, making sure to support the root ball. Be extra cautious not to harm the delicate roots during removal.
Step-by-Step Guide for Transplanting Chaparral Fleabane
Prepare the New Site
Choose a location with good drainage. Dig a hole that is twice as wide and as deep as the root ball.
Amend the Soil
Mix compost into the excavated soil to enrich it. This will help the plant establish quickly.
Transfer the Plant
Place the chaparral fleabane plant in the center of the hole, ensuring it sits at the same depth as it was previously. Backfill with the amended soil, pressing gently to eliminate air pockets.
Water Deeply
After transplanting, water thoroughly to help the soil settle around the roots.
Add Mulch
Apply a layer of mulch around the plant's base to retain moisture and suppress weeds.
How Do You Care For Chaparral Fleabane After Transplanting?
Watering
Keep the soil around the chaparral fleabane consistently moist, but not waterlogged, for the initial weeks post-transplant to encourage strong root development.
Pruning
Remove any damaged or dead leaves and stems to promote healthy growth.
Monitoring
Watch for any signs of transplant shock, such as wilting or yellowing foliage. If observed, provide extra care by watering and protecting the plant from harsh conditions.
Troubleshooting Common Issues with Chaparral Fleabane Transplantation.
When is the best time to transplant chaparral fleabane?
The optimal period to transplant chaparral fleabane is early to mid-spring.
What is the recommended spacing for chaparral fleabane?
Space chaparral fleabane 12-15 inches (30-38 cm) apart to allow for proper growth.
How to prepare the transplant site for chaparral fleabane?
Select a sunny location with well-drained soil and enrich with compost if needed.
How deep should I plant chaparral fleabane?
Plant chaparral fleabane at the same depth it was growing in its original container to prevent stress.
What should be done immediately after transplanting chaparral fleabane?
Water chaparral fleabane thoroughly right after transplanting to help the soil settle around the roots.
How often should chaparral fleabane be watered post-transplant?
Water chaparral fleabane regularly for the first few weeks until established, then decrease frequency.
What to do if chaparral fleabane shows signs of transplant shock?
Ensure chaparral fleabane receives sufficient water, and add mulch to retain moisture and regulate temperature.
Can I transplant chaparral fleabane during hot weather?
It's advisable to avoid transplanting chaparral fleabane in hot weather to minimize transplant shock.
Is it necessary to fertilize chaparral fleabane after transplanting?
Fertilize lightly with a balanced fertilizer once chaparral fleabane has established new growth.
How to prevent root damage when transplanting chaparral fleabane?
Handle the root ball gently and ensure it remains intact throughout the process.


