How to Transplant Seaside daisy?
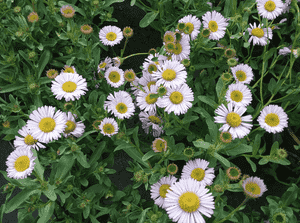
Seaside daisy flourishes most effectively following transplantation with the arrival of warm, growth-inducing conditions, particularly from early to mid-spring. Select a site featuring soil that drains efficiently and receives partial sunlight. Careful manipulation throughout this procedure is crucial for preserving the roots' soundness.
What Preparations are Needed Before Transplanting Seaside Daisy?
What is the Ideal Time for Transplanting Seaside Daisy?
The perfect time for relocating seaside daisy is at the start of spring's awakening or when the gentle warmth of mid-spring covers the garden. Placing seaside daisy into its new home during this period ensures roots establish in mild soils, energized by the season's soft heat. Choosing this season for transplanting allows seaside daisy to benefit from the full strength of the growing season, providing a supportive beginning and vigorous growth.
How Much Space Should You Leave Between Seaside Daisy Plants?
When getting ready to move your seaside daisy, aim for a distance of about 1-2 feet (30-60 cm) between each plant. This provides your seaside daisy ample room to grow and thrive without competing, promoting healthier development.
What is the Best Soil Mix for Seaside Daisy Transplanting?
Your seaside daisy prefers soil that drains well, so consider mixing some sand or perlite into your garden soil. A balanced, slow-release fertilizer blended into the soil before planting will offer an excellent nutrient foundation for your plant's growth.
Where Should You Relocate Your Seaside Daisy?
Select a spot that receives full sun to partial shade for your seaside daisy. This way, it will get enough sunlight for photosynthesis but won't be overly exposed during the hottest part of the day. Happy transplanting!
What Equipments Should You Prepare Before Transplantation Seaside Daisy?
Gardening Gloves
To shield your hands from dirt and minor injuries while working.
Shovel or Spade
To excavate the plant from its original spot and dig a hole in the new location.
Gardening Trowel
To be utilized for moving smaller plants or when a shovel is too large.
Garden Hose with Water
To hydrate the plant before and after its relocation.
Wheelbarrow or Bucket
To transport the plant from its initial position to the new site.
How Do You Remove Seaside Daisy from the Soil?
How Do You Remove Seaside Daisy from the Soil?
From Ground: To begin, gently water the soil around seaside daisy to moisten it. Next, dig around the plant using a shovel or spade, ensuring the root ball remains intact. Carefully slide the spade beneath the root ball and lift it.From Pot: Water the seaside daisy thoroughly to dampen the soil, which will make the plant easier to extract. Turn the pot sideways, hold the plant by its base, and gently pull it out.From Seedling Tray: Once the seedlings have developed at least two sets of true leaves and are manageable, they are ready for transplanting. Water the tray beforehand, then carefully remove each seedling by holding it by its leaves, taking care not to harm the stem or roots.
Step-by-Step Guide for Transplanting Seaside Daisy
Removal
Refer to the 'Removal Process' section above for detailed instructions on extracting seaside daisy from its current spot.
Transfer
Use a bucket or wheelbarrow to move the plant to its new location.
Placement
Dig a hole in the new spot that is twice as wide and the same depth as the root ball. Position seaside daisy in the hole, ensuring the top of the root ball is level with the soil surface.
Backfilling
Refill the hole with the original soil, being careful not to pile soil onto the plant's stem.
Watering
Water thoroughly after transplanting.
How Do You Care For Seaside Daisy After Transplanting?
Watering
Continue to keep the surrounding soil consistently moist for several weeks to help seaside daisy establish its roots. Avoid overwatering as this can lead to root rot.
Pruning
Trim any dead or damaged leaves to allow the plant to direct its energy towards new growth.
Mulching
Add a layer of mulch around the plant - keeping it away from the stem - to help retain soil moisture and reduce weed competition.
Monitoring
Keep an eye out for any signs of pests or disease that might affect your newly transplanted seaside daisy. Early detection and treatment can help save the plant.
Frost Protection
If frost is expected, cover seaside daisy with a horticultural fleece to protect it, as the plant will be vulnerable during the initial stages after transplanting.
Troubleshooting Common Issues with Seaside Daisy Transplantation.
When is the optimal time to transplant seaside daisy?
The best time to move seaside daisy is during 'S1-S2', as this ensures the plant can adapt to its new home before the growing season begins.
What is the suitable spacing between seaside daisy plants during transplanting?
When transplanting seaside daisy, maintain a distance of 1-2 feet (30-60 cm) between each plant. This spacing promotes healthy development and reduces competition for resources.
How do I prepare the soil before transplanting seaside daisy?
Prepare a nutrient-rich soil with good moisture retention. Loosen the soil to about 12 inches (30 cm) deep, incorporating compost for a strong start.
How should I handle the root ball of seaside daisy during transplantation?
Gently remove seaside daisy from its initial location, taking care not to harm the root ball. Keep as much soil around the roots as possible during the move.
What depth should seaside daisy be planted at when transplanting?
Plant seaside daisy at the same depth it was previously growing. If planted too deeply, the stem might rot; too shallowly, and the roots may dry out.
What is the appropriate watering routine after transplanting seaside daisy?
Water seaside daisy thoroughly immediately after transplanting to help settle the soil around the roots and lessen transplant shock. Then water regularly based on the weather, but avoid overwatering.
Can seaside daisy be pruned during or after transplanting?
After transplanting seaside daisy, prune lightly to maintain its shape and encourage bushier growth. However, do not hard prune it right after transplanting as it might add stress to the plant.
What to do if seaside daisy shows sign of wilting after transplantation?
If seaside daisy wilts after transplanting, it's typically due to transplant shock. Ensure it receives adequate water and consider shading it from intense sun for the first few days.
How can I promote faster root establishment after transplanting seaside daisy?
Applying a root stimulator fertilizer can encourage quicker root development in seaside daisy. Keep the plant well-watered, but be careful not to overwater, which can cause root rot.
What precaution should be taken to transplant seaside daisy in areas with pests or wildlife?
To protect seaside daisy from pests or wildlife, consider using physical barriers like fences or netting. Regularly monitor the plant and use organic pest control methods if necessary.



