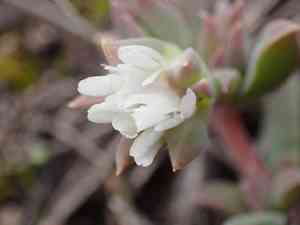
How to Transplant Seaside delosperma?
Seaside delosperma is best relocated during the early to mid-spring period or in mid-autumn, when temperatures are mild but not freezing. This plant flourishes in bright, adequately drained environments. Make certain the substrate is aerated to facilitate rapid root development.
What Preparations are Needed Before Transplanting Seaside Delosperma?
What is the Ideal Time for Transplanting Seaside Delosperma?
The best times for relocating seaside delosperma are early to mid-spring and mid-autumn. Moving them during these periods ensures mild temperatures and consistent moisture, allowing the perennial to establish roots before summer or winter extremes. This timing promotes robust growth and minimizes plant stress.
How Much Space Should You Leave Between Seaside Delosperma Plants?
For transplanting, it's best to space seaside delosperma plants approximately 12-18 inches (30-45 cm) apart. This provides ample room for them to spread and grow without overcrowding.
What is the Best Soil Mix for Seaside Delosperma Transplanting?
Prepare your soil by incorporating well-draining sandy soil and a small amount of compost. This helps keep the roots of seaside delosperma healthy and supplied with the necessary nutrients for thriving.
Where Should You Relocate Your Seaside Delosperma?
Seaside delosperma thrives in sunlight! Select a sunny location in your garden where the plant can receive at least 6 hours of direct sunlight daily.
What Equipments Should You Prepare Before Transplantation Seaside Delosperma?
Gardening Gloves
To safeguard your hands while handling soil and plants.
Hand Trowel
For excavating small holes and working with soil around the plant.
Shovel or Spade
For digging the plant from its original spot and preparing the new location.
Watering Can or Hose
To hydrate the plant before and after relocation.
Wheelbarrow
To move the plant if it's large or if the distance is considerable.
Pruning Shears
For trimming any damaged roots or stems.
How Do You Remove Seaside Delosperma from the Soil?
How Do You Remove Seaside Delosperma from the Soil?
From Ground: First, water the seaside delosperma plant to moisten the soil. Then, dig a wide trench around the plant using a shovel or spade, ensuring the plant's root ball remains intact. Carefully work the spade under the root ball to lift the plant from its original location.From Pot: Start by watering the seaside delosperma plant thoroughly. Gently turn the pot on its side and tap the bottom to loosen the root ball. Carefully slide the plant out, supporting the base to avoid damaging the roots.From Seedling Tray: Water the seaside delosperma seedlings before removing. Use a hand trowel to gently lift the seedlings, ensuring you scoop out the entire root structure with the soil to avoid root damage.
Step-by-Step Guide for Transplanting Seaside Delosperma
Prepare the New Site
Choose a location with adequate sunlight and room for your seaside delosperma plant to reach its full size. Ensure the soil is properly prepared by loosening it and adding any necessary amendments.
Dig the Hole
Excavate a hole in the new location that is twice as wide and equally deep as the seaside delosperma's root ball.
Lift the Plant
Carefully lift the seaside delosperma plant from its initial spot, keeping the root ball as intact as possible.
Place the Plant
Position the seaside delosperma plant in the new hole, making sure the top of the root ball is level with the surrounding soil.
Backfill the Hole
Fill the hole with soil, gently firming it around the plant to eliminate air pockets.
Water Thoroughly
Water the seaside delosperma plant immediately after transplanting to help settle the soil and reduce transplant shock.
Mulch (Optional)
Apply a layer of mulch around the base of the seaside delosperma plant to retain moisture and regulate soil temperature.
How Do You Care For Seaside Delosperma After Transplanting?
Watering
Keep the soil around the seaside delosperma consistently moist, but not waterlogged, for the first few weeks after transplanting to help establish strong roots.
Monitoring Growth
Regularly check the seaside delosperma for signs of stress or transplant shock, such as wilting or yellowing leaves, and adjust care accordingly.
Weed Control
Keep the area around the seaside delosperma free from weeds which can compete for water and nutrients.
Protection from Pests
Keep an eye out for pests and take necessary measures to protect the seaside delosperma plant from any potential damage.
Troubleshooting Common Issues with Seaside Delosperma Transplantation.
When is the best time to transplant seaside delosperma?
The best times to transplant seaside delosperma are early spring, mid spring, and mid fall.
How much space should I leave between seaside delosperma plants?
Leave 12-18 inches (30-45 cm) of space between each seaside delosperma plant for optimal growth.
What's the ideal soil type for seaside delosperma?
Seaside delosperma thrives in well-draining sandy or loamy soil. Avoid heavy clay soils.
How do I prepare the planting site for seaside delosperma?
Loosen the soil to a depth of 8 inches (20 cm) and mix in compost.
Should I water seaside delosperma immediately after transplanting?
Yes, water thoroughly right after transplanting to help establish roots.
How can I prevent transplant shock in seaside delosperma?
Transplant during the cooler parts of the day and water well to prevent stress.
What kind of light does seaside delosperma need?
Seaside delosperma prefers full sun but can tolerate partial shade in hotter climates.
How deep should I plant seaside delosperma?
Plant seaside delosperma at the same depth it was in its original container to avoid stress.
Can I mulch around seaside delosperma after transplanting?
Yes, mulch around seaside delosperma with organic material to retain moisture and suppress weeds.
How often should I water seaside delosperma after transplanting?
Water regularly for the first few weeks until the plant is established; then reduce frequency.


