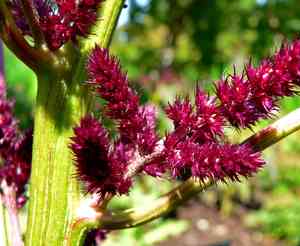
How to Transplant Shrubby deeringia?
Relocate shrubby deeringia during the pleasant temperatures of mid-spring, once the ground is amenable. Select a bright area featuring soil that drains effectively. Careful handling during the transfer guarantees this perennial flourishes in its new setting.
What Preparations are Needed Before Transplanting Shrubby Deeringia?
What is the Ideal Time for Transplanting Shrubby Deeringia?
The best time to move shrubby deeringia is from the start of early spring until the end of late spring. This period offers mild temperatures and plenty of rain, creating perfect conditions for roots to settle into new soil. Transplanting shrubby deeringia then takes advantage of the season's supportive environment, boosting root growth and plant vitality, setting it up for strong development all year.
How Much Space Should You Leave Between Shrubby Deeringia Plants?
When preparing to relocate your shrubby deeringia, position them approximately 24-36 inches (61-91 cm) apart. This provides sufficient room for them to thrive and display their beauty.
What is the Best Soil Mix for Shrubby Deeringia Transplanting?
For shrubby deeringia, ensure your soil is enriched with abundant organic material! A well-draining loam is perfect. Don't forget a balanced slow-release fertilizer to give them a great start.
Where Should You Relocate Your Shrubby Deeringia?
Choose a sunny location in your garden for shrubby deeringia, receiving at least 6 hours of sunlight. They will absorb the sun's energy and reward you with robust growth!
What Equipments Should You Prepare Before Transplantation Shrubby Deeringia?
Gardening Gloves
To safeguard your hands while handling soil and the plant.
Shovel or Spade
To excavate the plant from its original spot without harming the root ball.
Garden Fork
To loosen the earth and assist in carefully lifting the plant, if required.
Watering Can or Hose
To hydrate the plant before and after its relocation.
Wheelbarrow or Garden Cart
To move the plant and soil without causing damage to either.
Pruning Shears
To trim any damaged or overly long roots or branches prior to transplanting.
How Do You Remove Shrubby Deeringia from the Soil?
How Do You Remove Shrubby Deeringia from the Soil?
From Ground: First, water the shrubby deeringia plant to moisten the soil, making it easier to manage. Next, use a shovel or spade to dig a wide circle around the plant, preserving the root ball's integrity. Then, work the shovel beneath the root ball to carefully lift the plant from the ground.From Pot: Water the shrubby deeringia to dampen the soil, then turn the pot on its side and gently tap the edges and bottom to loosen the root ball. Carefully slide the plant out while supporting its base and stems.From Seedling Tray: Water the seedlings to keep the soil attached to the roots. Use a spoon or a small gardening tool to lift the seedling from the tray without disturbing the roots.
Step-by-Step Guide for Transplanting Shrubby Deeringia
Plant Health Check
Examine the shrubby deeringia for any indications of illness or pests before starting the transplant to prevent spreading problems to the new site.
Pre-Transplant Watering
Water the shrubby deeringia thoroughly the day before transplanting to lessen transplant shock and ensure the roots are well-hydrated.
Root Ball Preservation
Carefully dig around and beneath the root ball of the shrubby deeringia, keeping as much soil with the roots as possible to protect them during the move.
Transportation
Utilize a wheelbarrow or garden cart to move the shrubby deeringia to its new location to minimize stress and harm to the plant.
Planting Hole Preparation
Dig a hole twice the width of the root ball and the same depth to prevent the plant from being planted too deeply. Add some soil back if the hole is excessively deep.
Positioning the Plant
Place the shrubby deeringia in the center of the prepared hole. Ensure it stands upright and at the same depth it was previously growing.
Soil Backfilling
Gently refill the hole with soil around the root ball without compacting it too much, which could harm the roots or stem.
Watering After Planting
Water the shrubby deeringia generously immediately after transplanting to settle the soil and remove air pockets.
Mulching
Apply a layer of mulch around the base of the shrubby deeringia (without touching the stem) to retain moisture and keep the roots cool.
Initial Support
If the shrubby deeringia is tall or top-heavy, consider staking it to provide support until the roots establish themselves in their new environment.
How Do You Care For Shrubby Deeringia After Transplanting?
Monitoring
Observe the shrubby deeringia closely for the initial few weeks for any signs of stress, such as wilting or yellowing leaves, and take appropriate action if needed.
Regular Watering
Maintain consistent moisture in the soil, especially during dry periods, as the shrubby deeringia develops its root system. Avoid excessive watering, which can lead to root rot.
Pruning
Trim any dead or damaged branches after transplant, which will encourage new growth and help the shrubby deeringia recover from transplant shock.
Protection
Provide shelter from strong winds or accidental damage as the shrubby deeringia adapts to its new location by placing physical barriers if necessary.
Troubleshooting Common Issues with Shrubby Deeringia Transplantation.
How do I choose the best time to transplant shrubby deeringia?
For successful transplanting, aim for the period of active growth, typically from early to late spring.
What's the ideal distance between shrubby deeringia when transplanting?
Space them optimally at 24-36 inches (61-91 cm) apart to provide ample room for growth.
Why are my shrubby deeringia plants wilting after transplanting?
Wilting could be due to transplant shock. Ensure adequate watering and avoid full sun initially.
How deep should I dig the hole for shrubby deeringia transplanting?
Dig a hole as deep as the root ball and twice as wide to encourage growth.
Can I transplant shrubby deeringia during the summer?
It's best to transplant in cooler months to avoid stress from heat, early to late spring is ideal.
Why isn't my shrubby deeringia thriving post-transplant?
Check for proper soil conditions, correct spacing, and sufficient watering for recovery.
How much should I water shrubby deeringia after transplanting?
Water thoroughly after transplanting, then maintain consistent moisture without overwatering.
What type of soil is best for transplanting shrubby deeringia?
Use well-draining soil rich in organic matter to promote healthy root growth.
How can I protect my transplanted shrubby deeringia from pests?
Monitor regularly and consider using non-toxic methods or insecticidal soap if needed.
Is feeding shrubby deeringia necessary after transplanting?
Wait a few weeks post-transplant before applying a balanced, slow-release fertilizer to aid establishment.


