How to Transplant Miniature flatsedge?
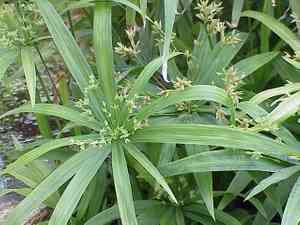
Miniature flatsedge flourishes optimally when relocated during the nascent warmth of early to mid-spring, facilitating robust establishment. Preferred sites feature ample sunlight and damp, adequately draining earth. Evaluate a partially shaded position if direct sunlight is unattainable.
What Preparations are Needed Before Transplanting Miniature Flatsedge?
What is the Ideal Time for Transplanting Miniature Flatsedge?
Miniature flatsedge, a perennial, benefits from being moved in early to mid-spring. This timing allows the plant to establish its root system before the summer's active growth phase. Transplanting during this period promotes optimal development and increased hardiness, resulting in a healthier plant better adapted to its new surroundings.
How Much Space Should You Leave Between Miniature Flatsedge Plants?
When relocating miniature flatsedge, ensure each plant is spaced 18-24 inches (45-60 cm) apart. This provides ample room for growth and prevents competition for resources.
What is the Best Soil Mix for Miniature Flatsedge Transplanting?
For miniature flatsedge, select a well-draining soil rich in organic material. Preparing the soil with a foundational fertilizer, such as compost or a balanced 10-10-10 blend, can supply essential nutrients.
Where Should You Relocate Your Miniature Flatsedge?
Position miniature flatsedge in an area that receives full sun to partial shade. This ensures the plant gets sufficient light for robust growth while being protected from harsh conditions.
What Equipments Should You Prepare Before Transplantation Miniature Flatsedge?
Gardening Gloves
To safeguard your hands while handling soil and plants.
Shovel or Spade
For excavating the plant from its initial spot and preparing the new planting hole.
Garden Trowel
For more precise digging and lifting of smaller specimens.
Watering Can or Hose
To hydrate the plant and its new location.
Wheelbarrow or Plant Tray
To move the plant to its new site if necessary.
Compost or Organic Matter
To enrich the soil in the new area and aid in the plant's establishment.
How Do You Remove Miniature Flatsedge from the Soil?
How Do You Remove Miniature Flatsedge from the Soil?
From Ground: First, moisten the miniature flatsedge plant to dampen the soil. Then, dig a wide trench around the plant using a shovel or spade, ensuring the plant's root ball remains intact. Carefully work the spade beneath the root ball to lift the plant from its original position.From Pot: Thoroughly water the miniature flatsedge plant. Gently tilt the pot and tap its sides to loosen the soil. Slide the plant out while supporting the root ball with your hands to prevent damage.From Seedling Tray: Water the miniature flatsedge seedlings well. Use a garden trowel to carefully lift each seedling, making sure to include the entire root system. Handle seedlings gently to avoid harming them.
Step-by-Step Guide for Transplanting Miniature Flatsedge
Site Preparation
Prepare the new location by digging a hole that is twice the width of the miniature flatsedge plant's root ball and of equal depth.
Adding Soil Amendments
Incorporate compost or organic matter into the excavated soil to enhance nutrient content and drainage.
Placing the Plant
Gently position the miniature flatsedge plant in the hole, ensuring it is at the same depth as it was in its original container. Backfill around the plant with the amended soil, pressing down lightly to eliminate air pockets.
Watering In
Thoroughly water the newly transplanted miniature flatsedge plant to help the soil settle and establish good contact with the roots.
Mulching
Apply a layer of mulch around the plant's base to help retain moisture and suppress weeds. Keep the mulch a few inches away from the plant stem.
How Do You Care For Miniature Flatsedge After Transplanting?
Watering
Keep the soil around the miniature flatsedge consistently moist, but not waterlogged, for the initial weeks after transplanting to encourage strong root development.
Monitoring
Regularly inspect the miniature flatsedge plant for signs of stress such as wilting or yellowing foliage, and adjust care as necessary.
Support
If required, provide support to the miniature flatsedge plant using stakes or other aids to help it remain upright and stable.
Troubleshooting Common Issues with Miniature Flatsedge Transplantation.
When is the best time to transplant miniature flatsedge?
Early to mid-spring is optimal for transplanting miniature flatsedge for best growth and establishment.
How far apart should I space miniature flatsedge plants?
Space miniature flatsedge plants 18-24 inches (45-60 cm) apart to ensure adequate room for growth.
How do I prepare the soil for miniature flatsedge?
Ensure well-draining soil with ample organic matter. Loosen soil to a depth of 12 inches (30 cm).
What should I do if miniature flatsedge shows signs of transplant shock?
Water consistently, initially avoid direct sunlight, and consider using a diluted seaweed extract.
How often should newly transplanted miniature flatsedge be watered?
Water miniature flatsedge every few days for the first few weeks, ensuring the soil stays moist but not saturated.
Why are the leaves of my transplanted miniature flatsedge turning yellow?
Yellow leaves often indicate excessive watering or poor drainage. Adjust irrigation schedule and improve soil drainage.
Can I transplant miniature flatsedge in full sun?
Yes, miniature flatsedge thrives in full sun. Ensure plants are gradually accustomed to sunlight to prevent scorching.
What should I do if miniature flatsedge is not growing after transplanting?
Check soil quality, watering practices, and sunlight exposure. Consider applying a balanced fertilizer to stimulate growth.
How deep should miniature flatsedge be planted?
Plant miniature flatsedge at the same depth it was in its original container, typically 2-3 inches (5-7.5 cm) deep.
Is it necessary to trim miniature flatsedge before transplanting?
Trimming is not essential, but removing dead or damaged leaves can help the plant focus on new growth.



