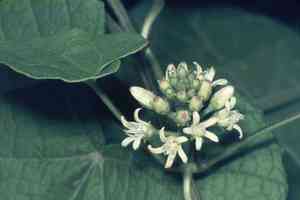
How to Transplant Honeyvine?
The arrival of warmer weather, prior to the peak of garden activity, establishes an ideal period for transplanting honeyvine. Select a location that receives abundant sunlight and possesses soil with good drainage. Careful management of the root system at this time encourages vigorous growth throughout the season.
Essential Preparations Before Relocating Honeyvine
Optimal Timing for Honeyvine Relocation
The gentle warmth of early spring offers the perfect window to settle honeyvine into your garden. The mild temperatures and extended daylight hours during this period create an ideal setting for root establishment, allowing honeyvine to synchronize its growth with nature's awakening. Furthermore, transplanting honeyvine at this time minimizes plant stress, as the cooler, moister soil helps retain hydration, reducing the risk of transplant shock. By introducing honeyvine to your outdoor space as spring unfolds, you provide this resilient perennial a head start for a season of vigorous development.
Recommended Spacing Between Honeyvine Plants
For honeyvine, aim to position your plants approximately 2-3 feet (0.6-0.9 meters) apart. This provides ample room for their development. It's crucial to avoid overcrowding to ensure they have access to essential nutrients, proper air circulation, and sufficient sunlight.
Ideal Soil Mixture for Honeyvine Transplanting
Before relocating honeyvine, prepare a soil that drains effectively. Incorporate organic matter or compost to enhance soil structure and fertility. Additionally, apply a slow-release, all-purpose fertilizer prior to placing honeyvine into the ground.
Selecting a New Location for Your Honeyvine
Regarding placement, honeyvine appreciates sunlight but also benefits from some partial shade. Choose a garden spot that receives full sun for several hours daily but is shaded during the most intense sun periods. This helps honeyvine thrive without becoming overheated.
Tools Required for Honeyvine Transplantation
Gardening Gloves
To safeguard your hands while handling soil and plants, and to prevent contact with the milky sap that honeyvine may exude, which can irritate the skin.
Garden Trowel
An excellent tool for excavating smaller holes for plants or seedlings. This small hand implement is typically used to loosen soil and remove weeds. Ideal for transplanting honeyvine.
Shovel
To assist in digging the hole in the garden where you will relocate the honeyvine plant, and to aid in its removal from its original spot.
Watering Can
For hydrating the honeyvine plant both before and after its move.
Garden Fork
Useful for breaking up compacted soil to ensure good aeration for the honeyvineâs roots to grow properly.
Wheelbarrow
To facilitate the transport of the plant and soil when moving the honeyvine to its new site.
Pruning Shears
For trimming the honeyvine plant as needed, both before and after transplanting.
Method for Extracting Honeyvine from the Soil
Method for Extracting Honeyvine from the Soil
From Ground: First, water the honeyvine plant to moisten the soil, which will simplify the removal process. Then, dig around the plant, ensuring you maintain a safe distance from the stem. Begin with a shallow trench and gradually increase its depth, being careful to stay well away from the main root ball to prevent damage. Slowly work the spade beneath the root ball and very gently lift the entire plant from its initial location.From Pot: Start by thoroughly watering the plant, as this will make it easier to slide the root ball out of the container. Place your fingers on the soil surface, forming a fan shape around the stem, then invert the pot. Gently tug at the base of the honeyvine plant, and it should slide out. It's crucial not to yank the plant, as this can harm the roots.Seedling Tray: Ensure the honeyvine seedling is damp before transplanting; this will keep the roots intact during the move. Using a dibber or a similar tool, create a hole in the compost and carefully lift the seedling from the tray. Handle the seedling by its leaves, not by the stem, as it is easily damaged.
Step-by-Step Guide for Relocating Honeyvine
Site Preparation
Excavate a hole in the prepared soil that is twice the width and the same depth as the honeyvine plant's root ball. Break up the soil walls of the hole with your hands or tools to facilitate easy root penetration.
Plant Placement
Position the honeyvine plant into the hole, ensuring the top of the root ball is level with the surrounding soil surface. Carefully backfill around the root ball with soil, gently firming it as you proceed.
Watering
Following transplantation, water the honeyvine plant to settle the soil around its roots. Avoid excessive watering, as this can lead to root rot.
Acclimatization
Allow the plant time to adjust to its new environment. It may take several weeks for the honeyvine plant to establish its roots and begin new growth.
Post-Transplantation Care for Honeyvine
Observation
Keep a close watch on your newly transplanted honeyvine plant. It may require some time to adapt to its new setting.
Watering
Water the honeyvine plant regularly, but remember that overwatering can be detrimental. It's best to keep the soil consistently moist.
Pruning
Do not rush to prune the honeyvine plant immediately after transplanting. Allow it some time to develop new growth, after which you can begin pruning as appropriate.
Protection
Safeguard your honeyvine from pests or animals that might cause damage by utilizing organic pesticides or installing fencing.
Addressing Common Issues During Honeyvine Transplantation
What is the optimal season for transplanting honeyvine?
Honeyvine thrives when transplanted during its peak season, S1. This is the ideal period to ensure successful growth.
Is there a specific distance to maintain between each honeyvine during transplantation?
Yes, for optimal growth, maintain a spacing of 2-3 feet (0.6 - 0.9 meters) between each honeyvine.
Do I need to prepare the soil before transplanting honeyvine?
Yes, preparing the soil by loosening it can promote seamless honeyvine growth. Also, ensure it is well-drained.
Should I water honeyvine immediately after transplanting?
Yes, watering honeyvine immediately after transplanting aids in root establishment. However, avoid over-watering and maintain moist, not soggy, soil.
Does the size of the hole matter during transplantation of honeyvine?
Absolutely! The hole should comfortably accommodate honeyvine's root ball. Typically, it should be double the width and equal to the depth of the root ball.
Should I prune honeyvine after transplanting?
No, pruning right after transplanting can induce stress. Allow honeyvine to establish itself in the new location before pruning.
Can honeyvine be transplanted in any kind of container?
While honeyvine is quite adaptable, ensure the container has drainage holes and is sufficiently large to support its growth.
Does honeyvine need fertilizing post-transplantation?
While not immediately essential, introducing a slow-release fertilizer a few weeks after transplantation can encourage healthier and more robust honeyvine growth.
How long does it take for honeyvine to establish after transplantation?
Honeyvine typically requires a few weeks to establish after transplantation. However, the duration may vary based on prevailing weather conditions.
What should I do if honeyvine's leaves turn yellow post-transplantation?
Yellowing may indicate over-watering or a nutrient deficiency. Reduce watering frequency and consider adding some nutritive soil amendments if necessary.


