How to Transplant Malabar gourd?
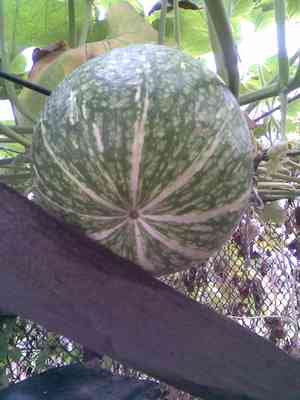
The most favorable period for relocating malabar gourd is from the beginning to the middle of spring, capitalizing on the moderate warmth for vigorous development. Select a location bathed in sunlight with fertile earth. Only disrupt the root system if it is constrained by the container, to foster an abundant yield.
Essential Preparations Before Relocating Malabar Gourd?
Optimal Timing for Malabar Gourd Relocation?
Early to mid-spring offers an ideal window for moving malabar gourd. This period leverages warming soil and stable weather, promoting strong root establishment. It also allows malabar gourd to maximize the growing season, enhancing growth and yield. A friendly tip: Planting malabar gourd during this time ensures a vigorous start to its life cycle!
Recommended Spacing Between Malabar Gourd Plants?
Proper spacing for malabar gourd is critical. Ideally, position each plant approximately 4-6 feet (1.2 - 1.8 meters) apart. This ensures ample room for growth without resource competition.
Best Soil Blend for Malabar Gourd Relocation?
For malabar gourd to flourish, utilize rich, well-drained soil with a pH between 6.0-6.8. Prior to planting, enrich the ground with a foundational fertilizer like compost. This supplies vital nutrients and stimulates plant development.
Optimal Location for Your Malabar Gourd?
Selecting a sunny spot in your garden for malabar gourd is crucial. Ensure the area receives at least six hours of direct sunlight daily. Sufficient sunlight will boost its growth and guarantee a healthy existence.
Necessary Tools for Malabar Gourd Transplantation?
Gardening Gloves
To safeguard your hands when handling the plant and soil.
Spade or Shovel
An essential implement for digging holes and carefully extracting the malabar gourd plant from its original spot without harming its root system.
Trowel
Facilitates the transplanting process, especially when dealing with young plants or smaller specimens.
Watering Can
Required for hydrating the malabar gourd plant after moving it to a new location.
Mulch
To help the soil retain moisture and regulate its temperature post-transplantation.
Gardening Scissors or Pruners
For removing any dead, diseased, or undesirable parts of the malabar gourd plant.
How to Extract Malabar Gourd from the Soil?
How to Extract Malabar Gourd from the Soil?
From Ground: First, ensure the soil around the malabar gourd plant is moist, not saturated. Loosen the soil around the plant using a shovel or spade, taking care not to damage the root ball. Once the soil is sufficiently loose, gently lift the plant, keeping the root system intact.From Pot: Before removing the malabar gourd plant from a container, water it thoroughly. Turn the pot on its side, hold the plant gently by its base, and tap the pot's rim against a firm surface. The malabar gourd plant should slide out with the soil and roots as one unit.From Seedling Tray: If your malabar gourd plant is in a seedling tray, water it well. Using a gardening trowel, carefully scoop out each seedling without disturbing the others. Ensure each seedling retains its surrounding soil along with the roots.
Step-by-Step Guide for Relocating Malabar Gourd
Preparation
Prepare the new planting site before extracting the malabar gourd plant from its current location. The new hole should be twice the width of the malabar gourd plant's root ball and of equal depth.
Removal
Depending on where your malabar gourd plant is currently situated (in the ground, a pot, or a seedling tray), follow the appropriate removal procedure.
Replanting
Gently place the malabar gourd plant into the new hole, ensuring the plant's crown is level with or slightly below the ground surface.
Backfilling
Refill the hole with soil, gently firming it around the base of the malabar gourd plant.
Watering
Water the malabar gourd plant thoroughly immediately after transplanting, being careful not to overwater.
Post-Transplantation Care for Malabar Gourd?
Watering
After relocation, the malabar gourd plant requires consistent watering. Keep the soil uniformly moist but never waterlogged. Adjust frequency based on current weather conditions.
Pruning
Trim the malabar gourd plant as needed. Remove any dead, diseased, or unwanted growth to redirect the plant's energy towards new development.
Mulching
Apply mulch around the base of the malabar gourd plant to help the soil retain moisture and maintain a stable temperature.
Monitoring
Regularly inspect the malabar gourd plant for any indications of stress or illness. Early detection is crucial for the plant's successful recovery and growth.
Addressing Common Malabar Gourd Transplantation Issues.
When is the best time to move malabar gourd?
The optimal periods to transplant malabar gourd are during S1 and S2 season. This allows it to establish itself before extreme heat or cold arrives.
How much space should I leave between each malabar gourd when moving them?
For malabar gourd, it's advisable to maintain approximately 4-6 feet (1.2-1.8 meters) between each plant. This provides ample room for growth and spreading.
What's the ideal way to prepare the soil for malabar gourd relocation?
Typically, malabar gourd thrives in well-drained soil rich in organic matter. Dig the soil about 10 inches (25 cm) deep and incorporate compost or manure for enrichment.
What common issues should I avoid when transplanting malabar gourd?
Avoid planting malabar gourd in waterlogged soil to prevent root rot. Ensure good air circulation to deter fungal diseases. Be cautious not to damage the root ball.
How should I water malabar gourd after it's been moved?
After transplanting, water malabar gourd deeply to settle the soil around its roots. Subsequently, maintain consistent moisture, but avoid overwatering to prevent root rot.
What kind of sun exposure does malabar gourd need after transplantation?
Malabar gourd prefers full sun exposure post-transplantation for vigorous growth. However, in extremely hot regions, some afternoon shade can be beneficial.
How should I handle malabar gourd seedlings during transplantation?
Be very gentle when handling malabar gourd seedlings. Avoid touching the stem or root; hold them by the leaves and place them into the prepared hole.
Should I fertilize malabar gourd after it's been transplanted?
Yes, malabar gourd will benefit from a slow-release, balanced fertilizer after transplanting. Follow the package instructions for application rates.
What if the leaves of my transplanted malabar gourd wilt?
Wilting after transplant is common, but if it persists, review the watering schedule and sun exposure. Your malabar gourd might be experiencing transplant shock; consider using root stimulators.
Why are the leaves of my transplanted malabar gourd turning yellow?
Yellow leaves can indicate overwatering or nutrient deficiency. Ensure that malabar gourd is not sitting in soggy soil, and use a balanced fertilizer to improve its health.



