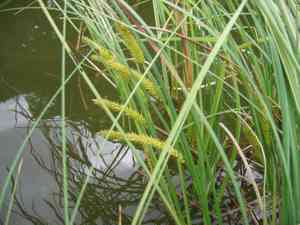
How to Transplant Beaked sedge?
Relocate beaked sedge during the transitional periods, when moderate conditions facilitate root development without severe fluctuations. Select a damp, partially shaded spot to replicate its native marsh environment. Carefully place beaked sedge in its new position, allowing sufficient room for expansion.
What Preparations are Needed Before Transplanting Beaked Sedge?
What is the Ideal Time for Transplanting Beaked Sedge?
The optimal period for relocating beaked sedge is during mild warming conditions, from the initial thaw of frost to the emergence of blossoms, or as foliage begins to fall in autumn. Moving beaked sedge at these times ensures comfortable establishment without the strain of extreme weather. Witness the delight as beaked sedge flourishes, rooting itself in harmony with nature's nurturing cycle, poised for vigorous growth.
How Much Space Should You Leave Between Beaked Sedge Plants?
When moving beaked sedge, aim for a separation of approximately 6-12 inches (15-30 cm) between plants. This provides ample room for each to thrive without becoming overcrowded.
What is the Best Soil Mix for Beaked Sedge Transplanting?
Prepare your garden with damp, well-draining soil abundant in organic material. A small amount of compost serves as an excellent base fertilizer to give beaked sedge a strong start!
Where Should You Relocate Your Beaked Sedge?
Select a location for beaked sedge that receives partial shade. They appreciate some sunlight but perform best away from the intensity of direct, midday sun. A spot mimicking the filtered light of their natural environment is perfect.
What Equipments Should You Prepare Before Transplantation Beaked Sedge?
Gardening Gloves
To safeguard your hands while excavating and handling the beaked sedge.
Spade or Shovel
For digging around and lifting the beaked sedge from its current spot.
Garden Fork
To loosen the soil and assist in lifting the root ball without causing harm.
Watering Can or Hose
For hydrating the beaked sedge prior to and following its relocation.
Wheelbarrow or Garden Cart
To move the beaked sedge to its new site without damage.
Mulch
To aid in regulating soil moisture and temperature post-transplant.
How Do You Remove Beaked Sedge from the Soil?
How Do You Remove Beaked Sedge from the Soil?
From Ground: First, moisten the beaked sedge to dampen the soil. Use a spade to dig a wide circle around the plant, ensuring the root ball remains intact. Carefully insert the spade beneath the root ball to lift the beaked sedge from the ground.From Pot: Water the beaked sedge and gently tap the pot's sides to loosen the soil. Tilt the pot sideways and carefully slide the plant out while supporting the root ball to prevent breakage.From Seedling Tray: Moisten the soil in the tray. Gently press from the cell's bottom to push the beaked sedge's root ball out. Handle the seedling by its root ball to avoid damage.
Step-by-Step Guide for Transplanting Beaked Sedge
Preparation
Before extracting the beaked sedge, prepare the new planting area by loosening the soil and digging a hole twice as wide and as deep as the root ball.
Removal
Follow the appropriate removal procedure for taking your beaked sedge from its original location, being mindful of its root system.
Transplanting
Position the beaked sedge in the center of the new hole. The top of the root ball should be level with the surrounding ground to ensure proper growth conditions.
Filling In
Gently backfill the hole with soil, firming it in place to eliminate air pockets. Water thoroughly to settle the soil around the root ball.
Stabilization
If the beaked sedge is particularly tall or top-heavy, use plant supports to stabilize it until its roots have had a chance to grow and establish.
How Do You Care For Beaked Sedge After Transplanting?
Watering
After transplanting, water the beaked sedge thoroughly, then apply a layer of mulch around its base to retain moisture.
Monitoring
Keep a close watch on the beaked sedge for signs of stress like wilting or yellowing leaves, and adjust care as needed.
Support
Regularly check any stakes or supports to ensure they are effective and not harming the beaked sedge.
Pruning
If necessary, trim any damaged or dead leaves to allow the beaked sedge to focus its energy on new growth.
Troubleshooting Common Issues with Beaked Sedge Transplantation.
How do I know when it's the best time to transplant beaked sedge?
Relocate beaked sedge during the ideal periods of early spring to late spring or from late fall to early winter for optimal root establishment.
What is the recommended spacing for beaked sedge when transplanting?
Allow a comfortable distance of 6-12 inches (15-30 cm) between beaked sedge plants to enable them to spread and flourish.
What should I do if beaked sedge's leaves wilt after transplanting?
Gently assist them by ensuring sufficient water and protection from intense sun; they may simply require time to adapt.
Can I transplant beaked sedge during the summer?
It's not advisable; intense heat can stress beaked sedge. Adhere to the milder temperatures of early spring through late spring or late fall to early winter.
Why are my transplanted beaked sedge plants not growing well?
Verify compatibility with soil conditions, light, water, and spacing. Harmonizing these factors can greatly help beaked sedge settle in.
How do I prepare the soil before transplanting beaked sedge?
Welcome beaked sedge by loosening the soil and enriching it with organic matter for a comfortable new home.
How deep should I plant beaked sedge's roots during transplanting?
Place beaked sedge's roots snugly at the same depth they were previously, as if they haven't been moved!
What's the best way to water beaked sedge after transplanting?
Provide beaked sedge with ample moisture, keeping the soil consistently damp but not waterlogged to help roots take hold.
Should I use fertilizer after transplanting beaked sedge?
Patience is key â allow beaked sedge time to settle before applying fertilizer. If necessary, use sparingly a few weeks post-transplant.
The leaves of beaked sedge are turning yellow post-transplant, why?
Don't worry! This might just be beaked sedge's temporary reaction to transplant shock. Continue its care and observe its progress.


