How to Transplant Dirty socks?
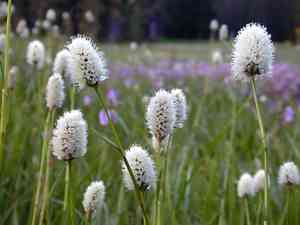
For dirty socks, the ideal period for relocation is during early to mid-spring, enabling the plant to settle prior to the warmer season. Select a spot offering partial shade and soil that drains effectively for optimal outcomes.
Essential Preparations Before Relocating Dirty Socks?
Optimal Timing for Relocating Dirty Socks?
The ideal period for moving dirty socks, a perennial, is in early to mid-spring. This timeframe offers mild temperatures and increased rainfall, fostering strong root development and establishment. Relocating dirty socks during this season allows the plant to adapt and strengthen before the intense summer heat, ensuring its long-term health and vigor.
Recommended Spacing Between Dirty Socks Plants?
Position each dirty socks plant approximately 12-18 inches (30-46 cm) apart to guarantee ample growth space without resource competition.
Ideal Soil Blend for Dirty Socks Relocation?
Utilize well-draining soil enriched with organic material. A foundational fertilizer rich in phosphorus will aid dirty socks in developing robust roots. Compost or aged manure can also supply vital nutrients.
Where to Replant Your Dirty Socks?
Select a location with full sun or partial shade. Ensure it receives at least 6 hours of daily sunlight. This will help dirty socks thrive and produce beautiful blooms.
Necessary Equipment for Transplanting Dirty Socks?
Gardening Gloves
To safeguard your hands while handling soil and the plant.
Shovel or Spade
For digging around and lifting the plant from its initial spot.
Watering Can
To dampen the soil before and after the relocation.
Trowel
For more precise digging and positioning the plant in its new home.
Garden Fork
To loosen the soil and assist in the plant's removal.
Mulch
To retain moisture and stabilize soil temperature post-transplant.
Stakes and Ties
For supporting taller plants if required.
How to Extract Dirty Socks from the Soil?
How to Extract Dirty Socks from the Soil?
From Ground: First, hydrate the dirty socks plant to moisten the soil. Then, excavate a wide trench around the plant using a shovel or spade, ensuring the plant’s root ball remains intact. Carefully work the spade beneath the root ball to lift the plant from its original position.From Pot: Water the dirty socks plant thoroughly. Gently invert the pot and tap its edge to loosen the soil. Carefully slide the plant out, ensuring the root ball and soil remain undisturbed.From Seedling Tray: Lightly water the dirty socks seedlings. Use a trowel or spoon to gently lift each seedling from the tray, taking care to keep the root system and surrounding soil intact.
Detailed Guide for Relocating Dirty Socks
Site Preparation
Prepare the planting area beforehand by loosening the soil and incorporating any necessary amendments. Dig a hole slightly larger and deeper than the dirty socks plant's root ball.
Plant Removal
Carefully extract the dirty socks plant from its initial location using the specified method: from ground, pot, or seedling tray.
Plant Placement
Position the dirty socks plant into the prepared hole at the same depth it was growing previously. Ensure the root ball is level with or slightly above the surrounding soil.
Filling the Hole
Backfill the hole with soil, gently pressing it down to eliminate air pockets. Firm the soil around the plant's base but avoid excessive compaction.
Watering
Thoroughly water the dirty socks plant to help settle the soil around its roots.
Staking (if needed)
For taller or delicate dirty socks plants, insert a stake near the plant and use ties to provide support and protect against wind or rain damage.
Post-Transplant Care for Dirty Socks?
Watering
Maintain consistent moisture in the soil around the dirty socks, avoiding sogginess, for the initial few weeks after transplanting to aid in strong root establishment.
Mulching
Apply a layer of mulch around the base of the dirty socks plant to retain moisture and regulate soil temperature, but keep it away from the stem.
Monitoring
Regularly inspect the dirty socks plant for signs of stress, such as wilting or yellowing leaves, and adjust care practices accordingly.
Pruning
Remove any damaged or dead leaves and stems to allow the dirty socks plant to focus its energy on root establishment.
Resolving Common Issues with Dirty Socks Transplantation.
When is the best time to transplant dirty socks?
The optimal time to transplant dirty socks is during early to late spring, for peak growth.
What kind of soil does dirty socks need?
Dirty socks thrives in well-draining soil enriched with organic matter for healthy development.
How much spacing does dirty socks require when transplanting?
Space dirty socks plants 12-18 inches (30-45 cm) apart to allow them room to grow.
What should I do if my dirty socks looks wilted after transplanting?
Ensure consistent watering and provide some shade to help dirty socks recover from transplant shock.
How deep should I plant dirty socks?
Plant dirty socks at its original growing depth to prevent stem rot.
What should I do if my transplanted dirty socks isn't growing?
Check soil moisture and nutrient levels, and consider adding a balanced fertilizer.
Can I transplant dirty socks if it's flowering?
It's preferable to transplant dirty socks before flowering to minimize stress and promote root establishment.
How do I prepare dirty socks plants for transplanting?
Water dirty socks thoroughly a day prior to transplanting to reduce root disturbance and stress.
What type of fertilizer is best for transplanted dirty socks?
Use a balanced, slow-release fertilizer to support dirty socks's root development and overall growth.
How often should I water dirty socks after transplanting?
Water dirty socks regularly to keep the soil moist but not waterlogged, especially during the initial weeks.



