How to Transplant Nodding milkweed?
Nodding milkweed flourishes when transplanted during the mild temperatures of early to mid-spring. This timeframe offers ideal conditions for developmentâplenty of light and moderate warmth. Select a bright, adequately drained location to encourage robust rooting, maximizing the likelihood of a successful move.
What Preparations are Necessary Before Relocating Nodding Milkweed?
What is the Optimal Period for Moving Nodding Milkweed?
The best time to move nodding milkweed is in early to mid-spring. Relocating at this point allows the plant to establish its root system before summer's heat, fostering more vigorous development. This timeframe offers ideal soil moisture and temperature conditions, minimizing transplant shock and enabling the perennial to flourish in its new spot.
What Spacing Should You Maintain Between Nodding Milkweed Plants?
When relocating nodding milkweed, ensure a distance of approximately 18-24 inches (45-60 cm) between them. This provides ample room for each plant to develop robustly and promotes good air circulation, which helps prevent diseases.
What is the Best Soil Mixture for Nodding Milkweed Relocation?
For optimal outcomes with nodding milkweed, prepare soil that drains well, such as sandy or loamy types. Enhance the planting area with a balanced base fertilizer or compost to supply essential nutrients. Steer clear of heavy clay soils as they retain excessive moisture.
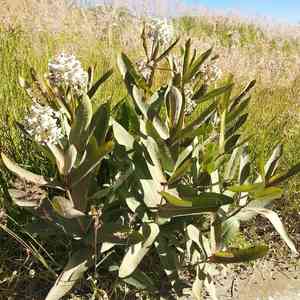
Where Should You Replant Your Nodding Milkweed?
Select a sunny location for replanting nodding milkweed. These plants thrive in full sun, so aim for a spot that receives at least 6-8 hours of direct sunlight daily. This will encourage strong growth and more vibrant blooms.
What Tools Should You Prepare Before Relocating Nodding Milkweed?
Gardening Gloves
To safeguard your hands while handling soil and the plant.
Shovel or Spade
For excavating the plant from its original spot and creating a new hole in the ground.
Trowel
To assist in loosening the soil around the plant and for working in confined areas.
Watering Can or Hose
For hydrating the plant before and after its relocation.
Pruning Shears
To trim any damaged or surplus roots and foliage.
Bucket or Wheelbarrow
To move the plant from its initial location to the new site.
How Do You Extract Nodding Milkweed from the Ground?
How Do You Extract Nodding Milkweed from the Ground?
From Ground: First, hydrate the nodding milkweed plant to moisten the soil. Next, dig a wide trench around the plant using a shovel or spade, ensuring the plant's root ball remains intact. Carefully work the spade beneath the root ball to lift the plant from its original position.From Pot: Water the nodding milkweed plant thoroughly. Gently tap the pot's sides to loosen the soil. Hold the plant's base and carefully slide it out of the pot, ensuring the root ball stays intact.From Seedling Tray: Water the seedlings in the tray. Use a trowel or spoon to gently lift each seedling from the tray, taking care to keep as much of the root system intact as possible.
Step-by-Step Guide for Relocating Nodding Milkweed
Site Preparation
Choose a spot with adequate sunlight and room for your nodding milkweed plant to reach its full size. Prepare the ground by loosening the soil and removing any weeds.
Digging the Hole
Excavate a hole in the prepared ground that is twice as wide and equal in depth to the nodding milkweed plant's root ball. This will provide space for the roots to spread.
Placing the Plant
Position the nodding milkweed plant in the hole. Ensure the top of the root ball is level with or slightly above the soil surface. Adjust the hole's depth if needed.
Filling the Hole
Backfill the hole with the excavated soil, gently pressing it down around the root ball. Confirm there are no air pockets around the roots, as these can impede the plant's growth.
Watering
Water the nodding milkweed plant thoroughly after relocation. This helps settle the soil around the roots and provides essential moisture for the plant's recovery.
Mulching
Apply a layer of mulch around the base of the nodding milkweed plant. This aids in retaining moisture, regulating soil temperature, and suppressing weed growth.
How Do You Care For Nodding Milkweed After Relocation?
Watering
Keep the soil around the nodding milkweed consistently moist, but not waterlogged, for the initial weeks post-relocation to aid in establishing strong roots.
Monitoring
Inspect the plant daily for indications of stress such as wilting or yellowing leaves. Adjust watering and provide temporary shade if necessary.
Pruning
Trim any damaged or excess foliage to lessen stress on the nodding milkweed plant and encourage healthy development.
Weed Control
Regularly remove any weeds surrounding the nodding milkweed to reduce competition for nutrients and water.
Support
If required, offer support like stakes or a small cage to help the plant remain upright and stable while it establishes its roots.
Troubleshooting Common Issues with Nodding Milkweed Relocation.
When is the optimal time to move nodding milkweed?
Relocate nodding milkweed during early to mid-spring for the best outcomes and successful establishment.
What distance should I maintain between nodding milkweed plants?
Space nodding milkweed plants 18-24 inches (45-60 cm) apart to ensure proper growth and air circulation.
What soil type is ideal for relocating nodding milkweed?
Well-draining, sandy or loamy soil is ideal for relocating nodding milkweed to encourage healthy growth.
How deep should I plant nodding milkweed in the soil?
Plant nodding milkweed at the same depth it was originally growing for best results.
How much water does nodding milkweed need after relocation?
Water thoroughly after relocating and keep soil moist, not saturated, during establishment.
What should I do if nodding milkweed wilts after relocation?
Ensure adequate water and reduce direct sunlight; wilting is often due to transplant shock.
How can I prevent root damage while relocating nodding milkweed?
Handle the root ball gently and avoid breaking or disturbing the roots during relocation.
Is it necessary to fertilize nodding milkweed after relocation?
Fertilize lightly with a balanced, slow-release fertilizer to support new growth, but don't over-fertilize.
What should I do if nodding milkweed leaves turn yellow after relocation?
Check for proper watering and good drainage; yellow leaves may indicate excess water or poor soil.
How can I protect nodding milkweed from pests after relocation?
Monitor plants regularly for pests and employ organic or chemical treatments as necessary.


