How to Propagate Forest keurboom?
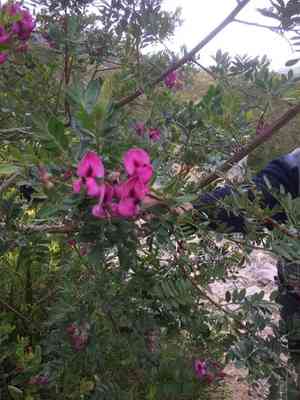
The Forest keurboom, a rapidly developing tree distinguished by its vibrant purple-pink blossoms, can be successfully multiplied through the use of cuttings. For best outcomes, choose semi-hardwood sections from robust, established specimens. Make certain the cuttings measure approximately 15-20 cm in length and apply a rooting stimulant to the severed ends to encourage root formation. Insert the cuttings into a propagation medium that drains efficiently and sustain steady humidity until the root system is firmly in place.
Optimal Period for Forest Keurboom Propagation
Propagation Method
Cutting
Propagation Season
Autumn,Winter
Tools Required for Forest Keurboom Propagation
Sharp Pruning Shears
Utilized for obtaining healthy cuttings from forest keurboom. Ensures precise cuts, minimizing plant harm and reducing disease spread. Sharpness is vital to prevent tissue crushing.
Rooting Hormone
Applied to the severed ends of forest keurboom stem cuttings to stimulate root growth. This boosts the likelihood of successful root formation and enhances plant vigor.
Sterile Potting Mix
Offers a pathogen-free medium for forest keurboom cuttings to establish roots. Its excellent drainage properties prevent waterlogging and root rot, crucial for cutting health and viability.
Propagating Trays
Used to arrange and stabilize forest keurboom cuttings during the rooting phase. Trays allow for proper spacing and air circulation, promoting uniform growth and reducing fungal infection risk.
Humidity Dome
Maintains a high-humidity environment for forest keurboom cuttings, essential for preventing dehydration and encouraging root development. It mimics the plant's natural habitat, ensuring ideal propagation conditions.
Heat Mat
Positioned beneath propagating trays to provide consistent warmth. This helps maintain an optimal soil temperature, accelerating root development and improving the overall success rate of forest keurboom propagation.
Sterilizing Solution
Used to sanitize tools like pruning shears before taking cuttings. Ensures no pathogens are introduced during the propagation process, vital for maintaining forest keurboom's health.
Labels and Markers
Crucial for tracking various forest keurboom cuttings. Proper labeling prevents confusion and allows for accurate monitoring of progress and success rates.
How to Propagate Forest Keurboom?
Propagation Type
Moderately Difficult
Post-Propagation Care for Your Forest Keurboom
Post-Propagation Care for Your Forest Keurboom
Once roots have developed, transfer forest keurboom into larger containers or garden beds with well-drained soil. Water consistently, especially during dry periods, but avoid overwatering. Provide partial shade initially, gradually moving to full sun exposure as the plant matures. Apply a balanced, slow-release fertilizer to encourage growth. Regularly check for pests and diseases, treating as needed.
Common Errors to Avoid When Propagating Forest Keurboom
Improper Soil Conditions
Many gardeners use soil that is either too compact or retains excessive moisture, which can lead to root rot or poor root development.
Overwatering
Excessive irrigation can suffocate roots and foster fungal diseases, which are detrimental to the propagation process.
Insufficient Light
Providing inadequate light can impede the plant's growth and development, as forest keurboom requires ample light for photosynthesis and healthy growth.
Incorrect Cutting Techniques
Using dull or unsterilized tools can cause damage to plant tissues and increase the risk of infections.
Lack of Humidity Control
Failing to maintain appropriate humidity levels can lead to desiccation, which is particularly problematic for young cuttings.
Advice for Propagating Forest Keurboom
Utilize Well-Draining Soil
Choose a soil mix that ensures good drainage to prevent waterlogging and provide adequate air circulation for the roots.
Moderate Watering
Water cuttings carefully; keep the soil moist but not saturated to prevent root rot and encourage steady growth.
Ensure Adequate Light
Place cuttings in a location where they receive plenty of indirect sunlight, which is crucial for their development.
Proper Cutting Techniques
Use sharp, sterilized tools to take cuttings. Ensure each cutting has at least two nodes, and handle gently to avoid damaging plant tissue.
Maintain Higher Humidity
Create a humid environment around the cuttings, using a humidity dome or plastic cover to retain moisture and encourage rooting.


