How to Propagate Groundcover milkvetch?
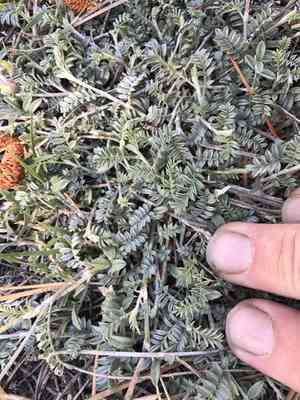
Flourishing in sandy, well-draining substrates, groundcover milkvetch capitalizes on its low-lying and spreading characteristic. For successful propagation, seeds ought to be planted directly into the earth following scarification to boost sprouting. While not particularly fussy, providing a sun-drenched spot and infrequent irrigation will encourage robust growth and maturation, establishing groundcover milkvetch as a hardy inclusion for ground cover in dry and semi-dry environments.
Optimal Period for Groundcover Milkvetch Propagation
Propagation Method
Seeding
Propagation Period
Spring
Tools Utilized in Groundcover Milkvetch Propagation
Seed Trays
Essential for starting seeds in a controlled setting, seed trays aid in the initial phases of groundcover milkvetch propagation. They offer ample room and ideal soil conditions for sprouting.
Potting Mix
A potting mix that drains well is crucial for groundcover milkvetch to prevent waterlogging, which can harm young plants. It supplies vital nutrients and supports robust root growth.
Seedling Heat Mat
A heat mat for seedlings ensures the soil maintains an optimal temperature for germination. For groundcover milkvetch, keeping a consistent and suitable temperature boosts the chances of successful seed sprouting.
Humidity Dome
A dome for humidity is placed over seed trays to maintain elevated moisture levels, vital for groundcover milkvetch germination. It helps keep seeds damp without frequent watering, which can disturb the soil.
Grow Lights
Grow lights deliver the necessary light spectrum for groundcover milkvetch's germination and early development. They are particularly useful when natural light is insufficient or inconsistent.
Seedling Trays
Once groundcover milkvetch seeds have sprouted, seedling trays facilitate easy handling and transplanting. They help minimize root disruption when moving young plants to larger containers or outdoors.
Watering Can with Fine Rose
A watering can equipped with a fine rose is perfect for gentle irrigation, ensuring the delicate seeds and seedlings of groundcover milkvetch are not dislodged. Consistent and gentle watering is essential for their survival.
Soil Thermometer
A thermometer for soil assists in precisely monitoring the soil temperature. For groundcover milkvetch, the correct soil temperature can significantly impact germination success rates.
Labels and Markers
Labeling is vital for tracking different batches of groundcover milkvetch seeds, especially when experimenting with various soil mixes or conditions. It ensures organized and efficient propagation.
How to Propagate Groundcover Milkvetch?
Propagation Type
Simple
Caring for Your Newly Propagated Groundcover Milkvetch
Caring for Your Newly Propagated Groundcover Milkvetch
Post-germination, continue to care for groundcover milkvetch by ensuring they receive at least 6 hours of daily sunlight. Water seedlings when the topsoil feels dry, but avoid overwatering. Gradually introduce young plants to outdoor conditions if they are to be transplanted. Once robust enough, typically after the second set of true leaves emerges, transplant them to their permanent spot, ensuring a well-draining location. Regularly inspect for pests and diseases, and provide light fertilization to encourage healthy growth.
Common Errors to Avoid When Propagating Groundcover Milkvetch
Overwatering
Excessive watering can easily lead to root rot, which is detrimental to groundcover milkvetch's growth and survival. This plant prefers well-draining soil and can suffer in waterlogged conditions.
Underestimating Soil Requirements
Using poor or heavy soils that do not drain well can hinder the root development of groundcover milkvetch, impacting its overall health and growth.
Improper Seed Treatment
Failing to scarify or pre-treat groundcover milkvetch seeds can result in low germination rates. This plant's seeds have a tough outer layer that needs softening for better sprouting.
Insufficient Light
Placing groundcover milkvetch in low-light conditions can lead to weak and leggy growth. This plant thrives in full sun and requires adequate light for robust development.
Ignoring Pests and Diseases
Neglecting to monitor for pests and diseases can quickly lead to infestations or infections that can weaken or kill groundcover milkvetch.
Tips For Propagating Groundcover Milkvetch
Moderate Watering
Water groundcover milkvetch sparingly but consistently, ensuring the soil remains moist but not waterlogged. This prevents root rot while providing sufficient hydration.
Well-Draining Soil
Utilize a well-draining soil mix or amend garden soil with sand or gravel to improve drainage. This ensures groundcover milkvetch roots do not sit in water, which could lead to decay.
Seed Scarification
Scarify groundcover milkvetch seeds by gently sanding or nicking the seed coat, or soak them in hot water for 24 hours before planting. This aids in improving germination rates by allowing water to penetrate the hard seed coat.
Full Sun Placement
Ensure groundcover milkvetch is planted in a location that receives full sunlight for at least 6 hours daily. Adequate sunlight is crucial for this plant's healthy growth.
Regular Monitoring
Keep an eye out for any signs of pests or diseases and address them promptly. Consistent monitoring and early intervention can prevent minor issues from becoming major problems.



