Aussie plume (Curcuma australasica)
Also known as: None
The plant you're referring to is the **Tillandsia cyanea**, also known as the "Pink Quill." This distinctive bromeliad is recognized for its vivid, cone-like pink to purple flowers that emerge conspicuously without initial foliage. Native to subtropical regions, it flourishes in warm, humid environments. The plant's vibrant inflorescences lend an exotic charm to its surroundings, making it a striking addition to any landscape.
In This Article
Attributes of Aussie plume
Lifespan
Perennial
Plant Type
Herb
Plant Height
90 cm
Spread
50 cm
Leaf Color
Green
Flower Size
5-10 cm
Flower Color
Yellow to orange
Images of Aussie plume
Quickly Identify Aussie plume
1
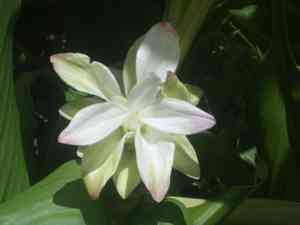
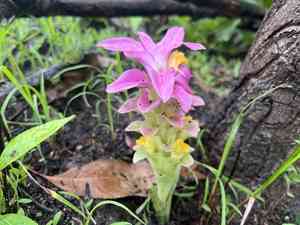
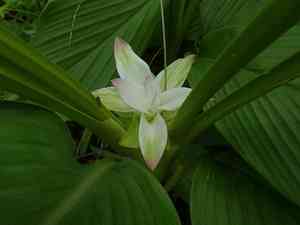
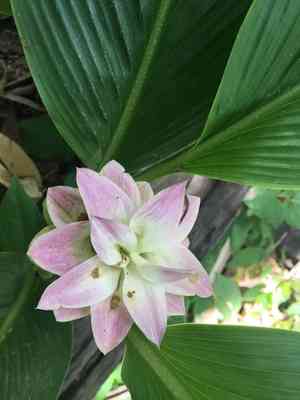
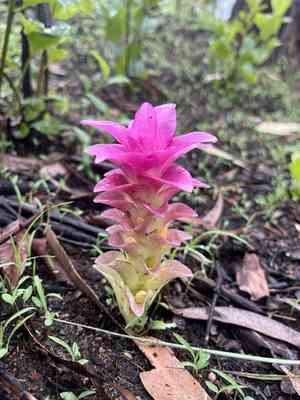
Curcuma australasica can be identified by its large, broad leaves that arise from an underground rhizome. The flowers are funnel-shaped, typically yellow to orange, and appear on a spike above the foliage.
Scientific Classification of Aussie plume
Phylum
Vascular plants
Class
Monocotyledons
Order
Zingiberales
Family
Ginger
Genus
Curcuma
Species
Aussie plume
Planting and Growing of Aussie plume
Care Difficulty
Moderate
Watering Schedule
Every 3 days
Sunlight Requirements
Partial sun
Sunshine Duration
4-6 hours
Ideal Temperature
68-77℉
Soil Type
Potting Mix, Peat Mix
Soil pH
6-7.5
Fertilizer Type
Balanced
Pruning Season
Spring, Summer
Pruning Area
Branches, Leaves
Pruning Frequency
2 times a year
Repotting Season
Spring
Pot Type
Plastic, Ceramic
 How to Water Aussie plume?
Curcuma australasica thrives when watered with approximately 500 ml per session. Ensure the soil is thoroughly saturated, but avoid pooling water at the surface. Always check that the top inch of soil is dry before re-watering to prevent waterlogging.
What are the symptoms of an underwatered Aussie plume?
›
What should I do if my Aussie plume is not getting enough water?
›
What are the symptoms of an overwatered Aussie plume?
›
How to save an overwatered Aussie plume?
›
 What Are the Sunlight Requirements for Aussie plume?
Curcuma australasica prefers a light range that includes partial sun, receiving about 4-6 hours of sunlight per day. Ideal lighting ensures the plant not only sustains its growth but also reaches its flowering potential and maintains its vibrant foliage.
What is the ideal light condition for Curcuma australasica?
›
How can you provide partial sun?
›
What benefits does Curcuma australasica gain from ideal lighting?
›
 What Is the Ideal Temperature Range for Aussie plume?
The ideal temperature range for Curcuma australasica ranges from 68°F to 77°F. This plant thrives in warm, humid environments typical of its native habitat. Maintaining this temperature range promotes optimal growth and blooming.
 What Soil is Best for Aussie plume?
Curcuma australasica thrives in soil that facilitates good drainage. Ensuring the soil is well-drained helps prevent waterlogging, which can lead to root rot and other diseases detrimental to the plant's health. This plant benefits from soils rich in organic matter. The availability of organic nutrients supports vigorous growth and vibrant blooms, reflecting the plant's natural tropical habitat. While Curcuma australasica prefers well-drained soil, it also requires consistent moisture. Maintaining balanced soil moisture levels promotes optimal growth and enhances the plant's resilience.
 How to Fertilize Aussie plume?
For Curcuma australasica, it's important to use a balanced fertilizer with equal parts nitrogen, phosphorus, and potassium. Typically, using one tablespoon of liquid fertilizer diluted in a gallon of water is sufficient. For slow-release fertilizers, apply according to package instructions but use about half of the recommended amount to avoid over-fertilization.
 How to Prune Aussie plume?
Begin by sterilizing your pruning shears to prevent disease spread. Trim back any dead or yellowing leaves at the base, allowing for more robust growth. Focus on shaping the plant for a balanced form, and remove spent flower spikes after blooming to encourage more blossoms. It's important to cut just above a node or joint to promote better regrowth. For Curcuma australasica, advanced pruning might involve thinning out the interior foliage to improve air circulation and reduce the chances of fungal infections. Carefully select the most densely packed areas and cut back excessive growth. This thinning not only boosts plant health but also enhances flowering by focusing the plant's energy on fewer, more vigorous growth points.
More About Pruning Techniques→
 How to Propagate Aussie plume plant?
1
Begin by selecting a healthy and mature Curcuma australasica plant. Ensure that it is well-watered before the division process, making it easier to separate the rhizomes without causing damage.
2
Carefully dig around the plant to expose the rhizomes. Use the garden spade to separate the clumps, ensuring each division has a good set of roots and some foliage for successful propagation.
3
After division, immediately replant the rhizomes into new pots or a prepared garden bed. Ensure they are planted at the same depth they were growing initially and water thoroughly after planting.
 How to Repot Aussie plume plant?
1
Curcuma australasica needs repotting when you see roots outgrowing the drainage holes or when the plant appears top-heavy. Repotting should be done during the active growing periods of spring or early summer to minimize stress and allow the plant to recover quickly.
2
Choose a pot that's 1-2 inches larger in diameter than the current one, with excellent drainage. A terracotta or ceramic pot helps wick moisture away, preventing root rot. A proper-sized pot prevents waterlogging and encourages healthy root development, contributing to the plant's lush growth.
3
Opt for a well-draining tropical soil mix enriched with organic matter. This medium retains enough moisture for the plant while allowing excess water to escape easily. A good soil mix provides the necessary nutrients, enhances air circulation, and supports robust growth.
Learn More About Aussie plume Diseases
Anthracnose
Bacterial Leaf Spot
Bacterial Soft Rot
Bacterial Wilt
Chemical Injury
Cyst Nematode
Damping-off
Downy Mildew
Drought Stress
Fusarium Wilt
Gray Mold
Leaf Spot
Mosaic
Nutrient Deficiency
Nutrient Toxicity
Powdery Mildew
Root Rot
Root-knot Nematode
Rusts
Sooty Mold
Spider Mites
Temperature Stress
Thrips Damage
White Mold


