Colton's milkvetch (Astragalus coltonii)
Also known as: Colton's Milk-vetch, Colton's Loco
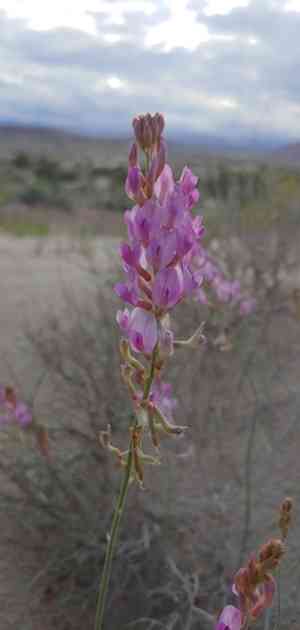
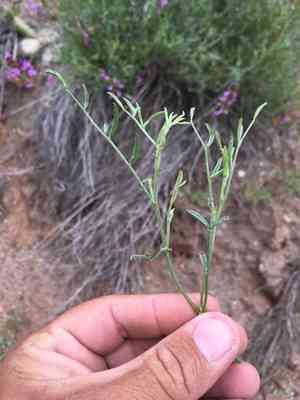
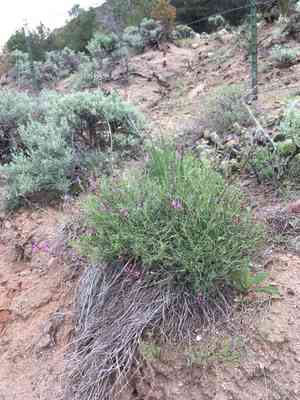
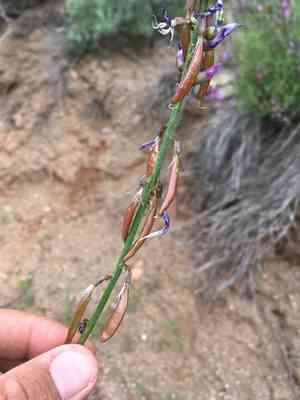
Colton's milkvetch is a perennial herb distinguished by its dense clusters of small, creamy to yellowish-white flowers that bloom from spring to summer. It thrives in dry, rocky slopes and sagebrush habitats, favoring well-drained, sandy, or gravelly soils in the Great Basin region. The plant features pinnate leaves with numerous tiny leaflets and hairy stems and leaves, which help it conserve water and withstand arid conditions. Its inflated, often velvety seed pods further set it apart, allowing it to endure harsh climates effectively.
In This Article
Attributes of Colton's milkvetch
Lifespan
Perennial
Plant Type
Herb
Plant Height
0.1 - 0.3 meters (4 - 12 inches)
Spread
Typically not applicable as it is a herbaceous plant
Leaf Color
Green
Flower Size
1 - 2 centimeters
Flower Color
White to pale purple
Images of Colton's milkvetch
Quickly Identify Colton's milkvetch
1
Key identification skills for Astragalus coltonii include examining the hairy stem, the pinnate leaves with numerous leaflets, and the small, clustered flowers which can be white to pale purple.
Scientific Classification of Colton's milkvetch
Phylum
Vascular plants
Class
Dicotyledons
Order
Fabales
Family
Legume
Genus
Milkvetch
Species
Colton's milkvetch
Planting and Growing of Colton's milkvetch
Care Difficulty
Moderate
Watering Schedule
Every 2 days
Sunlight Requirements
Partial sun
Sunshine Duration
6-10 hours
Ideal Temperature
60-70℉
Soil Type
Potting Mix, Peat Mix
Soil pH
6-8
Fertilizer Type
Balanced
Pruning Season
Spring, Summer
Pruning Area
Branches, Leaves
Pruning Frequency
2 times a year
Repotting Season
Spring
Pot Type
Plastic, Ceramic
 How to Water Colton's milkvetch?
For Astragalus coltonii, which thrives in drier conditions, ensuring the soil is moderately moist is crucial. Watering should be enough to moisten the top 5-10 centimeters of soil. Approximately 200 milliliters is optimal during each session, depending on the pot size and the local humidity, ensuring water reaches the root zone without causing waterlogging.
What are the symptoms of an underwatered Colton's milkvetch?
›
What should I do if my Colton's milkvetch is not getting enough water?
›
What are the symptoms of an overwatered Colton's milkvetch?
›
How to save an overwatered Colton's milkvetch?
›
 What Are the Sunlight Requirements for Colton's milkvetch?
Ideal light for Astragalus coltonii is partial sun. This range ensures it receives ample light for photosynthesis while reducing stress from prolonged direct exposure.
Daily Sun Exposure
›
Outdoor Placement
›
Effect of Ideal Light
›
 What Is the Ideal Temperature Range for Colton's milkvetch?
The ideal temperature range for Astragalus coltonii growth is between 60°F and 70°F. Within this range, the plant can perform essential functions like photosynthesis and respiration optimally. These temperatures are indicative of moderate climates where the plant's native environment is most commonly found. It helps support strong root development and robust growth throughout the plant’s life cycle.
 What Soil is Best for Colton's milkvetch?
Astragalus coltonii thrives in soil that drains well, preventing root rot and allowing for optimal growth. Such soils provide the plant with enough moisture while ensuring excess water is swiftly drained away, maintaining ideal nourishment levels. The plant does not require highly fertile soil. A balance of nutrients supports steady growth without overly rapid expansion, which can make the plant more susceptible to pests and diseases. Astragalus coltonii tolerates slightly alkaline soil conditions, which aligns with its natural habitat. This pH range facilitates better nutrient absorption and promotes healthy plant development.
 How to Fertilize Colton's milkvetch?
Astragalus coltonii benefits from a balanced fertilizer approach. Use a liquid fertilizer at half the recommended strength to avoid overpowering the plant. Solid slow-release fertilizers should be used sparingly, ensuring nutrients are released gradually over time.
 How to Prune Colton's milkvetch?
Familiarize yourself with the plant's structure. Identify old, dead, or misshapen stems that might be crowding the plant and detracting from its natural form. Understanding this helps in creating a more aesthetically pleasing and healthy plant shape. Begin by removing any dead or damaged stems first, cutting them close to the base. Next, thin out crowded sections to allow light and air to access the plant. Make cuts at an angle above a leaf node to promote healthy new growth.
More About Pruning Techniques→
 How to Propagate Colton's milkvetch plant?
1
Use a sterile, well-draining potting mix to fill your seed trays. This prevents disease and encourages good root growth. Lightly water the soil to ensure it's moist but not waterlogged.
2
Sow Astragalus coltonii seeds on the surface of the soil, gently pressing them into place without burying too deeply. Cover with a thin layer of soil or vermiculite to protect them without hindering their emergence.
3
Place the trays in a location with bright, indirect sunlight, maintaining a temperature of around 20-22°C (68-72°F). Keep the soil consistently moist but avoid over-watering.
 How to Repot Colton's milkvetch plant?
1
Repot Astragalus coltonii when it outgrows its pot or when the soil becomes compacted and loses its drainage efficiency. Another sign is the slowing growth rate or roots protruding through the drainage holes. Spring and early summer are the best times, as the plant is actively growing.
2
Pick a pot slightly larger than the current one, with at least one good drainage hole to prevent water accumulation. A well-fitted pot provides stability, reduces root rot risk, and encourages balanced growth. A terracotta pot can be beneficial due to its breathable nature.
3
Opt for a well-draining cactus or succulent mix to prevent root rot and allow air circulation. Incorporate perlite or sand to enhance drainage. This type of soil imitates the plant's natural habitat, promoting healthy growth and reducing the chances of fungal infections.
Toxicity
Ingestion
WARNING
The judgment on toxicity and danger is for reference only. We DO NOT GUARANTEE any accuracy of such judgment. Therefore, you SHALL NOT rely on such judgment. It is IMPORTANT TO SEEK PROFESSIONAL ADVICE in advance when necessary.


