How to Transplant Eve's needle?
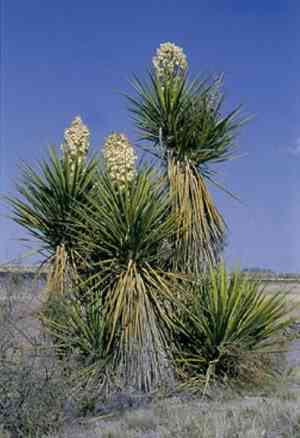
For eve's needle, the prime period for relocation is from mid to late spring, allowing for superior root development prior to the summer warmth. Select a bright, well-draining location and provide sufficient hydration post-transplant, to foster successful integration.
What Preparations are Needed Before Transplanting Eve's Needle?
What is the Ideal Time for Transplanting Eve's Needle?
The best period to relocate eve's needle is when winter's chill recedes, typically during the pleasant warmth of late spring. This timing allows eve's needle to settle in before peak summer, promoting robust development and avoiding frost damage. Warmer soil aids root growth, and longer days provide ample sunlight for photosynthesis, ensuring a strong start in its new spot.
How Much Space Should You Leave Between Eve's Needle Plants?
Allow your eve's needle ample room to grow! Aim for approximately 6-10 feet (1.8-3 meters) between individual plants. This ensures they have sufficient space to develop without overcrowding adjacent specimens.
What is the Best Soil Mix for Eve's Needle Transplanting?
For your eve's needle, prepare soil that drains effectivelyâconsider a sandy or gravelly composition. Incorporate a slow-release, balanced fertilizer to provide an initial nutrient boost. Careful soil preparation now leads to a healthier plant later!
Where Should You Relocate Your Eve's Needle?
Select a sunny location for your eve's needle where it can receive full sunlight for the majority of the day. These sun-loving plants will flourish with at least 6 hours of direct lightâmuch like sunbathers on a beach!
What Equipments Should You Prepare Before Transplantation Eve's Needle?
Shovel or spade
For excavating around and beneath the plant to carefully extract it from its current position.
Garden fork
For loosening the earth surrounding the plant without harming its root system.
Watering can or hose
For hydrating the plant prior to removal and post-transplant to alleviate shock.
Wheelbarrow
For moving the eve's needle between sites without physical strain.
Gardening gloves
To safeguard your hands while handling soil and the plant.
Measuring tape
For determining the appropriate hole dimensions for transplanting to ensure a proper fit.
Pruners or garden shears
To trim any dead or damaged roots or foliage before relocation.
How Do You Remove Eve's Needle from the Soil?
How Do You Remove Eve's Needle from the Soil?
From Ground: Water the eve's needle thoroughly the day before transplanting to ensure moist soil and hydrated roots. Use a shovel or garden fork to gently loosen the soil around the plant. Dig in a circular pattern, maintaining a generous distance to protect the root ball. Slide the shovel beneath the root ball and carefully lift the plant from the ground.From Pot: Water the eve's needle well before beginning the transplanting process. Gently tilt the pot sideways and tap its sides to loosen the soil's grip. Hold the plant's base and carefully ease it out, ensuring you support the root ball to prevent damage.From Seedling Tray: Identify the specific eve's needle you intend to transplant. Water the tray to moisten the soil, facilitating easier removal. Use a small tool, such as a dibble or spoon, to carefully lift the seedling by its root ball from the tray.
Step-by-Step Guide for Transplanting Eve's Needle
Preparing the New Site
Choose an appropriate location in the ground that can accommodate the mature size of eve's needle. Clear the area of any weeds and debris. Loosen the soil to a depth matching the plant's root ball and twice its width, to encourage root expansion.
Hole Digging
Excavate a hole in the center of the prepared site using your shovel. The hole should be as deep as the root ball and two to three times wider to provide ample space for root development.
Placing the Plant
Carefully position the eve's needle into the hole, ensuring it is upright and centered. The top of the root ball should be level with the ground surface or slightly elevated to account for settling.
Backfilling Soil
Gradually refill the hole with the native soil, gently compacting it around the base to eliminate air pockets. Water the soil to further aid in settling the roots.
Final Adjustments
Adjust the plant if necessary to ensure it stands upright and add more soil if settling occurs after watering. Create a water retention basin around the base to help direct moisture to the roots.
How Do You Care For Eve's Needle After Transplanting?
Immediate Watering
Provide eve's needle with a generous amount of water immediately after transplanting to settle the soil around its roots and minimize transplant shock. This aids in its establishment in the new location.
Mulching
Apply a layer of organic mulch around the base of eve's needle to conserve soil moisture, stabilize soil temperature, and reduce weed competition.
Monitoring Growth
Observe eve's needle for any indications of stress, such as wilting or yellowing leaves. These symptoms could suggest issues with root establishment or the presence of pests and diseases.
Adjusting Supports
If eve's needle requires staking for upright support, ensure the support is secure yet allows for some natural movement. Adjust ties to prevent them from cutting into the plant as it grows.
Troubleshooting Common Issues with Eve's Needle Transplantation.
What's the best time to transplant eve's needle for successful growth?
The optimal period for relocating eve's needle is from mid to late spring, allowing it to establish before winter.
How far apart should I space my eve's needle when transplanting?
Aim for a generous spacing of 6-10 feet (1.8-3 meters) to provide each eve's needle ample room to flourish.
Why is my eve's needle looking wilted after transplanting?
Wilting can result from transplant shock. Ensure adequate, but not excessive, watering, and the plant should recover.
How deep should the hole be when transplanting eve's needle?
Excavate a hole as deep as the root ball and twice as wide to allow roots to expand.
Is it necessary to amend the soil when transplanting eve's needle?
Yes, incorporate some organic compost with the native soil to enhance drainage and supply nutrients.
How do I know if I'm overwatering my transplanted eve's needle?
If leaves yellow or the soil is waterlogged, you might be overwatering. Allow the soil to dry between irrigation sessions.
What are the signs that my eve's needle isn't getting enough light post-transplant?
Insufficient light can lead to leggy growth or a lack of blooms. Position eve's needle in a location that receives full sun.
Should I prune eve's needle when transplanting?
Pruning is generally not required during transplanting, but do remove any damaged or diseased leaves or stems.
Could cold temperatures affect my newly transplanted eve's needle?
Yes, eve's needle is sensitive to cold. Protect it from late spring frosts with covers or by delaying transplant until stable weather conditions.
How should I support my eve's needle after transplanting?
If eve's needle is tall, staking may be necessary. Otherwise, simply ensure proper watering, sunlight, and protection from harsh environmental elements.



