How to Transplant Watsonia angusta?
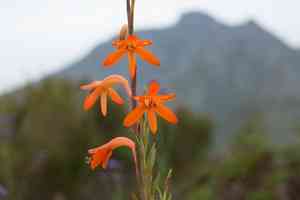
Watsonia angusta, ideally moved during early to mid-spring for peak development, thrives in bright, adequately drained locations. Select a somewhat damp, nutrient-rich substrate for its new placement. Should it be required, carefully manage the corms to lessen shock and safeguard their root systems.
What Preparations are Needed Before Transplanting Watsonia Angusta?
What is the Ideal Time for Transplanting Watsonia Angusta?
The best time to move watsonia angusta, a perennial, is from early to mid-spring. This timing allows the plant to establish its root system before the hotter, drier summer months. Transplanting at this point maximizes its growth potential and hardiness, ensuring the plant flourishes throughout the growing season.
How Much Space Should You Leave Between Watsonia Angusta Plants?
When planning to relocate watsonia angusta, ensure each plant is spaced 12-18 inches (30-45 cm) apart. This provides ample room for growth and prevents competition for resources.
What is the Best Soil Mix for Watsonia Angusta Transplanting?
Prepare soil that drains well with a pH ranging from slightly acidic to neutral. Incorporate compost or a balanced base fertilizer to supply the essential nutrients watsonia angusta needs to thrive.
Where Should You Relocate Your Watsonia Angusta?
Select a sunny location for transplanting watsonia angusta. This plant prefers full sun and will perform optimally when it receives at least 6 hours of direct sunlight daily.
What Equipments Should You Prepare Before Transplantation Watsonia Angusta?
Gardening Gloves
To safeguard your hands while handling soil and the plant.
Shovel or Spade
For digging around and lifting the plant from its original spot.
Trowel
Used for excavating a hole at the new planting site.
Watering Can or Hose
To hydrate the plant before and after its relocation.
Bucket or Container
To temporarily hold the plant, if necessary.
Mulch
To apply around the plant's base post-transplant to help retain moisture.
How Do You Remove Watsonia Angusta from the Soil?
How Do You Remove Watsonia Angusta from the Soil?
From Ground: First, moisten the soil around the watsonia angusta plant. Then, use a shovel or spade to dig a wide trench around the plant, ensuring the root ball remains intact. Carefully work the spade beneath the root ball to lift the plant from its initial position.From Pot: Gently tap the pot's sides to loosen the soil. Turn the pot sideways and carefully slide out the watsonia angusta plant, supporting the plant's base and root ball with your hand.From Seedling Tray: Insert a trowel or plastic plant marker under the seedling to extract it. Handle the watsonia angusta plant by its leaves or root ball, not the stem, to prevent damage.
Step-by-Step Guide for Transplanting Watsonia Angusta
Site Preparation
Choose and prepare a new location for your watsonia angusta plant. Ensure the hole is twice as wide and slightly deeper than the plant's root ball.
Removing
Carefully extract the watsonia angusta plant from its original spot, using the appropriate method based on its previous planting location.
Placing
Position the watsonia angusta plant in the prepared hole, making sure it sits at the same depth as it was previously growing.
Backfilling
Fill the hole with soil, gently firming it around the root ball. Be careful not to over-compact the soil.
Watering
Water the watsonia angusta plant thoroughly after transplanting to help the soil settle around the roots.
Mulching
Apply a layer of mulch around the plant's base, leaving a small gap around the stem to prevent rot.
How Do You Care For Watsonia Angusta After Transplanting?
Watering
Keep the soil around the watsonia angusta consistently damp, but not waterlogged, for the initial few weeks post-transplant to aid in root establishment.
Monitoring
Observe the watsonia angusta plant for any indications of stress, such as wilting or leaf drop. Adjust care as necessary.
Protection
Shield the watsonia angusta plant from harsh weather conditions like strong winds or intense midday sun during its initial adjustment period.
Pruning
Remove any damaged or dead foliage to reduce plant stress and promote healthy growth.
Troubleshooting Common Issues with Watsonia Angusta Transplantation.
When is the best time to transplant watsonia angusta?
Early to mid-spring is optimal for transplanting watsonia angusta. The weather conditions are favorable for new growth.
How much space should I leave between watsonia angusta plants?
Space each watsonia angusta plant 12-18 inches (30-45 cm) apart to allow adequate room for development.
What soil conditions does watsonia angusta prefer?
Watsonia angusta thrives in well-drained soil with a pH level between 6.0 and 7.0.
How deep should I plant watsonia angusta bulbs?
Plant watsonia angusta bulbs approximately 4-6 inches (10-15 cm) deep in the soil.
Should I water watsonia angusta immediately after transplanting?
Yes, watering watsonia angusta right after transplanting helps to settle the soil and encourage root establishment.
How should I prepare the planting site for watsonia angusta?
Remove weeds and debris, then loosen the soil to a depth of 10 inches (25 cm).
Can I fertilize watsonia angusta when transplanting?
Yes, applying a balanced fertilizer during transplanting can aid watsonia angusta's establishment.
Will watsonia angusta tolerate full sun?
Watsonia angusta prefers full sun but can also endure partial shade.
What should I do if watsonia angusta shows signs of transplant shock?
Ensure proper hydration, avoid excessive fertilization, and maintain consistently moistânot soggyâsoil.
Can I transplant watsonia angusta in the fall?
It is best to transplant watsonia angusta in early or mid-spring for optimal growth.



