How to Transplant Shelton's violet?
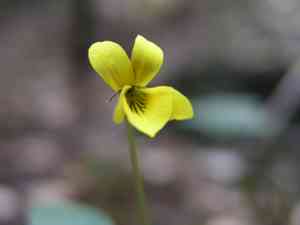
Shelton's violet flourishes most effectively when relocated from early to late spring, as this timeframe provides ideal conditions for development. Select a site with partial shade and soil that drains efficiently. Further advice on transplanting is not required if the process is executed properly.
What Preparations are Needed Before Transplanting Shelton's Violet?
What is the Ideal Time for Transplanting Shelton's Violet?
The optimal period for relocating shelton's violet spans from the beginning of early spring through the conclusion of late spring. This timeframe guarantees suitable soil warmth and moisture, fostering root development. Moving shelton's violet during this window leads to robust growth and improved adaptation, capitalizing on the plant's inherent growth cycle and ensuring strong vitality.
How Much Space Should You Leave Between Shelton's Violet Plants?
Ensure shelton's violet plants are spaced approximately 6-8 inches (15-20 cm) apart. This provides ample room for growth and prevents competition for essential resources like water and nutrients.
What is the Best Soil Mix for Shelton's Violet Transplanting?
For shelton's violet, prepare well-draining soil incorporating a blend of loam and organic compost. Adding a balanced, slow-release fertilizer at the base will give young plants a strong start without overwhelming them.
Where Should You Relocate Your Shelton's Violet?
Select a site that receives partial to full sunlight. Shelton's violet thrives with at least 4-6 hours of daily sunlight for optimal development and vibrant blooms.
What Equipments Should You Prepare Before Transplantation Shelton's Violet?
Gardening Gloves
To safeguard your hands while handling soil and plants.
Small Spade or Shovel
For excavating around the root ball and lifting shelton's violet.
Transplanting Trowel
Useful for manipulating soil around plant roots when moving from small containers.
Watering Can or Hose
To hydrate the plant before and after relocation.
Mulch
To retain moisture and offer insulation for the newly transplanted shelton's violet.
Plant Markers
To identify the new placement of the relocated shelton's violet.
How Do You Remove Shelton's Violet from the Soil?
How Do You Remove Shelton's Violet from the Soil?
From Ground: First, moisten the soil surrounding shelton's violet. This facilitates digging and minimizes root damage. Dig a wide trench around the plant using a small spade or shovel, ensuring the root ball remains intact. Carefully work the spade beneath the root ball to lift shelton's violet from its original spot.From Pot: Water the shelton's violet to ease its extraction. Gently tap the pot's sides to separate the soil from the edges. Tilt the pot and slide your hand over the plant's base, rotating the pot to allow the plant to slide into your hand.From Seedling Tray: Water the seedlings initially. Use a transplanting trowel to carefully lift each seedling from the tray, ensuring the root system stays intact.
Step-by-Step Guide for Transplanting Shelton's Violet
Site Preparation
Prepare the new location by digging a hole approximately twice the size of shelton's violet's root ball. Ensure the hole is wide enough for roots to spread comfortably.
Remove Plant
Gently extract shelton's violet from its initial position following the removal process guidelines.
Check Roots
Before placing shelton's violet in the new hole, inspect the roots. Trim any damaged or excessively long roots with clean shears.
Planting
Position shelton's violet into the prepared hole. Ensure the top of the root ball is level with the hole's surface. Backfill the hole with soil, gently pressing to eliminate air pockets.
Watering
Thoroughly water shelton's violet to settle the soil and help alleviate transplant shock.
Adding Mulch
Apply a layer of mulch around shelton's violet's base, keeping it a few inches from the stem to prevent rot. This will aid in moisture retention and plant protection.
How Do You Care For Shelton's Violet After Transplanting?
Watering
Maintain consistently moist, but not waterlogged, soil around shelton's violet for the initial weeks post-transplant to encourage strong root development.
Monitoring
Inspect shelton's violet daily for signs of stress, such as wilting or yellowing leaves, and provide additional water as needed.
Weeding
Regularly remove weeds surrounding shelton's violet to reduce competition for nutrients and water.
Fertilizing
After a few weeks, you may apply a balanced, slow-release fertilizer to support shelton's violet's growth.
Pruning
Remove any damaged or dead leaves to promote healthy growth and lessen stress on shelton's violet.
Troubleshooting Common Issues with Shelton's Violet Transplantation.
When is the best time to transplant shelton's violet?
The optimal period for relocating shelton's violet is from early spring to late spring.
How many inches apart should I plant shelton's violet?
Space shelton's violet 6-8 inches (15-20 cm) apart for ideal growth.
What type of soil is best for shelton's violet?
Well-drained, nutrient-rich soil is perfect for transplanting shelton's violet.
Why are my shelton's violet leaves wilting after transplanting?
Wilting leaves may signal transplant shock; ensure adequate hydration and avoid disturbing roots.
How do I reduce transplant shock in shelton's violet?
Water thoroughly before and after moving the plant to minimize transplant shock in shelton's violet.
Should I fertilize shelton's violet immediately after transplanting?
Wait several weeks before fertilizing shelton's violet to allow it to acclimate to its new spot.
How much water does shelton's violet need post-transplant?
Ensure consistent moisture but prevent waterlogging; water deeply once or twice weekly.
Can I transplant shelton's violet in hot weather?
Avoid relocating shelton's violet in hot weather to prevent stress; early to late spring is ideal.
What should I do if my shelton's violet isn't growing after transplant?
Check for root-bound issues or insufficient light; adjust conditions as necessary.
How can I protect shelton's violet's roots during transplanting?
Use a garden fork to gently lift and preserve root structure while transplanting shelton's violet.



