How to Transplant Rancheria clover?
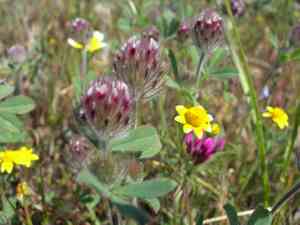
For rancheria clover, the ideal period for relocation is from the beginning to the end of spring, leveraging peak soil temperature and hydration. Preferably, select a bright spot with soil that drains effectively. Guaranteeing these circumstances fosters successful rooting for rancheria clover's development.
What Preparations are Needed Before Transplanting Rancheria Clover?
What is the Ideal Time for Transplanting Rancheria Clover?
The best period to relocate rancheria clover is from early to late spring, providing the plant with mild temperatures and sufficient rainfall for effective root establishment. This timing promotes vigorous growth and resilience, setting up rancheria clover for the upcoming growing season with the strongest possible foundation.
How Much Space Should You Leave Between Rancheria Clover Plants?
When moving rancheria clover, aim to position each plant 6-9 inches (15-23 cm) apart. This will allow ample room for healthy development without excessive crowding.
What is the Best Soil Mix for Rancheria Clover Transplanting?
For rancheria clover, it's optimal to use well-drained loamy soil. Incorporate a balanced base fertilizer, such as a 10-10-10 (N-P-K) blend, to aid your plants in developing robust roots.
Where Should You Relocate Your Rancheria Clover?
Ensure you transplant rancheria clover to a sunny spot. They thrive in full sun, meaning at least 6 hours of direct sunlight daily. This will help them flourish and produce beautiful blooms.
What Equipments Should You Prepare Before Transplantation Rancheria Clover?
Gardening Gloves
To safeguard your hands while handling soil and plants.
Hand Trowel
For digging small holes and loosening earth around the plant's root system.
Shovel or Spade
To excavate a larger hole at the new site and assist in lifting the plant from its original spot.
Watering Can or Hose
To hydrate the plant before and after its relocation.
Garden Fork
To aerate the soil at the new planting location.
Mulch
To help retain moisture around the newly transplanted plant.
How Do You Remove Rancheria Clover from the Soil?
How Do You Remove Rancheria Clover from the Soil?
From Ground: First, moisten the rancheria clover plant to dampen the soil. Then, dig a wide trench around the plant using a shovel or spade, ensuring the plant's root ball remains intact. Carefully work the spade beneath the root ball to lift the plant from its original location.From Pot: Thoroughly water the rancheria clover plant. Gently compress the sides of the pot to loosen the soil. Invert the pot while supporting the plant stem with your hand, and lightly tap the pot to release the plant. Slide the plant out, keeping the root ball undisturbed.From Seedling Tray: Water the seedlings well before transplanting. Use a hand trowel or pencil to carefully lift each rancheria clover seedling from the tray, ensuring the roots and surrounding soil stay intact. Handle the seedlings gently by their leaves rather than their stems to prevent damage.
Step-by-Step Guide for Transplanting Rancheria Clover
Preparing the New Location
Choose an appropriate spot in your garden and dig a hole at least twice the size of the rancheria clover plant's root ball. Loosen the soil at the bottom of the hole with a garden fork.
Removing the Plant
Extract the rancheria clover plant from its initial location using the suitable method (ground, pot, or seedling tray).
Transplanting
Position the rancheria clover plant in the prepared hole, ensuring it sits at the same depth as it did in its original spot. Backfill the hole with the excavated soil, gently firming it around the root ball.
Watering
Thoroughly water the rancheria clover plant after transplanting to help the soil settle around the roots.
Applying Mulch
Spread a layer of mulch around the base of the rancheria clover plant to help retain moisture and suppress weeds.
How Do You Care For Rancheria Clover After Transplanting?
Watering
Keep the soil around the rancheria clover consistently moist, but not waterlogged, for the initial few weeks post-transplant to aid in establishing strong roots.
Monitoring
Regularly inspect the rancheria clover plant for indications of stress such as wilting or yellowing leaves. Address any issues promptly.
Mulching
Maintain the mulch layer to keep the soil moist and temperature stable, and to prevent weed growth.
Fertilizing
Wait a few weeks before applying any fertilizer. Once the plant has settled in, use a balanced, slow-release fertilizer if necessary.
Troubleshooting Common Issues with Rancheria Clover Transplantation.
When is the best time to transplant rancheria clover?
The optimal period is from early spring to late spring for successful relocation.
What spacing should I maintain between rancheria clover plants?
Keep a distance of 6-9 inches (15-23 cm) to ensure healthy development.
How should I prepare the soil for transplanting rancheria clover?
Utilize well-drained soil and incorporate organic material to enhance soil quality.
What should I do if rancheria clover plants appear stunted?
Verify proper spacing and ensure soil is not waterlogged. Add nutrients if required.
How do I prevent root damage during rancheria clover transplantation?
Handle plants gently and minimize disturbance to the roots as much as possible.
What should I do if rancheria clover leaves turn yellow?
Ensure sufficient sunlight and check for overwatering or nutrient deficiencies.
How to water rancheria clover after transplanting?
Water thoroughly but avoid waterlogging. Keep the soil consistently moist.
What should I do if rancheria clover plants wilt after transplanting?
Provide shade, water adequately, and avoid transplanting during the hottest part of the day.
How can I avoid transplant shock in rancheria clover?
Acclimate the plants by gradually exposing them to outdoor conditions before relocation.
When should I start fertilizing rancheria clover after transplanting?
Wait two weeks post-transplant, then use a balanced fertilizer to encourage growth.



