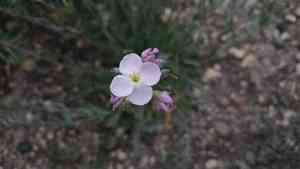
How to Transplant Gregg's keelpod?
Gregg's keelpod flourishes when relocated between mid-spring and early summer, enabling its root system to become established prior to the intense heat of midsummer. This plant favors bright areas with soil that drains effectively. Exercise care during the transfer process to lessen any disruption to its roots.
Essential Preparations Before Relocating Gregg's Keelpod?
What is the Best Period for Moving Gregg's Keelpod?
The prime window for relocating gregg's keelpod spans from late spring to early summer. During this time, the ground has adequately warmed, and there's abundant sunlight, fostering root development. Transplanting within this timeframe guarantees vigorous growth and blooming, as gregg's keelpod flourishes in moderate conditions with sufficient moisture and light.
How Much Room Should Be Allotted Between Gregg's Keelpod Plants?
When relocating gregg's keelpod, ensure each plant has ample room to expand. Aim for a separation of 9-12 inches (23-30 cm) between individual plants to allow for healthy development.
What is the Optimal Soil Blend for Gregg's Keelpod Relocation?
For gregg's keelpod, utilize well-draining soil enriched with a foundational fertilizer. A mix containing compost and a balanced, slow-release fertilizer will supply the necessary nutrients. Loamy or sandy soils are most suitable for this plant type.
Where Should You Replant Your Gregg's Keelpod?
Gregg's keelpod thrives in sunny environments. Select a location that receives direct sunlight for at least 6-8 hours daily. This will encourage robust plant growth and the finest blooms.
What Tools Are Necessary Before Relocating Gregg's Keelpod?
Gardening Gloves
To safeguard your hands while handling soil and the plant.
Hand Trowel
For excavating small holes and loosening the earth around gregg's keelpod.
Shovel or Spade
Required for digging larger holes when moving from the ground and ensuring a substantial root ball.
Watering Can or Hose
To hydrate the plant before and after its relocation.
Wheelbarrow (if needed)
For transporting the plant, especially if moving a larger gregg's keelpod from one spot to another.
Stakes and Ties (if necessary)
To offer support to the newly relocated gregg's keelpod, helping it remain upright until it re-establishes.
How Do You Extract Gregg's Keelpod from the Ground?
How Do You Extract Gregg's Keelpod from the Ground?
From Ground: First, moisten the gregg's keelpod plant to dampen the soil. Next, excavate a wide trench around the plant using a shovel or spade, ensuring the plant's root ball stays intact. Carefully work the spade beneath the root ball to lift the plant from its original position.From Pot: Hydrate the gregg's keelpod plant to help loosen the soil. Gently invert the pot while supporting the plant with your hand. Tap the pot's base to slide the plant out, being careful not to harm the roots.From Seedling Tray: Water the seedlings to ensure the soil is moist. Use a small hand trowel or your fingers to gently lift the seedlings from the tray's base, making sure to take as much soil as possible with the roots.
Step-by-Step Guide for Relocating Gregg's Keelpod
Preparation
Prepare the new planting site by digging a hole that is twice as wide and the same depth as the gregg's keelpod's root ball.
Soil Examination
Gently loosen the soil within the hole to facilitate root expansion.
Placement
Position the gregg's keelpod in the center of the hole, ensuring it is at the same depth as it was in its initial location. Backfill the hole with soil, pressing gently to remove any air pockets.
Support
For larger plants, use stakes and ties to provide temporary support and prevent the plant from toppling or being damaged by strong winds.
Watering
Thoroughly water the newly relocated gregg's keelpod to help settle the soil around the roots and minimize transplant shock.
How Do You Care For Gregg's Keelpod After Relocation?
Watering
Keep the soil around the gregg's keelpod consistently moist, but not waterlogged, for the initial weeks after relocation to aid in strong root establishment.
Mulching
Apply a layer of mulch around the base of the gregg's keelpod to retain moisture and regulate soil temperature. Ensure the mulch is kept away from the plant's stem.
Monitoring
Regularly inspect the plant for indications of stress or pests. Address any issues promptly to help the plant adapt to its new surroundings.
Fertilization
After a few weeks, you can apply a balanced fertilizer to support growth, but be careful not to over-fertilize as this can harm the plant.
Troubleshooting Common Issues with Gregg's Keelpod Relocation.
When is the optimal time to relocate gregg's keelpod?
Relocate gregg's keelpod from mid-spring to early summer for ideal growth and establishment.
How much space should I allow between each gregg's keelpod?
Space each gregg's keelpod plant 9-12 inches (23-30 cm) apart to ensure proper growth.
What soil type is best for relocating gregg's keelpod?
Use well-draining soil rich in organic matter to successfully relocate gregg's keelpod.
How deep should I plant gregg's keelpod seedlings?
Plant gregg's keelpod seedlings at the same depth they were in their original containers.
How often should I water newly relocated gregg's keelpods?
Water newly relocated gregg's keelpods regularly to keep the soil moist but not waterlogged.
Should I fertilize gregg's keelpod after relocating?
Fertilize gregg's keelpod lightly after relocating using a balanced fertilizer to promote healthy growth.
How can I safeguard gregg's keelpod from transplant shock?
Gradually acclimate gregg's keelpod to outdoor conditions before relocating to minimize shock.
Can I relocate gregg's keelpod on a hot day?
Avoid relocating gregg's keelpod on hot days; cooler, overcast days are ideal to prevent stress.
Do I need to prune gregg's keelpod before relocating?
Pruning isnât necessary but removing damaged leaves can help reduce stress during relocation.
How can I tell if gregg's keelpod is successfully relocated?
Look for new growth and vibrant leaves as signs of a successful gregg's keelpod relocation.


