How to Transplant Yellow water buttercup?
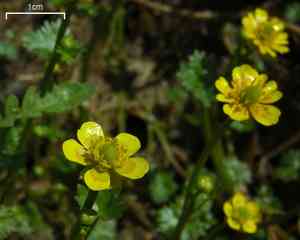
The ideal period for relocating yellow water buttercup spans from the revitalizing days of early spring to the onset of summer's heat. Select an aquatic environment that receives full sun to partial shade for best development. Maintaining consistently damp and adequately aerated soil will foster robust rooting.
What Preparations are Needed Before Transplanting Yellow Water Buttercup?
What is the Ideal Time for Transplanting Yellow Water Buttercup?
The optimal period to move yellow water buttercup is from the start of spring's thaw until the beginning of early summer. Relocating yellow water buttercup during this timeframe aligns with its natural growth cycle, allowing roots to establish well in the warming soil. Early transplantation leads to vigorous growth, as yellow water buttercup will utilize the full range of the season's mild temperatures and increasing daylight to flourish. By moving yellow water buttercup at this perfect moment, you encourage a spectacular display of flowers that truly reflects nature's harmony.
How Much Space Should You Leave Between Yellow Water Buttercup Plants?
When getting ready to transplant your yellow water buttercup, aim for a separation of approximately 6-8 inches (15-20 cm) between plants. This provides each plant ample room to thrive without overcrowding, ensuring they have access to necessary nutrients and moisture.
What is the Best Soil Mix for Yellow Water Buttercup Transplanting?
For yellow water buttercup, a soil mix that drains well and is rich in organic material is perfect. Incorporate compost or a balanced, slow-release fertilizer into the soil as a foundation before planting to give your yellow water buttercup a healthy start.
Where Should You Relocate Your Yellow Water Buttercup?
Select a location for your yellow water buttercup that receives abundant sunlight. These plants prefer bright conditions, so a spot that gets full to partial sun throughout the day is ideal for promoting strong growth and vibrant blossoms.
What Equipments Should You Prepare Before Transplantation Yellow Water Buttercup?
Gardening Gloves
To safeguard your hands while handling soil and plants.
Shovel or Garden Spade
To excavate the yellow water buttercup without harming its roots.
Wheelbarrow or Garden Cart
For moving the yellow water buttercup from its original spot to the new location.
Watering Can or Garden Hose
To hydrate the yellow water buttercup before and after relocation.
Mulch
To aid in retaining soil moisture and suppressing weed growth around the new planting area.
Pruning Shears
For trimming any dead or damaged roots and foliage prior to transplanting.
Trowel
For precisely adjusting the planting hole and adding or removing soil as needed.
How Do You Remove Yellow Water Buttercup from the Soil?
How Do You Remove Yellow Water Buttercup from the Soil?
From Ground: First, moisten the yellow water buttercup plant to dampen the soil. Next, dig a wide trench around the plant using a shovel or spade, ensuring the plant's root ball remains intact. Carefully work the spade beneath the root ball to lift the plant from its initial position.From Pot: Begin by watering the yellow water buttercup to facilitate its removal. Turn the pot on its side and gently tap the sides and bottom to loosen the soil. Carefully pull the plant out by its base, making sure to support the root ball.From Seedling Tray: Water the seedlings to moisten their roots. Use a trowel or your fingers to carefully lift the yellow water buttercup from the tray, ensuring minimal disturbance to its root structure.
Step-by-Step Guide for Transplanting Yellow Water Buttercup
Preparation
Prepare the new planting site for the yellow water buttercup, ensuring the ground is clear of weeds and debris.
Digging the Hole
Excavate a hole that is twice as wide and as deep as the yellow water buttercup's root ball. Loosen the surrounding soil to encourage root spread.
Root Pruning
Inspect the yellow water buttercup's roots, trimming any that are dead or excessively long, being careful not to harm healthy roots.
Transplanting
Position the yellow water buttercup in the center of the hole, adjusting its depth so it sits at the same level it grew previously.
Backfilling
Fill in around the root ball with soil, gently firming it to remove air pockets without over-compacting.
Watering
Thoroughly water the yellow water buttercup after transplanting to settle the soil and provide moisture to its roots.
Adding Mulch
Apply a layer of mulch around the base of the yellow water buttercup to conserve moisture and regulate soil temperature.
How Do You Care For Yellow Water Buttercup After Transplanting?
Monitoring
Check the yellow water buttercup daily for the initial couple of weeks, looking for indications of stress or insufficient water.
Maintenance Watering
Establish a consistent watering schedule, based on current weather conditions, to ensure the yellow water buttercup receives adequate hydration.
Mulch Management
Maintain the mulch layer but ensure it does not touch the yellow water buttercup's stem to prevent rot.
Support Structures
If the yellow water buttercup needs staking or other support, install these immediately after transplanting to avoid disturbing the roots.
Observation
Watch for new growth as a sign of successful transplant and establish a routine for ongoing care.
Troubleshooting Common Issues with Yellow Water Buttercup Transplantation.
What's the best time of year to transplant yellow water buttercup?
Move yellow water buttercup during the period from early to late spring, when temperatures are mild.
How deep should I plant yellow water buttercup when transplanting?
Plant yellow water buttercup at the same depth it was growing in its prior location, ensuring roots are fully covered.
What is the ideal distance apart for yellow water buttercup?
Space yellow water buttercup approximately 6-8 inches (15-20 cm) apart to allow each plant sufficient room to thrive.
My yellow water buttercup looks wilted after transplanting, what should I do?
Ensure you are watering deeply; yellow water buttercup may initially wilt but will recover with consistent moisture.
How much sun does yellow water buttercup need after being transplanted?
Yellow water buttercup flourishes in full to partial sunlight, so select a location that provides these conditions.
Should I fertilize yellow water buttercup right after transplanting?
Wait a few weeks before applying fertilizer to prevent root burn. Allow yellow water buttercup to acclimate first.
Can yellow water buttercup handle a transplant during hot weather?
It is best to avoid transplanting yellow water buttercup during hot temperatures. Stick to the cooler springtime window.
How should I prepare the soil for transplanting yellow water buttercup?
Enrich the soil with organic matter and ensure it drains well before transplanting yellow water buttercup.
How to prevent root shock in yellow water buttercup during transplanting?
Water yellow water buttercup thoroughly before and after transplanting, and minimize root disturbance.
Why are my yellow water buttercup plants not blooming after transplant?
Be patient; yellow water buttercup might not bloom as they adjust. Ensure proper care, and flowers should return.



