How to Transplant cherry prinsepia?
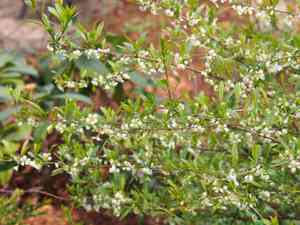
The most favorable period for relocating cherry prinsepia is from the middle of spring until its conclusion, providing an ideal window for root development prior to the summer's warmth. Choose a location bathed in sunlight featuring soil that drains effectively, and although optional, contemplate enhancing the area with organic material to foster superior growth.
What Preparations are Needed Before Transplanting âcherry Prinsepia?
What is the Ideal Time for Transplanting âcherry Prinsepia?
The optimal period for relocating âcherry prinsepia is at the onset of spring bloom, typically from mid- to late spring. This timing allows âcherry prinsepia's root system to recover most effectively, leveraging the moist soil and mild temperatures to establish a robust base. Moving âcherry prinsepia during this season utilizes spring's supportive conditions, providing plants with a strong start for the upcoming growth cycle.
How Much Space Should You Leave Between âcherry Prinsepia Plants?
When planning to move your âcherry prinsepia, ensure ample room for development. Position plants approximately 4.9-6.6 feet (1.5-2 meters) apart. This spacing guarantees sufficient area for them to thrive without becoming overcrowded.
What is the Best Soil Mix for âcherry Prinsepia Transplanting?
Prepare the ground for your âcherry prinsepia by selecting a well-draining loamy medium. Enhance the soil with organic compost or a balanced slow-release fertilizer to give your plant a vigorous start. This preliminary work will foster healthy root development and plant growth.
Where Should You Relocate Your âcherry Prinsepia?
Choose a site for your âcherry prinsepia that receives full sun to partial shade. Ensure the location gets at least 6 hours of sunlight daily for optimal development. A sunny spot will provide the energy your plant needs to produce its beautiful flowers and fruit.
What Equipments Should You Prepare Before Transplantation âcherry Prinsepia?
Gardening Gloves
To safeguard your hands while handling soil and plants.
Spade or Shovel
For excavating the plant and preparing the new planting site.
Hand Trowel
Useful for smaller digging tasks or refining the planting hole.
Watering Can or Hose
To hydrate the plant before and after relocation.
Wheelbarrow
To move the plant and soil if necessary.
Pruning Shears
For trimming any damaged roots or branches.
Mulch
To help retain soil moisture and regulate soil temperature post-planting.
Stakes and Ties
To support the plant if it is tall or top-heavy after transplanting.
How Do You Remove âcherry Prinsepia from the Soil?
How Do You Remove âcherry Prinsepia from the Soil?
From Ground: First, moisten the âcherry prinsepia plant's soil. Then, excavate a wide trench around the plant using a shovel or spade, ensuring the plant's root ball remains intact. Carefully work the spade beneath the root ball to lift the plant from its original spot.From Pot: Begin by watering the âcherry prinsepia plant in its current container for easier removal. Turn the pot sideways and gently tap the sides and bottom to loosen the plant. Support the plant by its base and carefully slide it out, preserving the root ball.From Seedling Tray: Water the seedlings to ensure the soil is damp. Use a hand trowel or a spoon to gently lift each âcherry prinsepia seedling by scooping beneath the root ball, taking care not to harm the delicate roots.
Step-by-Step Guide for Transplanting âcherry Prinsepia
Preparation
Ensure the new location has been prepared beforehand, as direct and prolonged exposure to the elements can stress the âcherry prinsepia plant.
Dug Hole Size
Excavate a hole in the ground that is twice the width of the âcherry prinsepia's root ball and of the same depth to allow for expansion without burying it too deeply.
Plant Positioning
Carefully place the âcherry prinsepia into the center of the hole, ensuring it stands upright. The top of the root ball should be level with the surrounding soil surface.
Backfilling
Gently refill the hole with soil, filling in around the âcherry prinsepia's root ball. Be careful not to compact the soil too tightly, which can hinder root growth.
Watering
After transplanting, thoroughly water the âcherry prinsepia to help settle the soil and eliminate air pockets. This step is vital for helping the roots establish in the new location.
Mulching
Apply a layer of mulch around the base of the âcherry prinsepia to conserve moisture and reduce weed competition. Keep the mulch a few inches away from the stem to prevent rot.
Support
If the âcherry prinsepia is tall or top-heavy, provide support with stakes and ties to prevent it from leaning or breaking.
How Do You Care For âcherry Prinsepia After Transplanting?
Regular Watering
Ensure the âcherry prinsepia receives sufficient water, especially during its initial growing season, to establish a robust root system. Water deeply to encourage roots to grow downwards.
Monitoring Growth
Observe for new growth as an indication that the âcherry prinsepia is adapting well to its new environment. Stunted growth or leaf discoloration could signal stress or disease.
Protecting
Utilize a physical barrier or repellent to safeguard the âcherry prinsepia from common pests and diseases in the area. Regularly inspect the plant for signs of infestation or illness.
Pruning
Prune any dead or damaged branches to encourage healthy growth and a desirable shape as the âcherry prinsepia matures in its new location.
Adjusting Care
Modify care practices based on weather conditions and the plant's response. For instance, provide more water during dry spells and less when rainfall is abundant.
Troubleshooting Common Issues with âcherry Prinsepia Transplantation.
When is the optimal time to transplant âcherry prinsepia?
The best time to move âcherry prinsepia is during mid to late spring, ensuring mild weather conditions for better root establishment.
How far apart should I plant âcherry prinsepia for proper growth?
Space âcherry prinsepia about 5-6.5 feet (1.5-2 meters) apart. Proper spacing prevents competition and promotes healthy growth.
Why are my âcherry prinsepia saplings wilting after transplanting?
Wilting may be due to transplant shock. Ensure proper watering, avoid full sun immediately after transplanting, and consider using a root stimulator.
What soil preparation is needed before transplanting âcherry prinsepia?
Prepare the soil with well-draining compost and make sure the pH is slightly acidic to neutral for optimal âcherry prinsepia growth.
How deep should the hole be for transplanting âcherry Prinsepia?
The hole should be twice as wide and the same depth as the root ball to allow roots to expand without stress.
Can I transplant âcherry Prinsepia during the fall or winter?
It's not recommended because âcherry prinsepia establishes best in the gentle warmth of spring. Fall or winter transplantation might expose them to harsh conditions.
How much water does âcherry Prinsepia need after transplanting?
Water generously at transplanting and then maintain consistent moisture, especially in the first growing season, without overwatering.
What should I do if âcherry Prinsepia's leaves turn yellow post-transplant?
Yellow leaves can indicate overwatering or poor drainage. Check soil moisture and ensure the planting site is well-draining.
Is it necessary to prune âcherry Prinsepia during transplanting?
Light pruning is beneficial to remove any damaged parts and to encourage new growth, but avoid heavy pruning which can stress âcherry prinsepia.
Should I fertilize âcherry Prinsepia immediately after transplanting?
Wait a few weeks before fertilizing to allow âcherry prinsepia to settle. Over-fertilizing can harm delicate new roots.



