How to Prune cherry prinsepia?
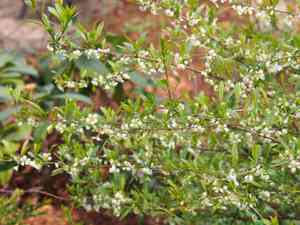
This leafy shrub, valued for both its decorative appeal and fruit production, thrives with trimming performed in late winter or early spring. To preserve the vitality and structure of cherry prinsepia, eliminate any lifeless or ailing branches, reduce crowded sections to enhance light exposure and airflow, and sculpt the plant according to preference. Light pruning fosters its inherent shape and yield, whereas deliberate cuts aid in stimulating new development. Always ensure your implements are keen and sanitized to avert the spread of pathogens.
What Are the Benefits of Pruning âcherry Prinsepia?
What Are the Benefits of Pruning âcherry Prinsepia?
Trimming âcherry prinsepia promotes vigorous development and maintains its desired shape. Strategic cutting back stimulates fresh, strong shoots and helps form the plant's structure for optimal beauty and yield.
What Is the Best Time for Pruning âcherry Prinsepia?
What Is the Best Time for Pruning âcherry Prinsepia?
Pruning âcherry prinsepia from late winter to early spring is advantageous as it typically precedes new growth, allowing the plant to recover quickly and channel energy into developing new shoots and blooms. This also lowers the risk of disease, as many pathogens are less active then. Furthermore, pre-flowering pruning enhances floral displays and, for fruit-bearing plants, can boost fruit production. This timing also helps gardeners clearly see the plant's structure due to the absence of leaves, facilitating more accurate cuts.
What Tools Do I Need to Prune âcherry Prinsepia?
Bypass Pruners
Perfect for making clean cuts on young, living growth and smaller branches of âcherry prinsepia. These pruners minimize tissue damage, aiding in better healing.
Loppers
Offer extended reach and greater leverage for cutting thicker branches commonly found on mature âcherry prinsepia. This ensures accuracy and reduces gardener fatigue.
Pruning Saw
An essential tool for cutting branches over 1.5 inches thick on âcherry prinsepia, helping to manage its size and form without harming adjacent branches.
Pruning Shears
Useful for shaping and maintaining the dense foliage of âcherry prinsepia, allowing for quick, clean snips to encourage healthy development.
Gloves
To shield your hands from the thorns of âcherry prinsepia during pruning, gloves are crucial for safety and comfort.
Eye Protection
To safeguard against potential eye injuries from flying debris or thorns while working on âcherry prinsepia.
How to Prune âcherry Prinsepia
Clean tools
Start with sanitized pruning tools to prevent disease spread. Clean your pruner blades with isopropyl alcohol before beginning and between cuts, especially when removing diseased material from âcherry prinsepia.
Remove diseased leaves
Carefully take off any diseased leaves by cutting them at the base of their stem. Ensure you collect and dispose of them away from âcherry prinsepia to prevent re-infection.
Trim withered leaves
Snip off withered leaves, identifiable by their dry, crumbly texture. Cut these leaves at the stem, being careful not to harm new growth or healthy tissues on âcherry prinsepia.
Eliminate dead branches
Cut away all dead branches, recognized by their brittle nature and lack of green when lightly scratched. Make clean cuts at the base of dead branches to encourage healthy growth and maintain the natural shape of âcherry prinsepia.
Prune diseased branches
Prune any diseased branches by cutting at least several inches below the affected area to ensure complete removal of diseased tissue. This will help promote health and vigor in âcherry prinsepia. Dispose of removed branches properly.
Common Pruning Mistakes with âcherry Prinsepia
Overpruning
Removing too much foliage from âcherry prinsepia at once, which can stress the plant and lead to poor growth or reduced flowering.
Inadequate tool care
Using dull or dirty pruning tools, which can damage âcherry prinsepia branches and introduce diseases.
Neglecting dead wood
Failing to remove dead or diseased wood can hinder the overall health and appearance of âcherry prinsepia by limiting air circulation and attracting pests.
Pruning to the wrong size
Cutting branches back to an incorrect size, which can result in poor form and expose âcherry prinsepia to pests or diseases.
Ignoring plant shape
Not considering the natural growth habit and form of âcherry prinsepia during pruning, leading to an unnatural look and potentially harming the plant's development.
Torn bark
Pruning in a way that tears the bark can leave âcherry prinsepia vulnerable to infection and decay.
Common Pruning Tips for âcherry Prinsepia
Sharp clean tools
Always use sharp and clean tools to make precise cuts and help prevent the spread of diseases to âcherry prinsepia.
Angle cuts
Make cuts at a slight angle, away from the bud, to promote proper healing and new growth for âcherry prinsepia.
Gradual pruning
Gradually prune âcherry prinsepia over several seasons if extensive shaping is needed, rather than drastic pruning in one go.
Specific branch selection
Selectively prune only the branches that are necessary, such as dead, damaged, or diseased wood, to maintain the health and form of âcherry prinsepia.
Follow branch collar
Prune branches just above the branch collar for âcherry prinsepia's healthy callousing and wound compartmentalization.
Thin interior
Thin out interior branches as needed to increase light penetration and air flow within the canopy of âcherry prinsepia, enhancing its vitality and flowering capability.



