How to Transplant Knobcone pine?
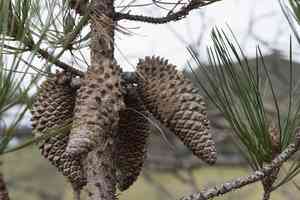
Knobcone pine transplantation thrives as the ground becomes active in springtime, providing optimal humidity and warmth. Choose sunny, adequately draining locations for vigorous development. Careful management of roots during the move is crucial for a smooth adaptation.
What Preparations are Needed Before Transplanting Knobcone Pine?
What is the Ideal Time for Transplanting Knobcone Pine?
The perfect moment to move knobcone pine to its new spot is during the revitalizing spring season. This period offers mild temperatures and ample rainfall, which helps the roots adapt to their new surroundings. Spring transplanting allows knobcone pine to benefit from the entire growing season, developing a strong root system before harsh weather arrives. Taking these initial steps in spring ensures a better start for knobcone pine, promising a thriving future.
How Much Space Should You Leave Between Knobcone Pine Plants?
When relocating knobcone pine, provide ample room for growth. Aim for a spacing of approximately 10-12 feet (3-3.7 meters) between each plant. This allows their roots to spread and become firmly established in the ground.
What is the Best Soil Mix for Knobcone Pine Transplanting?
For knobcone pine, prepare a well-draining sandy or loamy soil. It prefers slightly acidic conditions, so a base fertilizer enriched with organic matter will be advantageous. This establishes a solid foundation for healthy plant development.
Where Should You Relocate Your Knobcone Pine?
For optimal growth, transplant your knobcone pine to a location with full sun exposure. These plants thrive in sunlight and will flourish with plenty of daylight. Choose a spot that isn't excessively shaded.
What Equipments Should You Prepare Before Transplantation Knobcone Pine?
Gardening Gloves
To safeguard your hands while handling soil and knobcone pine.
Shovel or Spade
A robust tool for digging to extract the knobcone pine from its original spot and prepare a new location.
Pruning Shears
For trimming any damaged roots or branches on the knobcone pine prior to transplanting.
Wheelbarrow or Tarp
To move the knobcone pine between its old and new sites with minimal harm.
Watering Can or Garden Hose
To hydrate the knobcone pine both before and after transplanting to reduce shock and aid its establishment in the new location.
How Do You Remove Knobcone Pine from the Soil?
How Do You Remove Knobcone Pine from the Soil?
From Ground: First, moisten the soil around the knobcone pine to facilitate removal. Using a shovel or spade, carefully dig around the plant, being cautious not to harm the roots. Try to keep as much of the root ball intact as possible. Once loose, gently lift the knobcone pine and place it on a wheelbarrow or tarp for transport.From Pot: Before beginning, water the potted knobcone pine thoroughly to ease its removal. Turn the pot on its side, hold the knobcone pine at its base, and carefully slide the plant out with the root ball intact. If the plant is stuck, try tapping the pot's bottom or rolling it on a flat surface to loosen the roots.From Seedling Tray: Water the tray beforehand. Using a small spade or spoon, carefully lift the knobcone pine seedling, ensuring as much of the root ball and soil remain intact as possible. Handle seedlings only by their leaves to prevent damage to delicate stems.
Step-by-Step Guide for Transplanting Knobcone Pine
Preparation
Water the knobcone pine thoroughly in its current location several hours before transplanting. This makes removal easier and helps reduce transplant shock.
Digging the Hole
The hole should be twice as wide and the same depth as the knobcone pine's root ball to provide ample room for root spread. Roughen the sides of the hole to encourage root penetration into the surrounding soil.
Placement
Gently lower the knobcone pine into the hole, ensuring it sits at the same depth as it was in its original spot. The top of the root ball should be level with or slightly above the surrounding ground.
Backfill
Fill in around the roots with the excavated soil, firming it as you go to support the plant and eliminate air pockets. The knobcone pine should stand upright.
Watering
After planting, water the knobcone pine thoroughly to settle the soil around the roots. This also aids in recovery from transplant shock.
How Do You Care For Knobcone Pine After Transplanting?
Watering
Keep the soil around the knobcone pine consistently moist but not waterlogged. Regular watering helps the plant establish roots in its new location.
Pruning
Trim back the knobcone pine's growth after transplanting to lessen the strain on its roots. For the initial few weeks, focus on root establishment rather than top growth.
Mulch
Applying a layer of mulch around the knobcone pine, leaving a gap near the stem, helps retain soil moisture and suppresses weeds, which compete for nutrients.
Monitor
Observe the knobcone pine for signs of stress or disease, such as wilting, discolored, or falling leaves. Also, regularly check for pest infestations.
Troubleshooting Common Issues with Knobcone Pine Transplantation.
What is the ideal season for transplanting knobcone pine?
The best time to transplant knobcone pine is during S1-S3, when the weather is cool and moist enough to support root growth without stressing the plant.
What is the recommended spacing when planting multiple knobcone pine?
It's advisable to maintain a generous spacing of about 10-12 feet (3-3.6 meters) between each knobcone pine, allowing them ample room to grow and flourish.
What should I keep in mind before starting with the transplantation of knobcone pine?
Ensure you have a suitable location that meets knobcone pine's requirements - sufficient sunlight and well-drained soil. Dig a hole twice as wide and just as deep as the root ball.
What steps should I follow during the actual transplanting process of knobcone pine?
Place knobcone pine into the hole, ensuring it's at the correct height, then backfill with soil. It's vital that the tree isn't planted too deeply, as this can negatively impact root health.
Do I need to firm the soil after transplanting knobcone pine?
Yes, gently firming the soil around knobcone pine helps to eliminate any air pockets and provides stability to the newly transplanted plant.
How often should I water knobcone pine after transplanting?
After transplanting, water knobcone pine generously. Then, establish a consistent watering schedule, ensuring the soil remains moist but avoiding waterlogging.
Is the use of fertilizer necessary after transplanting knobcone pine?
Yes, using a slow-release granular fertilizer can be beneficial. However, be careful not to over-fertilize, as this can burn the roots and harm the knobcone pine.
Should I use a stake for supporting my transplanted knobcone pine?
Staking is essential if the knobcone pine lacks stability. It offers support, helping the tree stay upright. Remember to use soft tie material to prevent injuring the bark.
Is there any special care needed for knobcone pine post-transplant?
Post-transplant, knobcone pine may require protection from strong winds or intense sunlight. Use a tree guard if necessary and closely monitor the tree for the first year.
What are signs to look out for that suggest my transplanted knobcone pine isn't doing well?
Yellowing leaves, a lack of new growth, and wilting are all indicators that your knobcone pine may be struggling. If you notice these symptoms, promptly review your care practices.



