How to Transplant Guinea henweed?
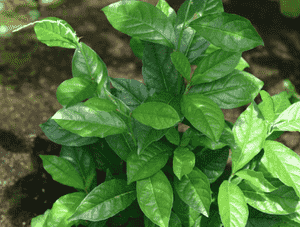
The most favorable period for relocating guinea henweed is in the pleasant warmth of late spring through summer, capitalizing on active growth phases. Select a bright spot with adequately draining earth to rapidly establish sturdy roots, promoting vigorous progress.
What Preparations are Needed Before Transplanting Guinea Henweed?
What is the Ideal Time for Transplanting Guinea Henweed?
The optimal period to relocate guinea henweed is during late spring or early summer. At this time, the warmer soil aids rapid root establishment, ensuring guinea henweed flourishes. Moving guinea henweed within this timeframe leverages extended daylight and moderate temperatures, vital for adaptation and vigorous development, setting the stage for a thriving existence.
How Much Space Should You Leave Between Guinea Henweed Plants?
For guinea henweed, a good general guideline is to maintain a distance of approximately 2-3 feet (about 0.6 - 0.9 meters) between each plant. This provides ample room for them to grow and expand without becoming overcrowded. It's an easy rule to remember and beneficial for guinea henweed.
What is the Best Soil Mix for Guinea Henweed Transplanting?
The correct conditions are crucial for cultivating healthy guinea henweed. Utilize well-drained, fertile soil enriched with organic matter (such as compost). Incorporate a slow-release base fertilizer, like 10-10-10, to supply nutrients throughout the growing season. This offers an excellent beginning for guinea henweed.
Where Should You Relocate Your Guinea Henweed?
Guinea henweed thrives with abundant sunlight, so select a location that receives full sun for several hours daily. If your garden has partial sunlight, do not worry. Guinea henweed can tolerate it. This way, guinea henweed will acquire the energy necessary for robust growth.
What Equipments Should You Prepare Before Transplantation Guinea Henweed?
Gardening Gloves
To safeguard your hands while handling soil and plants.
Shovel or Spade
For digging the initial hole and extracting the plant if it's in the ground.
Trowel
Useful for removing the guinea henweed plant from containers or seedling trays.
Organic Compost
To enrich the planting hole with nutrients.
Gardening Fork
This tool helps to loosen the soil at the new site, facilitating root spread for the plant.
Watering Can or Hose
To hydrate the plant before and after its relocation.
Mulch
To assist in retaining soil moisture post-transplanting.
Hand Pruners
These may be needed to trim back the plant, if necessary, at its original spot before moving it.
How Do You Remove Guinea Henweed from the Soil?
How Do You Remove Guinea Henweed from the Soil?
From Ground: Begin by thoroughly watering the guinea henweed plant to simplify the removal process. Next, dig a trench wide enough around the plant's base using your spade or shovel, being careful not to cut into the root ball. Once done, gently slide your shovel beneath the root ball and carefully lift the plant from its spot.From Pot: Water your guinea henweed plant well, then turn the pot on its side, and gently pull the base of the plant. If the plant resists, lightly tap the sides and bottom of the pot to loosen it.From Seedling Tray: Ensure the guinea henweed seedlings are adequately hydrated. Carefully lift the seedling by its leaves (avoid pulling by the stem), and if needed, push up from the tray's bottom to help dislodge the roots. Remember to handle the young guinea henweed plant with care.
Step-by-Step Guide for Transplanting Guinea Henweed
Plant Preparation
Begin by trimming any dead or damaged parts of the guinea henweed plant. This helps minimize transplant shock and promotes healthy new growth after the move.
Prepare the Hole
Use your shovel or spade to excavate a hole at the new site. The hole should be twice as wide as the root ball, but no deeper. Loosen the sides and bottom of the hole with a gardening fork. Then, enrich the hole with some organic compost.
Planting Process
Lower the guinea henweed plant into the hole, ensuring it sits at the same depth as it did in its original location. Backfill half the hole with original soil and water thoroughly. After the water drains, fill the remainder of the hole with soil.
Water and Mulch
Water the plant thoroughly once more and apply a layer of mulch around the plant to help retain soil moisture and inhibit weed growth. Be sure not to pile the mulch against the plant stem to prevent rot.
How Do You Care For Guinea Henweed After Transplanting?
Watering
Carefully monitor the guinea henweed's hydration requirements. The plant will likely need more water than usual for the initial few weeks post-transplant. Ensure to water thoroughly, allowing moisture to reach the root system.
Monitoring
Observe the guinea henweed plant's development. If you notice wilting or discolored leaves, it could indicate transplant shock. Ensure it receives proper care. If wilting persists despite adequate care, consult a local nursery or extension service.
Pruning
If the guinea henweed plant becomes too large, it may be beneficial to prune it back slightly to reduce stress on the root system. Always sterilize your pruners before use to prevent disease spread.
Feeding
Approximately a month after transplanting the guinea henweed, you can begin feeding it with a balanced plant food or fertilizer. Follow package instructions for correct dosages and application methods to avoid over-fertilization.
Troubleshooting Common Issues with Guinea Henweed Transplantation.
What's the best season to transplant guinea henweed?
The optimal period to move guinea henweed is during S3-S6, which spans late summer to early winter, allowing for good establishment.
What is the ideal distance between guinea henweed when planting?
You should maintain a gap of 2-3 feet (0.6-0.9 meters) between each guinea henweed, to provide space for growth and root development.
How much sunlight does guinea henweed need after transplanting?
Guinea henweed thrives with ample sunlight, but ensure to shield it from intense midday sun. Gradual sun exposure aids better adaptation.
How often should I water guinea henweed after transplanting?
Water guinea henweed thoroughly immediately after transplanting. Subsequently, keep the soil moist but avoid waterlogging, which can lead to rot.
Should I add compost or fertiliser when transplanting guinea henweed?
While not essential, incorporating compost or organic fertilizer can revitalize the soil and give guinea henweed the best chance for vigorous growth.
How deep should I dig to transplant guinea henweed?
Excavate a hole deep enough to fully accommodate the root ball of guinea henweed. Typically, this depth is at least 10 inches (25 cm).
What should I do if the leaves of guinea henweed wilt after transplanting?
Wilting indicates stress, often from overwatering or sudden sun exposure. Adjust watering practices and gradually introduce it to sunlight.
How can I help guinea henweed establish quicker post-transplant?
Ensuring sufficient sunlight, frequent but careful watering, and maintaining the 2-3 feet (0.6-0.9 meters) spacing can support faster establishment of guinea henweed.
Is it normal for guinea henweed to lose leaves after transplant?
It's common for plants to shed some leaves after relocation, as they adapt to their new surroundings. Continue nurturing it and don't be alarmed.
Why doesn't my guinea henweed flower after transplanting?
Post-transplant, guinea henweed prioritizes root establishment, which may delay flowering. Allow it time, ensure good care, and blooming should follow.



