How to Transplant Bridge penstemon?
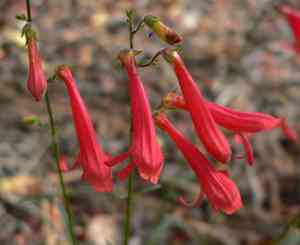
The ideal period for relocating bridge penstemon is amidst the warmth of summer, which offers prime conditions for development. Select a bright spot with soil that drains effectively. Careful handling guarantees this perennial flourishes after transplantation.
What Preparations are Needed Before Transplanting Bridge Penstemon?
What is the Ideal Time for Transplanting Bridge Penstemon?
For bridge penstemon, mid-summer offers an unparalleled chance for establishment, as consistent warmth promotes root development. Moving bridge penstemon during this period maximizes vigor, allowing ample time to adapt before colder months arrive. This strategic timing not only boosts survival rates but also guarantees abundant blooms in subsequent seasons. This transplanting window facilitates a smooth transition for bridge penstemon, with natural conditions providing optimal growth for these perennials.
How Much Space Should You Leave Between Bridge Penstemon Plants?
When preparing to relocate your bridge penstemon, position them approximately 2-3 feet (60-90 cm) apart. This spacing allows each plant sufficient room to grow without excessive competition. Take your time to ensure every bridge penstemon has its own comfortable spot!
What is the Best Soil Mix for Bridge Penstemon Transplanting?
Your bridge penstemon thrives in well-drained soil. Consider preparing a mixture of loam, sand, and a small amount of compost as a foundational fertilizer. Remember, excellent soil is the first step toward healthy plants. Your bridge penstemon will appreciate the extra effort!
Where Should You Relocate Your Bridge Penstemon?
Select a location that receives full sunlight for your bridge penstemon. They flourish in bright, sunny spots! If a fully sun-drenched area isn't available, these beautiful plants can also tolerate partial shade. Enjoy your gardening journey!
What Equipments Should You Prepare Before Transplantation Bridge Penstemon?
Gardening Gloves
Protect your hands while handling soil and plants.
Spade
Used for digging holes in the ground for relocation.
Watering Can
For gently hydrating seedlings and the new planting site.
Pruning Shears
To remove any dead or damaged parts of the bridge penstemon.
Compost
To blend with existing soil, aiding in rapid root development.
Trowel
A small tool useful for moving the bridge penstemon and for delicate root work.
Gardening Fork
Used to loosen soil, making it easier to extract the bridge penstemon from its original spot.
Wheelbarrow
To simplify and lighten the task of moving the plant.
How Do You Remove Bridge Penstemon from the Soil?
How Do You Remove Bridge Penstemon from the Soil?
From Ground: First, moisten the soil around the bridge penstemon by watering, which will simplify its removal. Use a gardening fork to loosen the soil around the plant to prevent accidental root damage. Dig a wide circle around the bridge penstemon, ideally twice the plant's spread. Work the spade beneath the root ball and carefully lift it from the ground.Pot: If the bridge penstemon is in a pot, the process is similar. Begin by thoroughly watering the plant. Then, place your fingers over the pot's top, with the bridge penstemon stem between them. Invert the pot and gently tap it. The bridge penstemon should slide out, keeping its root ball intact.Seedling Tray: For bridge penstemon seedlings, start by watering the tray so seedlings release more easily. Gently squeeze the bottom of each cell or use a small tool like a spoon handle, and the seedling should pop out.
Step-by-Step Guide for Transplanting Bridge Penstemon
Preparation
Clear the planting area of debris and turn over the soil with a spade. Incorporate compost into the soil to supply nutrients.
Digging
Use your spade to create a hole twice the width of the bridge penstemon's root ball and of equal depth. Planting too deep might cause the bridge penstemon to sit too low after placement.
Placing the Plant
Carefully position the bridge penstemon in the prepared hole. The top of the root ball should be level with the ground surface.
Backfilling
Return the excavated soil (mixed with compost) into the hole to secure the bridge penstemon.
Watering
Water generously after transplanting. This helps reduce transplant shock and aids the plant in establishing itself in its new location.
How Do You Care For Bridge Penstemon After Transplanting?
Watering
Keep the soil around bridge penstemon consistently damp, but not waterlogged, for the initial weeks post-transplant to encourage strong root development. Gradually decrease frequency until watering is only needed during dry spells.
Pruning
For the first season, it's best not to prune bridge penstemon extensively, though you can remove any dead or damaged parts.
Mulching
Consider applying an organic mulch around bridge penstemon to help retain soil moisture and suppress weeds.
Monitoring
Regularly inspect the bridge penstemon for any signs of disease or pests during the first few weeks after transplanting. Early detection allows for appropriate measures to maintain your bridge penstemon's health.
Troubleshooting Common Issues with Bridge Penstemon Transplantation.
When is the best time to transplant bridge penstemon?
The optimal period for transplanting bridge penstemon is from the late post-peak bloom season to the beginning of dormancy, typically referred to as 'Stage 4 to Stage 6'.
What should be the spacing between bridge penstemon plants during transplant?
Ensure ample room for bridge penstemon by maintaining a distance of approximately 2-3 feet (60-90 cm); this promotes healthy growth.
Why does my transplanted bridge penstemon look wilted or discolored?
Ensure regular watering as the plant might be dehydrated. However, be cautious not to overwater, which can lead to root rot.
What ideal soil conditions should I ensure during transplanting bridge penstemon?
Well-drained soil with a pH from neutral to slightly acidic is best for transplanting bridge penstemon. Avoid waterlogged or extremely dry conditions.
How deep should I plant bridge penstemon during transplanting?
Plant bridge penstemon deep enough to cover the root ball. Approximately 10 inches (25cm) deep should suffice to ensure stability and growth.
How to care for bridge penstemon post-transplanting?
Water them regularly and apply a layer of mulch to retain moisture. Frequently check for signs of disease or pests.
Why are the leaves of my transplanted bridge penstemon turning yellow?
Check for proper drainage. Poorly draining soil can cause overwatering, leading to yellowing leaves due to potential root issues.
What is the ideal temperature for transplanting bridge penstemon?
While bridge penstemon are quite adaptable, they thrive best in moderate temperatures. Avoid transplanting during extreme heat or when temperatures drop below freezing.
How to acclimate bridge penstemon before transplanting?
Gradually expose the bridge penstemon to its new environment before transplanting. This process, known as 'hardening off', reduces post-transplant shock.
Why is my transplanted bridge penstemon not flowering?
Insufficient sunlight or poor soil conditions could be contributing factors. Also, remember that plants often require a year to acclimate before blooming.



