How to Transplant Thin paspalum?
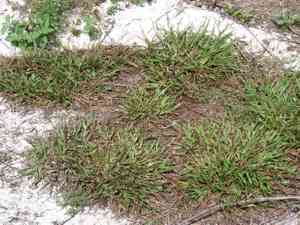
For sparse paspalum, the ideal time for relocation is from early to mid-spring or late summer to mid-autumn, enabling the plant to settle prior to harsh temperatures. Provide a spot with full sun to partial shade and soil that drains effectively for peak development.
Essential Preparations Before Relocating Thin Paspalum?
Optimal Timing for Relocating Thin Paspalum?
Relocating thin paspalum, a perennial species, is best done from early to mid-spring and late summer to mid-fall. These periods offer mild temperatures and sufficient soil moisture, fostering robust root development and minimizing transplant shock. This timing allows thin paspalum to flourish, ensuring vigorous growth and sustained vitality.
Recommended Spacing Between Thin Paspalum Plants?
When relocating thin paspalum, aim for a separation of 12-18 inches (30-45 cm). This provides ample room for development and promotes healthier plants by reducing competition for nutrients, water, and sunlight.
Ideal Soil Mixture for Thin Paspalum Relocation?
Prepare the ground by selecting a well-draining, sandy or loamy soil type. Incorporate a base fertilizer rich in phosphorus to aid root growth. Compost is an excellent addition to organically enrich the soil for thin paspalum.
Preferred Location for Your Thin Paspalum?
Select a sunny spot for relocating thin paspalum. This plant thrives in full sunlight, so ensure it receives at least 6-8 hours of direct sun daily to guarantee vigorous development.
Equipment Checklist for Thin Paspalum Relocation?
Gardening Gloves
To safeguard your hands while handling soil and the plant.
Shovel or Spade
For excavating the plant from its original spot and preparing the new hole.
Trowel
Useful for precise digging and working in confined areas.
Watering Can or Hose
To hydrate the plant before and after its move.
Wheelbarrow
For moving the plant if necessary.
Method for Extracting Thin Paspalum from the Ground?
Method for Extracting Thin Paspalum from the Ground?
From Ground: First, moisten the thin paspalum plant to soften the soil. Next, dig a wide trench around the plant using a shovel or spade, ensuring the plant's root ball remains intact. Carefully work the spade beneath the root ball to lift the plant from its initial position.From Pot: Gently tap the pot's sides to loosen the soil. Carefully invert the pot, supporting the plant with your hand, and tap the bottom to release it. If it doesn't come out easily, run a trowel along the pot's edges.From Seedling Tray: Use a trowel or your fingers to carefully lift the seedlings from the tray, making sure to keep as much of the root ball and soil intact as possible. Be cautious not to harm the delicate roots.
Step-by-Step Guide for Relocating Thin Paspalum
Pre-Water the New Site
Water the area where you intend to relocate your thin paspalum a few hours prior to the move to ensure the soil is prepared for the new plant.
Excavate the New Hole
Use a shovel to dig a hole that is twice as wide and the same depth as the root ball of your thin paspalum. This allows the roots ample space to spread and establish themselves in the new location.
Incorporate Compost
Mix compost into the soil removed from the hole to provide additional nutrients for your thin paspalum.
Position the Plant
Place your thin paspalum in the center of the hole, ensuring it is at the same depth as it was in its original spot.
Backfill the Hole
Fill the area around the plant with the soil and compost mixture, gently pressing it down to eliminate air pockets.
Water Thoroughly
Water the thin paspalum deeply to help the soil settle and ensure the roots have access to moisture.
Apply Mulch
Spread a layer of mulch around the plant's base to help retain moisture and reduce weed competition.
Post-Relocation Care for Thin Paspalum?
Watering
Maintain consistent moisture around the thin paspalum, avoiding sogginess, for the initial weeks after relocation to aid in strong root establishment.
Monitoring
Regularly inspect the plant for signs of distress, such as wilting or yellowing leaves, and adjust care as necessary.
Protection
Consider using a temporary shield, like a shade cloth or light mulch, to safeguard the thin paspalum from harsh weather conditions while it adapts to its new environment.
Addressing Common Issues with Thin Paspalum Relocation.
What is the optimal season for relocating thin paspalum?
Relocate thin paspalum from early to mid-spring or late summer to mid-fall for best outcomes.
How much distance should I maintain between thin paspalum plants?
Space your thin paspalum plants 12-18 inches (30-45 cm) apart to ensure adequate growth room.
How do I prepare the soil for relocating thin paspalum?
Loosen the soil to a depth of 8 inches (20 cm) and blend in compost for improved drainage.
What if thin paspalum appears wilted after relocation?
Ensure the thin paspalum is well-hydrated and shaded for the first few days to aid its recovery.
At what depth should I plant thin paspalum during relocation?
Plant thin paspalum at the same depth it was in its original container to prevent root stress.
What if thin paspalum struggles after relocation?
Check soil drainage and pH, and confirm proper spacing. Adjust watering as needed to support growth.
Should I fertilize immediately after relocating thin paspalum?
Wait several weeks before fertilizing thin paspalum to allow it to adapt to its new surroundings.
How much water does thin paspalum require after being relocated?
Thin paspalum needs consistent moisture. Water thoroughly but avoid waterlogging to prevent root rot.
How can I minimize transplant shock for thin paspalum?
Water the plant thoroughly before and after relocation, and reduce root disturbance during the process.
What type of mulch is best for thin paspalum after relocation?
Utilize organic mulch, such as straw or wood chips, to maintain soil moisture and temperature.



