How to Transplant Shrubby daisybush?
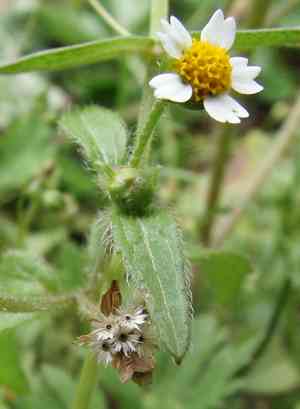
Relocate shrubby daisybush from early spring to late spring for the best root development. Position it in a bright spot with soil that drains effectively. Facilitate a smooth beginning by disturbing the roots as little as possible.
What Preparations are Needed Before Transplanting Shrubby Daisybush?
What is the Ideal Time for Transplanting Shrubby Daisybush?
The best period for moving shrubby daisybush is from the start of early spring through the end of late spring. This timeframe provides the new growth and moderate temperatures that shrubby daisybush prefers. Relocating shrubby daisybush during this revitalizing season promotes strong root development, leading to abundant blooms and lush foliage. By selecting this interval, you are setting shrubby daisybush up for success, with spring's gentle climate aiding its move to a new spot.
How Much Space Should You Leave Between Shrubby Daisybush Plants?
When placing your shrubby daisybush, allow ample room for growth! Aim for a separation of 12-20 inches (30-50 cm). This ensures they can expand their leaves and receive sunlight without competing with nearby plants.
What is the Best Soil Mix for Shrubby Daisybush Transplanting?
Your shrubby daisybush will flourish in soil that drains well and has some added nutrients! Incorporate compost or a slow-release fertilizer to give them a good start. Just remember, they dislike soggy conditions, so keep the soil light.
Where Should You Relocate Your Shrubby Daisybush?
Sunlight is beneficial for your shrubby daisybush! Select a location that receives full sun to partial shade. This means about 6-8 hours of direct sunlight daily. A sunny spot will keep your shrubby daisybush producing abundant flowers.
What Equipments Should You Prepare Before Transplantation Shrubby Daisybush?
Gardening Gloves
To safeguard your hands while handling soil and plants.
Trowel or Shovel
For excavating the hole in the garden bed and assisting in lifting the shrubby daisybush.
Watering Can or Hose
To hydrate the shrubby daisybush prior to and following transplantation.
Pruning Shears
To trim any damaged roots or stems before moving the plant.
Wheelbarrow or Garden Cart
To transport the shrubby daisybush and soil if necessary.
Garden Fork
To loosen the soil surrounding the plant's root ball in its current position.
How Do You Remove Shrubby Daisybush from the Soil?
How Do You Remove Shrubby Daisybush from the Soil?
From Ground: Water the shrubby daisybush generously to make the soil easier to manage. Using a garden fork, gently loosen the soil in a wide circle around the plant. Carefully work the tool under the root ball to lift the plant, keeping as much soil attached to the roots as possible.From Pot: Thoroughly water the plant and allow it to drain. Grasp the shrubby daisybush near its base and gently invert the pot, supporting the plant with your hand. If the plant doesn't slide out, tap the pot's edges on a firm surface or gently squeeze a flexible pot to loosen it.From Seedling Tray: Water the seedlings to ensure the soil is moist. Use a trowel or a dibber to carefully lift the root ball of the shrubby daisybush from the tray, taking care not to harm the delicate roots.
Step-by-Step Guide for Transplanting Shrubby Daisybush
Prep Work
Water the shrubby daisybush in its current spot a few hours before you plan to move it to reduce stress and make the root ball easier to extract.
Plant Removal
Follow the appropriate method based on whether the shrubby daisybush is being removed from the ground, a pot, or a seedling tray. Handle the root ball with extreme care to prevent damage.
Hole Preparation
Dig a hole in the new location that is twice the width of the root ball and the same depth as its original position. Loosen the soil at the bottom of the hole with a fork or shovel.
Setting Plant
Place the shrubby daisybush in the center of the hole, ensuring it stands upright. Partially fill the hole with soil and water it to settle the roots. Continue filling the hole and gently firm the soil around the plant.
Final Positioning
Verify that the shrubby daisybush is at the same soil depth as before and adjust if needed. The point where the stem meets the roots, known as the crown, should be level with the soil surface.
Watering In
Water the shrubby daisybush thoroughly after planting to help the soil settle and eliminate air pockets around the roots.
How Do You Care For Shrubby Daisybush After Transplanting?
Stabilization
Provide support for the shrubby daisybush if it is large or has a heavy top. Stake it carefully, avoiding damage to the roots.
Monitoring
Keep a close watch on the shrubby daisybush, looking for indications of transplant shock, such as wilting, leaf drop, or discoloration.
Watering
Water the shrubby daisybush thoroughly after planting and maintain consistent moisture during the initial weeks as the roots become established.
Pruning
Trim off any damaged or wilted leaves and stems to help the shrubby daisybush direct its energy towards root establishment.
Troubleshooting Common Issues with Shrubby Daisybush Transplantation.
How do I know when it's the best time to transplant shrubby daisybush?
Move shrubby daisybush during the milder conditions of early to late spring, avoiding the intense heat of summer and the cold of winter.
What's the ideal distance apart when transplanting shrubby daisybush?
Allow shrubby daisybush ample space by planting them 12-20 inches (30-50 cm) apart, promoting healthy growth and air circulation.
Why are my transplanted shrubby daisybush wilting after planting?
Wilting can be a sign of transplant shock. Ensure the soil is moist and plants are adequately watered without being waterlogged.
Can I transplant shrubby daisybush on a hot day?
It's best to avoid hot days for transplanting. Choose a cooler, overcast day to minimize stress on the plant.
How deep should I plant shrubby daisybush when transplanting?
Plant shrubby daisybush at the same depth it was growing in its previous container to ensure proper establishment.
What type of soil is best for transplanting shrubby daisybush?
Use well-draining soil rich in organic matter to provide a nourishing environment for transplanted shrubby daisybush.
How often should I water shrubby daisybush after transplanting?
Water shrubby daisybush generously after transplanting and then regularly to maintain consistent soil moisture, without overwatering.
Is it necessary to fertilize shrubby daisybush when transplanting?
Fertilizing is not crucial at transplant time; wait until shrubby daisybush is established before applying a balanced fertilizer.
How should I protect my transplanted shrubby daisybush from direct sun?
Provide temporary shade using a cloth or screen to shield shrubby daisybush from intense sunlight for the first few days.
When can I expect my transplanted shrubby daisybush to start growing?
Once acclimatized, which typically takes a few weeks, you'll observe shrubby daisybush beginning to grow and thrive in their new location.



