How to Transplant Argentine cress?
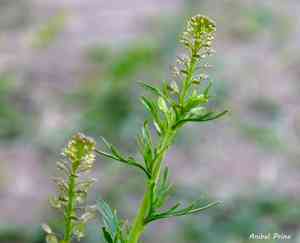
The most favorable period for relocating argentine cress is from late spring to mid-summer, when temperatures are warm, which guarantees vigorous development. Select a location that receives ample sunlight and has soil that drains effectively. It is crucial to handle the plant with care to protect its fragile root system.
Essential Preparations Before Relocating Argentine Cress?
When is the Best Time to Move Argentine Cress?
The perfect window for transplanting argentine cress spans from the gentle warmth of late spring through the heart of midsummer. This period offers mild conditions crucial for argentine cress's root development and overall growth. By selecting this timeframe, you leverage longer daylight hours and increased sun exposure, both vital for argentine cress's progress. This timing aligns with argentine cress's natural growth cycle, leading to a more robust and vibrant display of its distinct foliage and form. A friendly reminder: your argentine cress will thrive with such thoughtful timing!
What is the Recommended Spacing Between Argentine Cress Plants?
Greetings, fellow gardener! When preparing to rehome your argentine cress, aim for a spacing of approximately 12-18 inches (30-46 cm) between each plant. This provides ample room for individual plants to flourish without competing for essential resources.
What is the Optimal Soil Blend for Transplanting Argentine Cress?
For your argentine cress, well-draining soil is paramount. Enhance your garden bed by incorporating compost to enrich the soil's quality. A balanced, slow-release fertilizer will give your plants an excellent start. Remember, healthy soil fosters thriving plants!
Where is the Ideal Spot to Replant Your Argentine Cress?
Your argentine cress will thrive in a sunny garden location that receives abundant light. Select a site that gets at least 6 hours of direct sunlight daily. This will help your argentine cress grow vigorously and yield a plentiful harvest!
What Tools Are Needed Before Transplanting Argentine Cress?
Gardening Gloves
To safeguard your hands while handling soil and plants.
Shovel or Spade
For excavating the plant and preparing a new planting hole.
Hand Trowel
For more precise digging and manipulating smaller soil areas.
Watering Can or Hose
To hydrate the plant before and after moving to minimize transplant shock.
Pruning Shears
To trim any damaged roots or leaves prior to relocation.
Wheelbarrow or Plant Tray
For transporting argentine cress if it's large or if multiple plants are being moved.
Measuring Tape
To ensure proper plant spacing during transplantation.
How to Extract Argentine Cress from its Current Location?
How to Extract Argentine Cress from its Current Location?
From Ground: First, moisten the argentine cress's soil to make it easier to work with. Carefully dig a wide circle around the plant using a shovel or spade, ensuring you're generous to avoid root damage. Gradually deepen the circle, then angle the spade beneath to gently lift the root ball.From Pot: Water the argentine cress to ensure the soil is damp, which helps the roots and soil stay together. Tilt the pot sideways and gently tap its base to loosen the plant. Support the plant at its base with your hand and carefully slide it out of the pot, making sure the soil around the roots remains intact.From Seedling Tray: Water the soil to keep the root ball cohesive upon removal. Use a hand trowel or your fingers to carefully separate the argentine cress from the tray. Be careful not to pull on the plant's stems or leaves; instead, focus on lifting from beneath the root area.
Step-by-Step Guide for Relocating Argentine Cress
Dig New Hole
At the chosen site, excavate a hole twice the width and equal to the depth of the argentine cress's root ball. This provides ample space for roots to expand and access nutrients.
Prepare Plant
Before placing the argentine cress in its new spot, ensure any dead or excess foliage is removed, and any broken roots are cleanly trimmed to encourage fresh growth.
Place argentine cress
Gently position the argentine cress into the new hole, ensuring it is upright and centered. The plant should be situated so the top of its root ball is level with the surrounding ground.
Refill Hole
Carefully backfill the hole with soil, gently compacting it around the root ball to eliminate air pockets. Water the area to help the soil settle.
Support Plant
If the argentine cress is large or in a windy area, gently insert a stake into the soil near the plant. Secure the argentine cress to the stake with plant ties for stability.
Post-Transplant Care for Argentine Cress
Watering
Water the argentine cress gently and deeply at its base, avoiding excessive wetting of the foliage. Keep the soil consistently moist but not waterlogged to aid new root establishment.
Mulching
Apply a layer of organic mulch around the base of the argentine cress to conserve soil moisture and regulate temperature. Leave some space around the stem to prevent rot.
Monitoring
Observe the argentine cress daily for signs of stress, such as wilting or discolored leaves, and adjust care as needed.
Protection
If frost or strong winds are anticipated, provide temporary coverings like cloches or windbreaks for protection.
Addressing Common Issues with Argentine Cress Transplantation.
Why is my argentine cress drooping after being moved?
Post-transplant wilting can be due to shock. Ensure careful handling and sufficient water to help argentine cress recover.
What's the best season to transplant argentine cress?
Transplant argentine cress from late spring's warmth through mid-summer's peak for optimal outcomes.
How can I tell if my argentine cress is root-bound?
Check if roots are tightly circling the soil. If so, gently untangle them to encourage outward growth when planting.
Can I fix leggy argentine cress seedlings before transplanting?
Yes, plant leggy stems deeper into the soil, up to the first set of leaves, to promote stability.
How much should I water argentine cress after transplanting?
Water thoroughly immediately after transplanting and regularly thereafter, keeping the soil consistently moist but not saturated.
What is the ideal spacing for planting argentine cress?
Space argentine cress optimally at intervals of 12-18 inches (30-45 cm) to ensure adequate room for growth and air circulation.
Will adding fertilizer help my argentine cress after transplanting?
A light application of balanced fertilizer can assist in establishing argentine cress, but avoid overfeeding, which can harm delicate roots.
How do I protect my transplanted argentine cress from pests?
Maintain vigilance for pests, and if necessary, use appropriate, gentle pest control methods, avoiding chemicals when possible.
Why are the leaves of my argentine cress turning yellow?
Yellow leaves might indicate overwatering or a nutrient deficiency. Adjust your watering routine and consider a soil test.
Should I trim argentine cress when transplanting?
Trimming is generally not required unless you're shaping the plant or removing damaged foliage to direct growth to healthy parts.



