How to Transplant Oval-leaf clustervine?
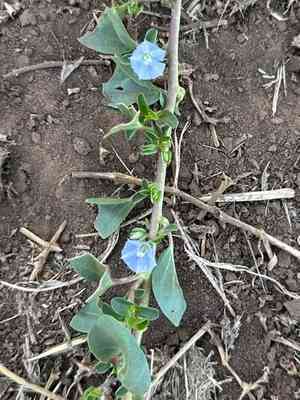
Oval-leaf clustervine flourishes most effectively when relocated between early and late spring or from mid to late autumn, facilitating superior root development. Select a bright spot featuring soil that drains efficiently. Guarantee minimal disruption to the root system during the relocation process to encourage robust growth.
Essential Preparations Before Relocating Oval-leaf Clustervine
Optimal Timing for Oval-leaf Clustervine Relocation
Oval-leaf clustervine, a perennial species, thrives when moved during early to late spring or mid to late autumn. These periods offer ideal soil moisture and moderate temperatures, minimizing transplant stress. Relocating oval-leaf clustervine during these seasons promotes robust root development and healthier growth, maximizing its resilience and blooming potential.
Recommended Spacing Between Oval-leaf Clustervine Plants
For oval-leaf clustervine, aim for a spacing of approximately 24-36 inches (60-90 cm) between each plant. This provides ample room for growth without competition for resources. Pre-measuring and marking your planting spots can streamline the transplanting process.
Ideal Soil Blend for Oval-leaf Clustervine Transplanting
Prepare well-draining soil enriched with compost or organic matter to supply nutrients. Incorporating a balanced base fertilizer, such as a 10-10-10, can be advantageous. Ensure the soil pH is slightly acidic to neutral, around 6.0-7.0.
Selecting a New Location for Your Oval-leaf Clustervine
Choose a site that receives full sun or partial shade. Oval-leaf clustervine flourishes best in areas where it can get at least 6 hours of daily sunlight. Observing your garden at various times can help you pinpoint the perfect spot.
Tools Required Before Transplanting Oval-leaf Clustervine
Gardening Gloves
To safeguard your hands while handling soil and plants.
Shovel or Spade
For excavating a hole and extracting the plant from its original position.
Watering Can or Hose
Used for hydrating the plant before and after its relocation.
Trowel
To assist with more precise digging and planting tasks.
Pruning Shears
For trimming any damaged or excess roots or stems.
Method for Extracting Oval-leaf Clustervine from the Soil
Method for Extracting Oval-leaf Clustervine from the Soil
From Pot: First, hydrate the oval-leaf clustervine plant to moisten the soil. Gently tap the pot's sides to loosen the root ball. Grasp the plant's base and carefully pull it out, ensuring the root ball remains intact.From Seedling Tray: Water the oval-leaf clustervine plant to make the soil more pliable. Gently press the bottom of the seedling cell to release the plant. Handle the plant by its leaves or root ball to prevent stem damage.From Ground: Water the oval-leaf clustervine plant to dampen the soil. Dig a wide trench around the plant using a shovel or spade, ensuring the plant's root ball stays intact. Carefully work the spade beneath the root ball to lift the plant from its initial location.
Detailed Steps for Transplanting Oval-leaf Clustervine
Location Selection
Pick a spot with adequate sunlight and room for your oval-leaf clustervine plant to reach its mature size.
Hole Preparation
Dig a hole in the ground slightly larger than the root ball of your oval-leaf clustervine plant. Ensure the hole is deep enough to comfortably accommodate the root system.
Plant Positioning
Place the oval-leaf clustervine plant into the hole. Make sure the top of the root ball is level with the surrounding soil. Adjust the hole's depth if needed.
Backfilling
Fill the hole around the root ball with soil. Gently press the soil down to eliminate air pockets. Avoid over-compacting the soil.
Watering
Thoroughly water the plant after transplanting to help the soil settle around the roots. Ensure the soil is moist, but not waterlogged.
Post-Transplant Care for Oval-leaf Clustervine
Watering
Maintain consistent moisture in the soil around the oval-leaf clustervine, avoiding sogginess, for the initial weeks after transplanting to aid in strong root establishment.
Mulching
Apply a layer of mulch around the base of the oval-leaf clustervine plant to help retain moisture and deter weeds. Avoid piling mulch directly against the stem.
Monitoring
Regularly inspect the plant for signs of distress, such as wilting or yellowing leaves, and promptly address any issues.
Pruning
Trim any damaged leaves or stems to encourage healthy new growth and prevent disease.
Resolving Common Issues with Oval-leaf Clustervine Transplantation
When is the best time to transplant oval-leaf clustervine?
The optimal period to transplant oval-leaf clustervine is from early to late spring or mid to late fall.
What spacing does oval-leaf clustervine require during transplanting?
Oval-leaf clustervine should be spaced 24-36 inches (60-90 cm) apart for ideal growth.
How should I prepare the soil for oval-leaf clustervine?
Ensure the soil is well-drained, rich in organic matter, and loosened to a depth of 10 inches (25 cm).
What depth should I plant oval-leaf clustervine?
Plant oval-leaf clustervine at the same depth it was growing in its original container.
How often should I water oval-leaf clustervine after transplanting?
Water oval-leaf clustervine thoroughly after transplanting and keep the soil consistently moist, but not waterlogged.
Should I fertilize oval-leaf clustervine immediately after transplanting?
Wait a few weeks after transplanting before fertilizing oval-leaf clustervine, allowing roots to establish first.
What if oval-leaf clustervine shows signs of transplant shock?
Provide ample water, mulching, and protection from intense sunlight while oval-leaf clustervine recovers from transplant shock.
How do I ensure oval-leaf clustervine roots properly?
Plant oval-leaf clustervine in a hole twice the width of the root ball, and water deeply.
What temperature range is ideal for transplanting oval-leaf clustervine?
Transplant oval-leaf clustervine in temperatures ranging from 50-75°F (10-24°C) for optimal results.
How can I protect oval-leaf clustervine from pests after transplanting?
Monitor oval-leaf clustervine regularly, use natural insect repellents, and ensure proper spacing to minimize pest issues.



