How to Transplant Feverpod?
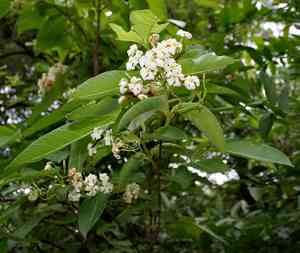
The ideal period for relocating feverpod is from mid-spring to late spring, when it benefits from extended daylight and moderate warmth, which are conducive to root development. Select a brightly illuminated location that offers sufficient room for its expansion. Should it be required, amend the soil with organic material to enhance feverpod's vitality post-transplant.
What Preparations are Needed Before Transplanting Feverpod?
What is the Ideal Time for Transplanting Feverpod?
The best period for relocating feverpod spans from the middle of spring to the start of summer. During this timeframe, moderate temperatures and increased daylight promote strong root development without the strain of intense summer heat. Moving feverpod within this window provides the benefit of a full growing season ahead, allowing the plant to adapt and flourish in its new spot.
How Much Space Should You Leave Between Feverpod Plants?
Hello! Before moving your feverpod, let's make sure they have ample room to flourish. An optimal spacing of 2-3 feet (60-90 cm) between each plant is recommended. This provides them sufficient area for root growth without crowding their neighbors!
What is the Best Soil Mix for Feverpod Transplanting?
For your lovely feverpod, the soil should be well-draining and nutrient-rich. Incorporate a balanced fertilizer, such as a 10-10-10 blend, to enrich the soil. Mixing in some compost or aged manure will give your feverpod an excellent start!
Where Should You Relocate Your Feverpod?
Your feverpod enjoys sunlight but appreciates a break from the intense midday sun. Select a location that offers full to partial sunlight. Morning sun with afternoon shade, or a spot with filtered sunlight throughout the day, would be absolutely perfect for them!
What Equipments Should You Prepare Before Transplantation Feverpod?
Gardening Gloves
To safeguard your hands while handling soil and plants.
Shovel or Spade
For digging and lifting the plant during its relocation.
Watering Can or Hose
To hydrate the soil when extracting the plant and after replanting it.
Pruning Shears
To trim any damaged roots or foliage prior to transplanting.
Wheelbarrow or Garden Cart
To move the plant and soil without causing harm.
Mulch
To help retain moisture and suppress weeds around the newly transplanted feverpod.
Trowel
For more precise movements and adjustments during transplanting.
How Do You Remove Feverpod from the Soil?
How Do You Remove Feverpod from the Soil?
From Ground: First, water the feverpod to moisten the soil, making it easier to manage. Dig a wide circle around the plant, well beyond the root ball to avoid cutting into the roots. Carefully pry the plant from the ground with a spade, preserving as much of the root ball as possible.From Pot: Gently tap the sides of the pot to loosen the soil. Invert the pot and carefully guide the feverpod out while supporting the base of the plant stem with your other hand. Be gentle to minimize stress and damage to the plant.From Seedling Tray: Water the seedling tray to make the soil pliable. Use a trowel or your fingers to gently lift the feverpod from its cell, ensuring to bring along the soil clinging to the roots to prevent undue shock.
Step-by-Step Guide for Transplanting Feverpod
Digging the New Hole
Excavate a hole in the ground where feverpod will be replanted. The hole should be twice the width of the root ball and of the same depth to ensure that the roots have ample room to comfortably spread out.
Preparing feverpod
Before placing feverpod into the ground, use pruning shears to remove any dead or damaged roots or foliage. This will help the plant to direct its energy towards establishing new roots in its new location.
Placing the Plant
Carefully position feverpod in the center of the new hole. The top of the root ball should be level with the surrounding ground. Gently backfill around the roots with soil to eliminate air pockets without compacting the soil too tightly.
Watering after Transplant
After feverpod is in place, water the plant thoroughly. This will settle the soil around the roots and help remove any remaining air pockets. Water slowly and deeply to encourage the roots to grow downward.
Applying Mulch
Apply a layer of mulch around the base of feverpod to conserve moisture and suppress weed growth. Ensure the mulch is not in direct contact with the plantâs stem to prevent rot.
How Do You Care For Feverpod After Transplanting?
Monitoring for Pests and Diseases
Keep a close watch for any indications of pests or diseases. Early detection allows you to address any issues before they become serious problems for feverpod.
Staking (If Necessary)
If feverpod is tall or prone to bending, you might need to provide support by staking the plant. Install stakes carefully to avoid damaging the roots and tie the plant loosely for support.
Gradual Sunlight Exposure
If feverpod was previously grown in a more shaded environment, gradually expose it to its new sunlight conditions over several days to prevent shock.
Continued Watering
For the initial few weeks after transplanting, ensure the soil around feverpod remains consistently moist to support root growth. Adjust the frequency of watering based on rainfall and soil conditions.
Troubleshooting Common Issues with Feverpod Transplantation.
What's the best time to transplant feverpod?
The optimal transplanting season for feverpod is from mid to late spring, ensuring mild weather and favorable growth conditions.
How far apart should I plant feverpod seedlings?
Allow a generous spacing of 2-3 feet (60-90 cm) between feverpod plants to ensure adequate growth room.
Why are my feverpod seedlings wilting after transplant?
Wilting may occur due to transplant shock. Ensure gentle handling, sufficient watering, and provide some initial shade.
Should I amend the soil when transplanting feverpod?
Yes, incorporating organic compost with the native soil can enhance drainage and supply nutrients for feverpod.
How do I water feverpod after transplanting?
Water feverpod generously immediately after transplanting and maintain consistent moisture without overwatering for the first few weeks.
Can feverpod be transplanted on cloudy days?
Cloudy, cooler days are ideal for transplanting feverpod as they minimize evaporation and reduce stress on the plant.
How deep should the hole be for transplanting feverpod?
Dig a hole twice the width and the same depth as the root ball of feverpod to accommodate its growth.
What should I do if feverpod leaves turn yellow post-transplant?
Yellowing may indicate overwatering or poor drainage. Check moisture levels and ensure the soil drains well.
How to protect feverpod against pests after transplanting?
Keep an eye out for pests and treat with appropriate organic pesticides or encourage beneficial insects.
Is it necessary to prune feverpod during transplanting?
Light pruning can help feverpod to focus energy on root establishment, but heavy pruning right after transplanting is not suggested.



