How to Transplant Pacific oakfern?
Pacific oakfern flourishes when relocated from the beginning of spring to its end, or from the middle to the conclusion of autumn. Choose a spot that receives full or partial shade and has damp, adequately draining earth. Guarantee negligible disruption to the roots to encourage robust settling.
What Preparations are Needed Before Transplanting Pacific Oakfern?
What is the Ideal Time for Transplanting Pacific Oakfern?
The optimal period for relocating pacific oakfern spans from early to late spring and mid to late autumn. These seasons provide mild temperatures and sufficient rainfall, fostering strong root development. Transplanting during these times ensures peak growth and minimizes plant stress, enhancing its health and longevity.
How Much Space Should You Leave Between Pacific Oakfern Plants?
When moving pacific oakfern, ensure each plant is positioned 12-18 inches (30-45 cm) apart. This spacing provides ample room for individual growth without overcrowding, promoting healthy development.
What is the Best Soil Mix for Pacific Oakfern Transplanting?
Prepare the soil for pacific oakfern using a well-draining mixture, ideally with a pH between 5.0 and 7.0. Incorporating organic compost or a balanced, all-purpose base fertilizer can support vigorous growth.
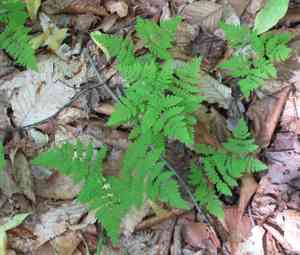
Where Should You Relocate Your Pacific Oakfern?
Select a shaded to partially shaded spot for pacific oakfern. While they can endure some morning sun, avoid locations with intense afternoon sunlight to maintain optimal growth.
What Equipments Should You Prepare Before Transplantation Pacific Oakfern?
Gardening Gloves
To safeguard your hands while handling soil and the plant.
Shovel or Spade
Used for digging around the plant and lifting it from its current spot.
Garden Fork
Helps to loosen the soil surrounding the plant's root system.
Watering Can or Hose
For hydrating the plant before and after its relocation.
Tarp or Wheelbarrow
To move the pacific oakfern plant to its new site.
Pruning Shears
To trim any damaged roots or foliage during the process.
Mulch
For retaining moisture and regulating temperature around the transplanted pacific oakfern.
How Do You Remove Pacific Oakfern from the Soil?
How Do You Remove Pacific Oakfern from the Soil?
From Ground: First, moisten the soil around the pacific oakfern plant. Then, dig a wide trench around the plant with a shovel or spade, ensuring the root ball remains intact. Carefully work the spade beneath the root ball to lift the plant from its original position.From Pot: Water the pacific oakfern plant thoroughly, then gently squeeze the pot's sides to loosen the soil. Carefully tilt the pot sideways and slide the plant out, supporting the root ball with your hand.From Seedling Tray: Water the seedling tray to make the soil pliable. Use a small garden trowel or your fingers to gently lift each pacific oakfern seedling from the tray, keeping the root ball intact.
Step-by-Step Guide for Transplanting Pacific Oakfern
Prepare the New Site
Dig a hole in the new location that is twice as wide and as deep as the plantâs root ball. Ensure the site conditions are suitable for pacific oakfern to thrive.
Position the Plant
Place the pacific oakfern plant into the hole. Make sure the top of the root ball is level with or slightly above the surrounding ground.
Backfill the Hole
Gently fill the hole around the root ball with the excavated soil, pressing lightly to remove air pockets.
Water the Plant
Thoroughly water the pacific oakfern plant immediately after transplanting to help settle the soil around its roots.
Add Mulch
Apply a layer of mulch around the base of the pacific oakfern plant to retain moisture and regulate soil temperature.
How Do You Care For Pacific Oakfern After Transplanting?
Watering
Keep the soil around the pacific oakfern consistently moist, but not waterlogged, for the initial weeks post-transplant to aid in strong root establishment.
Monitoring
Regularly inspect the pacific oakfern plant for indications of stress or disease. Watch for wilting leaves or discoloration and address these issues promptly.
Pruning
Remove any damaged or dead foliage to encourage new growth and reduce stress on the pacific oakfern plant.
Fertilizing
After a few weeks, you can provide the pacific oakfern plant with a balanced, slow-release fertilizer to support its growth.
Troubleshooting Common Issues with Pacific Oakfern Transplantation.
When is the best time to transplant pacific oakfern?
The optimal periods for relocating pacific oakfern are early to late spring and mid to late fall.
What spacing should I use when transplanting pacific oakfern?
Space each pacific oakfern 12-18 inches (30-45 cm) apart to allow ample room for growth.
How should I prepare the soil for pacific oakfern?
Ensure well-drained, loamy soil rich in organic matter for optimal growth of pacific oakfern.
How deep should I plant pacific oakfern?
Plant pacific oakfern at the same depth it was growing previously to avoid stress.
Should I water pacific oakfern immediately after transplanting?
Yes, water pacific oakfern thoroughly right after transplanting to help it settle in the new soil.
What if pacific oakfern starts wilting after transplanting?
Wilting might indicate transplant shock. Ensure proper watering and keep pacific oakfern in a shaded area temporarily.
How can I prevent transplant shock in pacific oakfern?
Water adequately before and after transplanting, and avoid disturbing the roots too much.
Can I transplant pacific oakfern if it has new growth?
Pacific oakfern is best transplanted before it has significant new growth to reduce stress.
What type of mulch is best for pacific oakfern after transplanting?
Use organic mulch like leaf litter or straw around pacific oakfern to conserve moisture and protect roots.
Do I need to fertilize pacific oakfern after transplanting?
Wait a few weeks before fertilizing pacific oakfern to allow it to recover from transplant shock.


